Rules to Better CRM for Developers - 42 Rules
If you still need help, visit Microsoft Customer Relationship Management CRM | SSW Consulting Sydney, Brisbane & Melbourne and book in a consultant.
When demoing Dynamics to a client we will typically use a dedicated demo environment for a few reasons:
- Demoing company Dynamics not a good idea due to sensitive data leakage
- Can preinstall any first-party or third-party solutions ahead of time
- Potentially hand demo environment over to the client for further evaluation
What are the demo options?
Microsoft Partners
Microsoft Partners have access to the Customer Digital Experience site. This site allows each eligible user to create up to 2 demo environments. Environments are provisioned within minutes and contain the entire Microsoft 365 suite with Dynamics 365 pre-installed. There usually sample users and enough licenses to add custom users to the demo.
Adding a Dynamics Environment is as easy as navigating to:My Environments | Create Tennant | Dynamics 365 Customer Engagement

Once the environment is created it's good for 90 days.
Office 365
The second option is to provide a trial via Office 365. If using this method, it is preferable to provision via the client's Office 365 instance, as you don't want to provision users for the client in your Office 365 tenant. To provision a Dynamics trial in Office 365 use the following:
- Browse to Microsoft Admin Portal
- Billing | Purchases Services (it's ok we're not buying anything yet)
- Search for "Trial" and scroll down to Dynamics 365 Customer Engagement Plan Trial
- Details | Get free trial
The Office 365 based Dynamics trial is good for 1 month and includes 25 users.
The advantage of using an Office 365 based Dynamics trial (in the customers' Office Instance), is that is can be converted to a paid product very easily and with all data kept intact.
You should be able to show:
- Accounts
- Contacts
- Sales (Leads, Opportunities, Quotes, and Invoices)
- Marketing (built-in Campaigns and Quick Campaigns, also talk about Marketing for Dynamics solution)
- Service (Cases, Field Service)
- Mail Merge
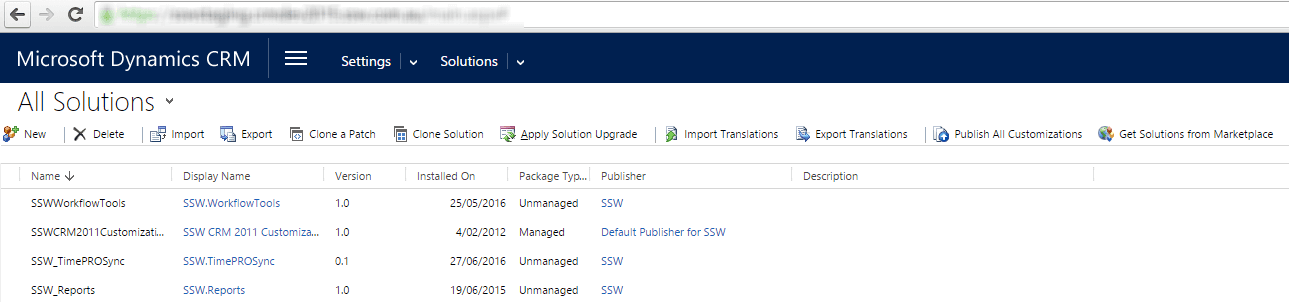
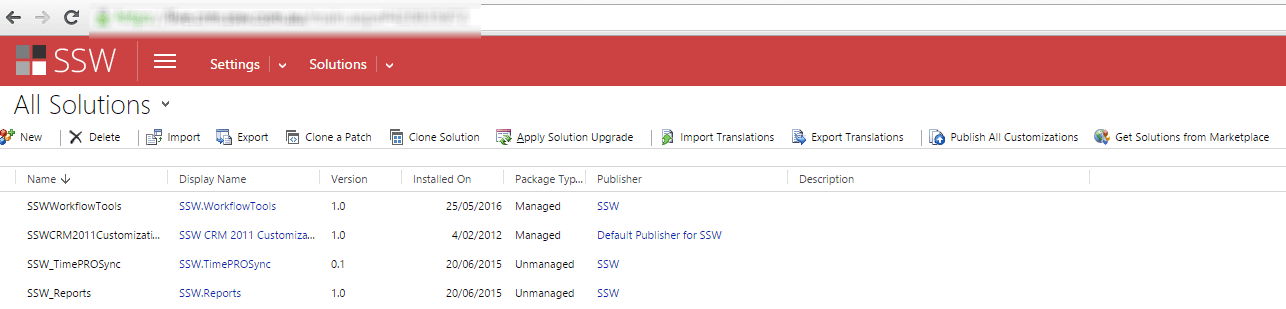
As per rule "Do you have separate development, testing, and production environment?", it's better to use different background colors to identify Development, Test and Production servers.
CRM
Figure: Staging uses blue background 
Figure: Production uses red background The way to change the default background color is to edit the CRM CSS files. These changes aren't supported and may be overwritten when CRM Rollups are applied.
CRM 2015 and CRM 2016
Using theme feature to change the environment color.

Figure: Changing CRM 2016 UI by using theme feature CRM 2013
Edit
{{ CRM WEBSITE ROOT }}\_controls\navbar\navbar.css:.navigationControl { background-color: #006600; margin: 0; z-index: 999; float: left; width: 100%; position: relative; }Figure: Edit the background color to reflect the environment
Figure: CRM 2013 with a green navigation bar CRM 2011
Edit
{{ CRM WEBSITE ROOT }}\_static\css\1033\cui.css, locate and modify the section ms-cui-tabBody so that it reads:background-color: #ffffff;Change color to a suitable color for the environment:
background-color: #bbffaa;
Figure: CRM Ribbon color green to signify production environment CRM 4
Edit,
{{ CRM WEBSITE ROOT }}\_common\styles\global.css.aspxbody.stage { <% if (CrmStyles.IsRightToLeft) { %> dir:rtl; <%} %> border-top:1px solid #6893cf; /* background-color: #d6e8ff; */ background-color: #ffff00; padding: 4px; /* background-repeat: repeat-x; background-image: url(/_imgs/app_back.gif); */ }Figure: In
C:\Inetpub\wwwroot\\_common\styles\global.css.aspxcomment out and change the reference in yellow so the users know what server they are on
Figure: Color of CRM Development Server - Red 
Figure: Color of CRM Test Server - Yellow 
Figure: Color of CRM Production Server - Default SharePoint Online
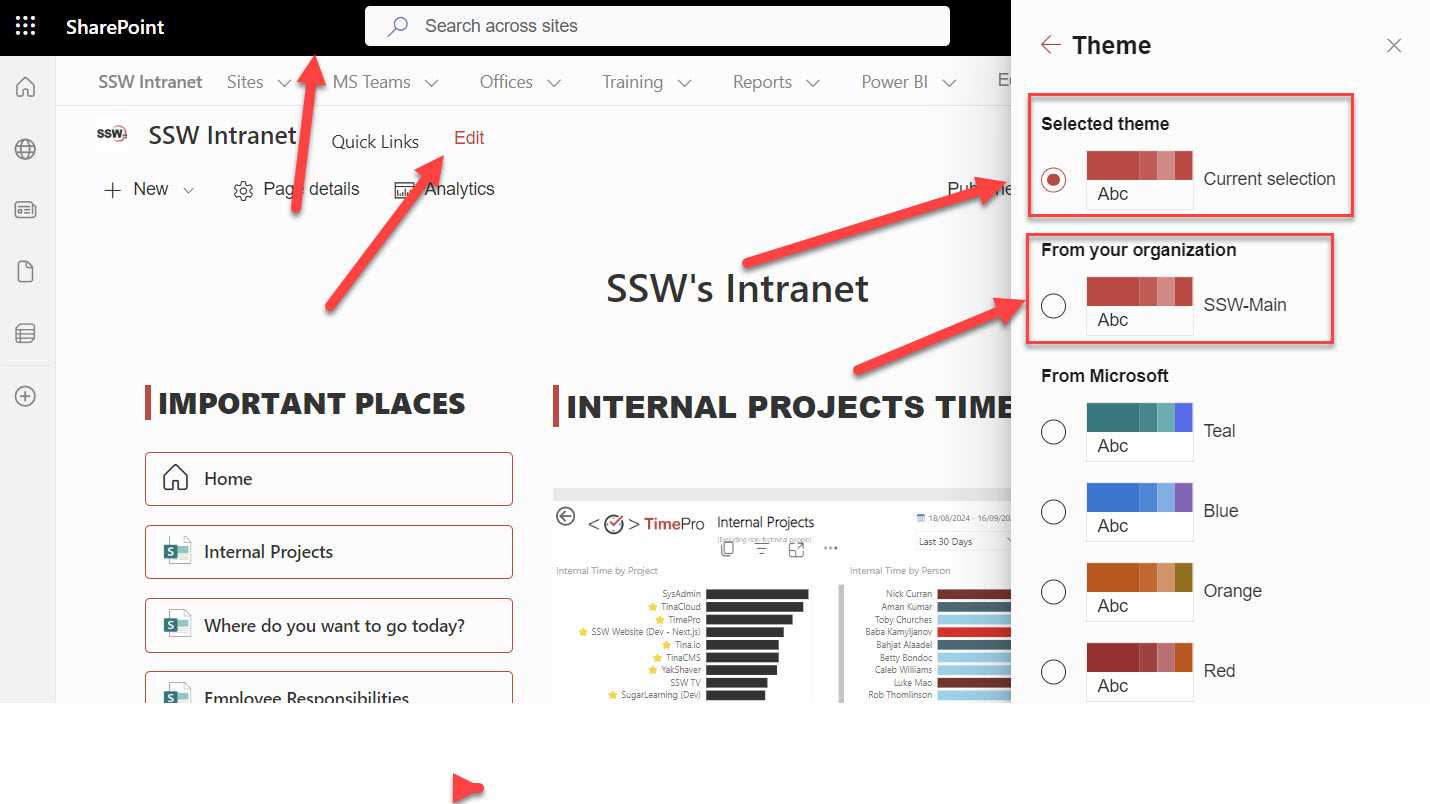
In SharePoint Online, we use Theme colours to differentiate between Production and Development environments.
To change the Theme, simply navigate to Site Settings | Change The Look | Theme

Development - Default Microsoft Blue Theme

Production - SSW Custom Theme
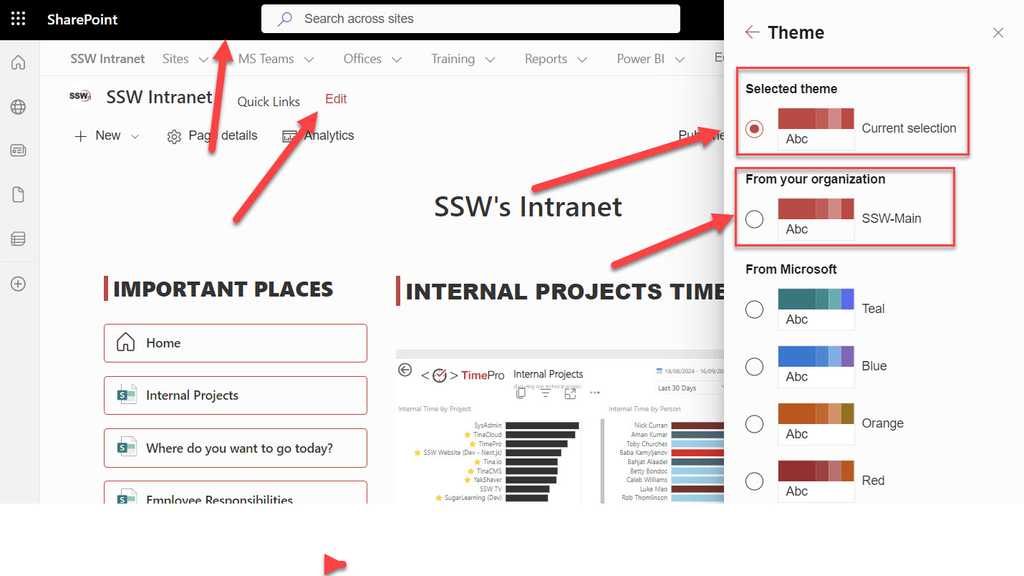
Figure: Selecting Red SSW Custom theme for Production More about SharePoint Online custom themes: https://learn.microsoft.com/en-us/sharepoint/dev/general-development/how-to-deploy-a-custom-theme-in-sharepoint
It is important to use consistent language when talking about changes made to a CRM environment. The terms configuration and customization are sometimes used interchangeably. It is clearer to use the following to differentiate them: Configuration, Customization and Extending.
Configuration applies to any changes made to existing options available within the default installation of CRM, examples might include changing the default currency from USD to AUD or the way emails are sent; using the Email Router instead of Outlook etc. Configuration applies to objects like: Business Units, Security Roles, Users, Teams, Field Security, Auditing, and Solutions
Customization is anything that can be done within CRM without resorting to the SDK or external code. Adding new fields to an existing entity, creating new entities, option sets, reports etc. Customization would apply to: Fields, Entities, Relationships, Forms, Views, and Charts, Workflows, Imports etc.
Extending is anything that involves writing custom code. This could be a plug-in (SDK) or JavaScript code (external code).
See the TFS rule for correct definitions.
When exceptions occur in CRM they are trapped by the platform layer and a standard error message is displayed to the user.
By turning DevErrors on (mainly applicable to CRM 3 and 4) you will obtain the actual error. This is what that will be posted onto newsgroups. Microsoft Support should also ask you for this information, so you probably cannot do any meaningful troubleshooting until this has been activated. To switch DevErrors on, open the web.config and change DevErrors value ="On".

Figure: Turn on DevErrors within Web.Config file to get details of error In CRM2011 we accomplish the same thing by turning on tracing. For more information on tracing refer to MS KB907490.
Now if all that info on the MS KS was too much, use the Diagnostics Tool for Microsoft Dynamics CRM 2011. It makes collecting trace information a snap.
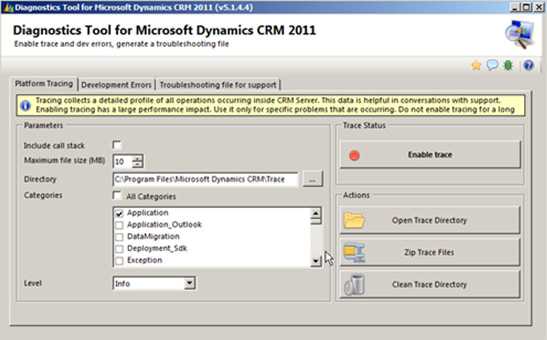
Figure: Diagnostics for CRM2011 Prior to CRM 2013 if a CRM user wanted to:
- Show an error message
- Set a field value
- Set business required
- Set field visibility (show/hide fields)
- Lock or unlock a field
They would normally need to get a CRM developer involved to write JavaScript code to automate these actions.
Starting with CRM 2013 (and much improved in CRM 2015), users can now use Business Rules to automate these actions without getting a CRM developer involved.
Take the following Example:
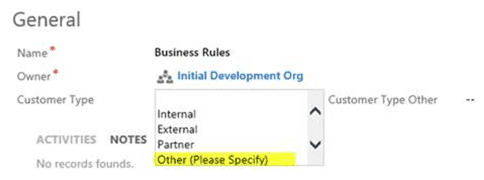
Figure: ‘Customer Type Other’ should be hidden and only displayed when Other is selected To make this work use the following Business Rules:
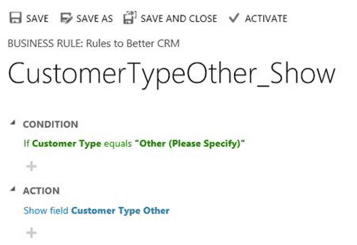
Figure: Show the ‘Customer Type Other’ field when Customer Type equals Other The flip side of the expression also needs to be set where Customer Type doesn’t equal Other to hide the ‘Customer Type Other’ field (you could also optionally clear this field too)
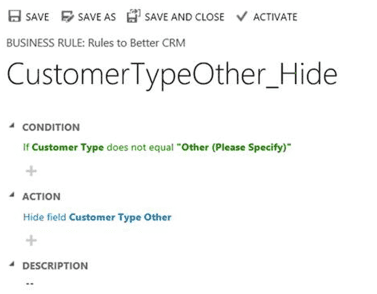
Figure: Hide the ‘Customer Type Other�’ field when Customer Type doesn’t equal Other Finally the last step is to Activate the Business Rules. To activate click the activate button on the top right of the tool bar.
Now the form will look like this:
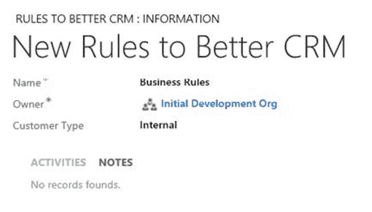
Figure: Great. Now ‘Customer Type Other’ is hidden 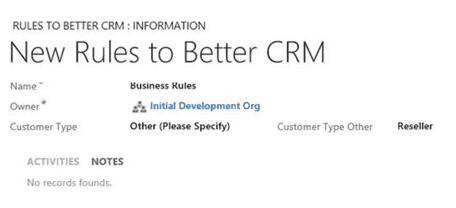
Figure: And on the other side ‘Customer Type Other’ is visible Note: CRM 2015 further improves on this by introducing the if… else… construct, so instead of creating two business rules (one for show and one for hide), this rule can be reduced to just one.
CRM Workflows have always been a great option to create, update and delete data when a certain action has occurred, eg: When a customer is created, create a task for sales to update contact information. This is an example of an asynchronous workflow ie: it occurs after the record is created at some time determined by CRM.
CRM 2013 adds real-time (synchronous) workflows. These workflows run in sync with the record. An example of this might be a setting a Lead’s Estimated Value too high (say greater than $100,000), if a user enters a value greater than $100,000 the value isn’t going to be accepted.
First Create the Workflow (don’t forget to uncheck the Run this workflow in the background):
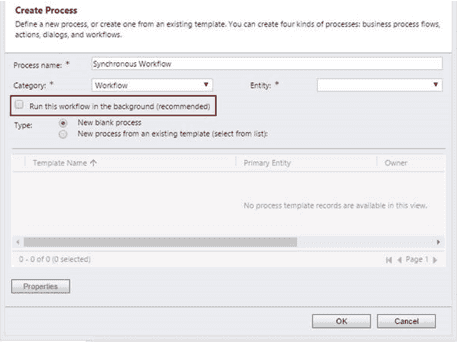
Figure: Create the Workflow Second, set the properties of the workflow:
In this example it’s set to when ‘Est Value’ field changesIf ‘Est Value’ is greater than $100,000 then stop and cancel
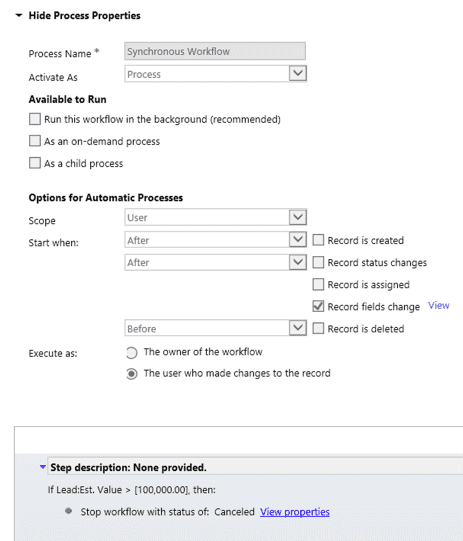
Figure: Stop and cancel if ‘Est Value’ greater than $100,000 Once the Real-Time workflow is Activated the ‘Est Value’ field will no longer accept values above $100,000. This is a simple example but in versions prior to CRM2013 this would have been implemented in Javascript or Plugin Code.
Using the Real-Time Workflow saves a lot of time and effort.
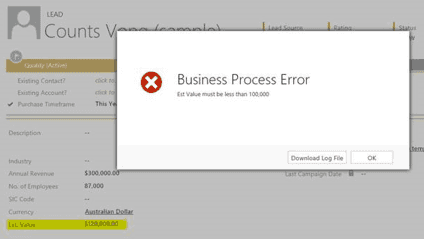
Figure: Lead cannot be saved if Est value is greater than $100,000 The built-in CRM report wizard is great for users to quickly and easily create reports in CRM.
Figure: The starting point But when the user wants to create a report that needs additional totals, different formatting, summaries in the header etc. A custom report is required.
Do you use Filtered Views or Fetch?
Filtered Views allows the report developer to query underlying SQL data directly. Filtered views are fully compliant with the Microsoft Dynamics CRM security model. When you run a report that obtains data from filtered views, the Microsoft Dynamics CRM security role determines what data you can view in the report.
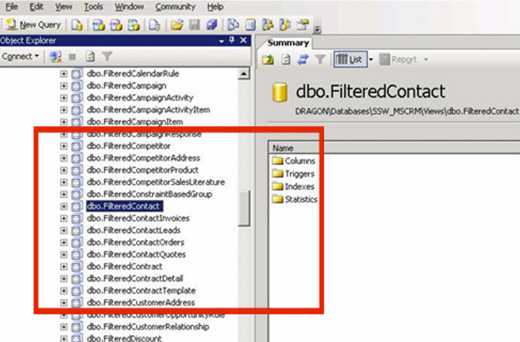
Figure: Filtered Views in the CRM SQL Database Fetch is a proprietary query language that is used in Microsoft Dynamics CRM. It is based on a schema that describes the capabilities of the language. The FetchXML language supports similar query capabilities as query expression. It is used primarily as a serialized form of query expression, used to save a query as a user owned saved view in the userquery entity or as an organization owned view in the savedquery entity.
Now with that out of the way, which one do I use?
- If you’re using CRM Online then you have no choice, you will use Fetch as CRM Online does not allow access to the underlying CRM SQL Database.
- If you're using On-Premise CRM and are unlikely to ever migrate to CRM Online then Filtered Views is the right choice.
- If you're using On-Premise CRM and there is any chance of moving the CRM Online then use Fetch (otherwise your custom reports will need to be re-written to use Fetch).
Fetch Restrictions:
- Fetch does not support RIGHT OUTER JOIN and FULL OUTER JOIN.
- Fetch does not support EXISTS/IN condition with sub-query/expression.
- An amount of 5000 returned records maximum.
- No “UNION” selects.
- You cannot specify group by / sum queries – You can only select the records in detail and then perform the aggregation in your report.
- Number of entity join (link) limitations.
- FetchXML reports cannot use non-CRM online data sources.
- Learning curve – for report writers that are not familiar with FetchXML the syntax is quite different from SQL.
What do you need get started writing Fetch based CRM Custom Reports?
- Visual Studio (or BIDS, SSDT etc)
- Dynamics Report Authoring Extensions
Get up and running quickly with Fetch:
- Create your report using the CRM Reporting Wizard
- Save the RDL file
- Import RDL file into Reporting Services Project
- Update and enhance report
- Upload back into CRM
More advanced users will have a boilerplate(s) for the various CRM report styles they produce and just build on top of the template.
Here's an example of a before (CRM Wizard) and after (Visual Studio) for an Activity Report:
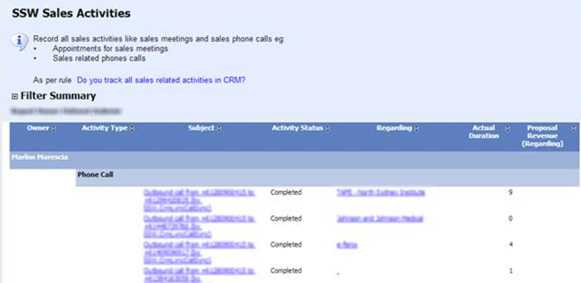
Figure: Report created using CRM Wizard
Figure: Report updated in Visual Studio 5 enhancements that required a custom report:
- Company logo top left
- Total call minutes in header
- Total call count and minutes totals for staff
- Links to regarding account (in a grouping)
- Colour coded series for charts that relate back to the report data headings
More Information:
The Microsoft Dynamics 365 Implementation Guide contains essential information on installation pre-requisites and planning, implementation tools and troubleshooting.
Figure: Searching the PDF version of the implementation guide is much nicer than the Word document Usually there is not much point creating an over-complicated organizational structure in MSCRM, a flatter organizational chart will achieve the same end result. Whilst the security model of Microsoft CRM is highly configurable, most organizations do no need to have excessive differentiation of data ownership and hence could cut down on unnecessary work. It is recommended to use the "out of the box" roles for almost all organizations less than 30 users.
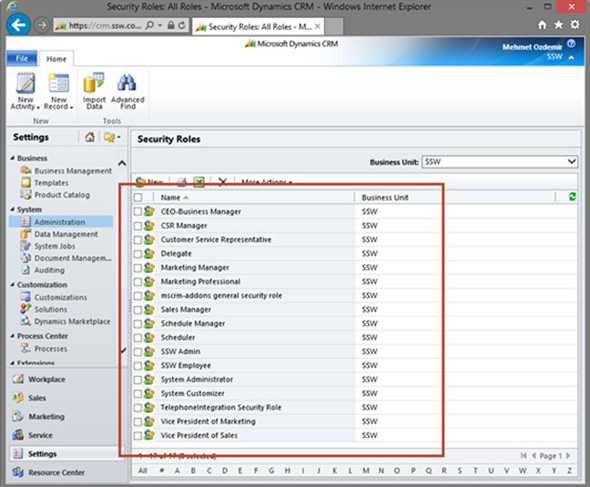
Figure: Microsoft CRM Default Security Roles are good enough to start with - this is not a thing to stuff with early on First thing first... never delete an Out of the Box (OOTB) role. Instead just disable... Period. The reason is it can cause system instability when the only solution can be to start from scratch with a New Organization.
CRM Roles and Business Units (BUs) are related but quite separate in concept. When designing security roles, there are two schools of thought - job function oriented and functional task oriented. Hybrid model is commonly seen as well.
BU's don't normally equate to an Organization Chart in real life, and more often than you might realize.
Considerations when designing BU's:
- Security
- Data ownership
- Operations and collaborations
- Business functions
- Geographical locations
In CRM 2011, two new features help in simplifying security design:
- Multiple forms per entity can be assigned to different security roles
- Field level security to add to the next level of security granularity
As of the December 2012 Service Update (online) and Rollup 12 (on-prem) CRM HTML Components (HTC) are disabled by default. This means any JavaScript that references the V4 API will fail. Using the CRM Custom Code Validation Tool will help you to track down this legacy code and update it. It is not recommend to re-enable the HTC controls as it will just create more problems down the track.
To use the CRM 2011 Custom Code Validation Tool, download the zip file from Microsoft and install the solution into CRM2011. Once installed in CRM you will be able to run the validation tool over the custom JavaScript. Issues in red highlight deprecated functions and should be fixed immediately, issues in blue are uses of undocumented functions, while not as important they should also be checked.
Figure: Using Custom Code Verification Tool Download the CRM 2011 Custom Code Validation Tool.
You have data in CRM 2011, so how do you see it in SharePoint? The data that is stored in CRM entities should be available in SharePoint so users can find and use the data in areas such as:
- SharePoint search
- SharePoint reporting (if you are using SQL Reporting Services in integrated mode)
There are many ways to get to this data, let's go through them:
Option 1: SharePoint BCS Adapter (provided by the CRM Team) RECOMMENDED
This BCS Adapter for CRM 2011 is from the CRM team (It does all of the BCS work for you by interrogating the CRM metadata service).
Summary: SharePoint BCS > Pre-built Adapter (.NET Assembly) > CRM web services > CRM database
Pros Cons Read/Write.
Minimal coding.
Easiest to implement.
The likely way forward (Best Practice as Microsoft)Needs to be deployed and published to the web server.
Less performance than SQL filter views directly.
More information:
- Download from Microsoft
- Find and read "Connecting to CRM Online 2011 with SharePoint 2010 Business Connectivity Services"
- Run tool to generate the XML mapping (.BDCM)
- This solution uses a BCS Connector – a .NET Assembly responsible for mapping external data into a form usable by SharePoint. This component is loaded and hosted within SharePoint 2010 and communicates with CRM via the CRM Proxy Service.
Option 2: SQL Server Filtered Views
CRM recommends that you *don't* read from the Tables, so they provide SQL Views for this purpose.
Summary: SharePoint BCS > CRM database
Pros Cons Best performance.
CodelessRead-only.
Not available for hosted CRM.
Security issues as you are exposing the view.Filtered Views in Microsoft CRM provide access to the data available that supports providing picklist name and id values (lookup tables).
More information:
If you only want read-only for CRM on-premises data for SharePoint users, this solution is fine. You create the External Content Type directly against the Filtered Views in the CRM database as per Use SQL and Filtered Views to Retrieve Data for Reports .
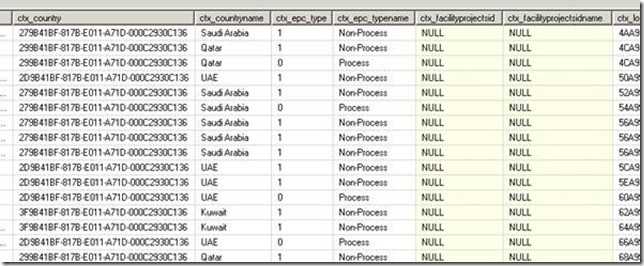
Figure: The result of "SELECT * FROM FilteredCtx_Project". Use Office SharePoint Designer to hook this up Option 3: Web Services
CRM provides web services.
Summary: SharePoint BCS > Code calling CRM web services > CRM database
Pros Cons Read/Write Needs lots of code and test work. Needs to be deployed and published to the web server.
Less performance than SQL filter views directly #1Note: Performance could be improved by making the reads from the views and the writes through the web service
More information:
- Use BCS in VS 2010
- Write code that calls the CRM web services (that access the CRM data)
- Test
- Deploy
Option 4: Expose OData from CRM as RSS
The CRM 2011 OData Query Designer can be used to build queries to expose the data from CRM as RSS
Pros Cons Easy configuration 50 records limit.
Need to page through the results.
Possible issues with firewalls and proxies because it uses Integrated Security for authentication.
Read-Only.
No easy way to consumeNote: You can really only call the OData endpoint from an application that already has an authentication cookie with the CRM server. i.e. you can't impersonate and call it like you can the standard WCF endpoints So it is really only suited to calling from Silverlight and JavaScript web resources that are delivered inside CRM (because they have the cookie)
More information: The first step is to expose the data:
- Install http://crm2011odatatool.codeplex.com
- Make a query
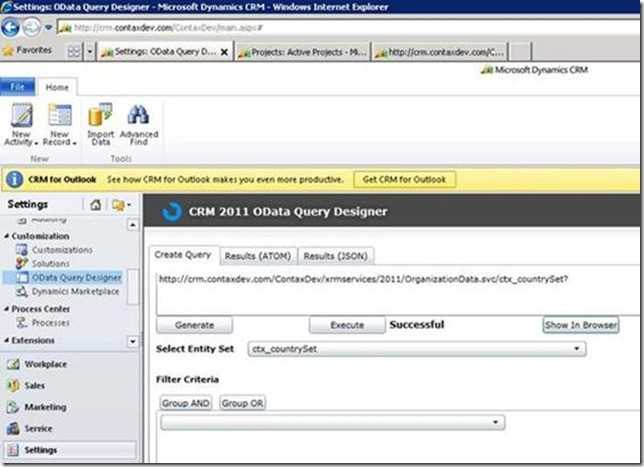
Figure: Designing a query - See the data
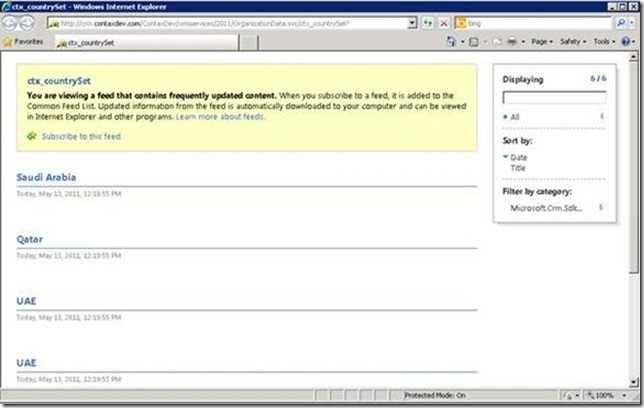
Figure: See the data - RSS source for xtc_countrySet
The second step (and the problem) is consuming the data
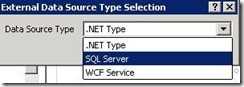
Figure: BCS has no option to consume RSS data. Please Microsoft SharePoint Team, we need a new 'Data Source Type' = OData In summary, CRM 2011 can expose OData, but SharePoint 2010 BCS doesn't consume OData.
The 3 options to consume the OData/RSS data:
- Consume the OData by SQL Server, via TSQL ??? Then use BCS to call SQL Server. Summary: SharePoint BCS > DataSourceType: SQL Server > OData > CRM database
You would need to be crazy to go down this route Calling a Web Service from T-SQL (Stored Procedure) using MSXML RSS
- Consume the OData by a BCS adapter + code calling web services (same story as above). Summary: SharePoint BCS > code calling OData > CRM database
- Consume the RSS by "SharePoint RSS view web part" directly. Summary: SharePoint RSS view web part > OData > CRM database (not recommended as it could not be used in "SharePoint Search")
So OData is all things horrible because it is hard to eat :-(
Option 5: BizTalk
Biztalk is built for mapping systems together, unfortunately, this solution is only considered for large enterprises.
Summary: SharePoint BCS > BizTalk Database > CRM database
Pros Cons Read/Write.
The BizTalk data centre can also provide data for any system.
Requires little code if users already have BizTalkBizTalk :-)
Deployment - Needs external work to deploy BizTalk server.
Licence CostOption 6: OData 3rd Party solutions (doesn't exist)
Today SharePoint 2010 exposes lists and document libraries as OData, but does not natively consume OData.
What does this mean?
- CRM 2011 exposes it data as OData, but cannot consume OData
- SharePoint 2010 exposes it data as OData, but cannot consume OData ...and there are no 3rd party solutions to solve this...
With CRM4, customizations cannot be undone and are cumulative, e.g. if you add an attribute on a form and deploy, there is no easy way to remove the attribute from the entity. We have a suggestion to CRM on this issue.
In order to remove the attribute, what you have to do:
- If attribute is not a required field then go to step 3.
- Set attribute to be not required field
- Save and publish the changes
- Remove attribute from the form
- Save and publish the changes
- Remove attribute from the entity
- Save and publish the changes
Because of this reason, we have to take extra care in tracking and maintaining the CRM customization changes. So the solution:
- Make someone (that person is called CRM Champion) in charge of schema changes
- Define security roles so that only this person can make customization changes
- Everyone else has to send customization changes to the CRM Champion in development team
On larger scale projects, functional design documentation governs the customization and on multiple member project teams, it’s normally the BA(s), who are in charge of designing and configuring CRM. Developers rarely configure the system unless acting in a BA capacity.
CRM 2011 is designed to work with:
- SQL Server 2012 (CRM Update Rollup 6 or greater required), SQL Server 2008 (or 2008 R2)
- SQL Reporting Services 2012, SQL Reporting Services 2008 (or 2008 R2)
- .NET Framework 4.0 for Plugins, .NET Framework 4.0 or 3.5 for Visualizations (Charts)
Make sure you are using the correct version of Visual Studio to edit reports, either Visual Studio 2008 or Visual Studio 2010 or even better use Visual Studio 2012 and SSDT-BI to edit Report files .
The benefit of using SSDT-BI is you will be able to target SQL Reporting Services 2008-2012 without having different versions of Visual Studio installed.
SSDT-BI can be downloaded from: http://www.microsoft.com/en-au/download/details.aspx?id=36843
History
CRM 3.0 is in .NET 1.1 so it was designed to work with:
- SQL Server 2000 (even better to use 2005)
- Reporting Services 2000 (design reports in VS.NET 2003)
- Callouts in VS.NET 2003
Tip #1: Do try to use SQL 2005 if available - it is marginally faster.
Tip #2: Don't try working in VS.NET 2005 - there are workarounds but they become very, very painful.
Tip #3: SQL Reporting Services and the .rdl files are not backward compatible - there is no hope of doing them in 2005 and back porting the RDL.
Note when you do a customization it gives it a prefix with the schema name - in our case SSW. With this prefix you can easily distinguish customized attributes from default attributes.
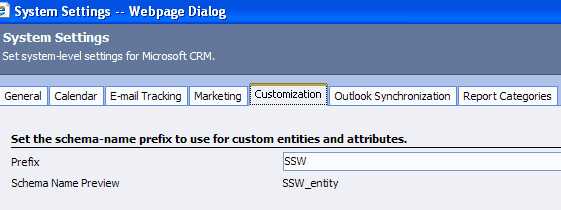
Figure: Set your schema-name prefix to use for custom entities and attributes 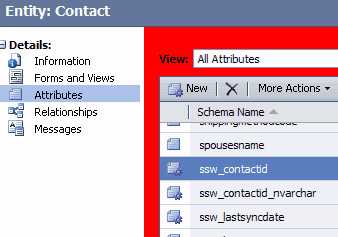
Figure: customized attributes with the prefix You will want to have a list of all customizations - from Custom Entities to Callouts. You can export the customizations to an XML file - but that is not fun to read. There is no tool to document or any visual tool to look at - so the best thing is screen captures with circles highlighting the customized areas.
The following tools can also help you to export this data:
Out of the box CRM4 only enables a contact to have 3 phone numbers (home, business and mobile) + 3 email addresses (but only one visible). A customization that almost everyone needs is to remove this limitation (to allow contacts to have an unlimited amount of phone numbers and email addresses).
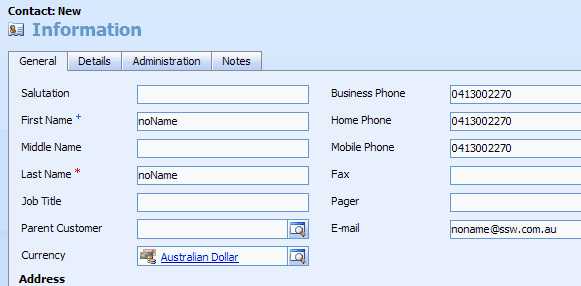
Figure: Bad example - Out of the box a contact can only have 3 phone numbers and 1 email address There are a few customizations needed to get the SSW Contact Makeover:
- Show some hidden fields
- Make some form changes to move to a new tab
- Make a CRM frame (to add in a subform)
- Add some entities
- Add some form java script to hide the core Contact Details? tab when a user is entering a new contact
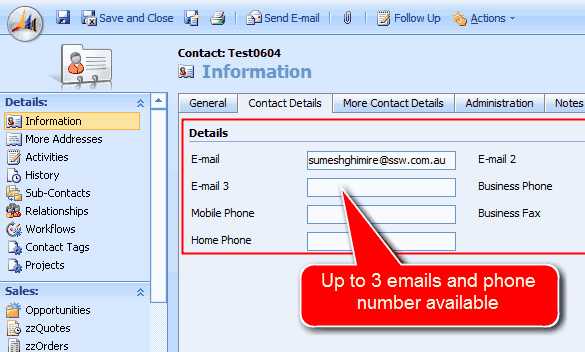
Figure: Good example - Enable the hidden fields and move it to a new tab. And now a Contact has 3 email addresses and phone numbers 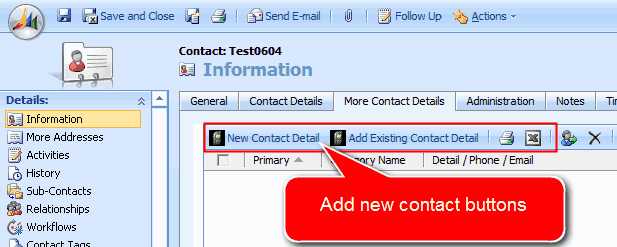
Figure: Good example - After adding an entity, you add a frame show the unlimited contact details (phone, fax, email etc) Q: So what is the end result?A: The end user experience to add a phone number is ..
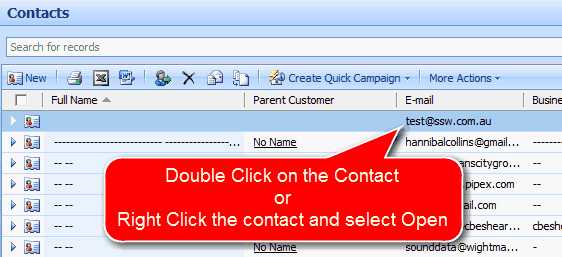
Figure: Step 1: Double-click the contact (or right-click the contact and select Open) Open 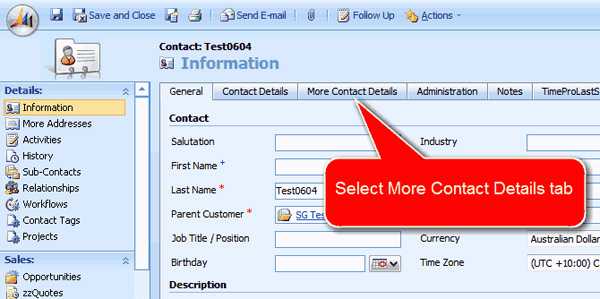
Figure: Step 2: Select the tab 'More Contact Details' 
Figure: Step 3: Click the button 'New Contact Detail' 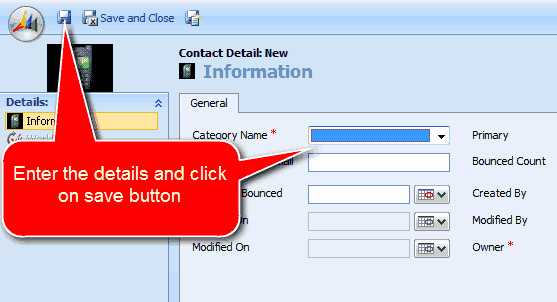
Figure: Step 4: Enter the details and click button 'Save and Close' (top left) As a developer, we don't always think of the importance of the reporting that the business and marketing professionals use years down the track. It is so easy to give a data entry form a combo box, when a multi-checked list would be a better choice...
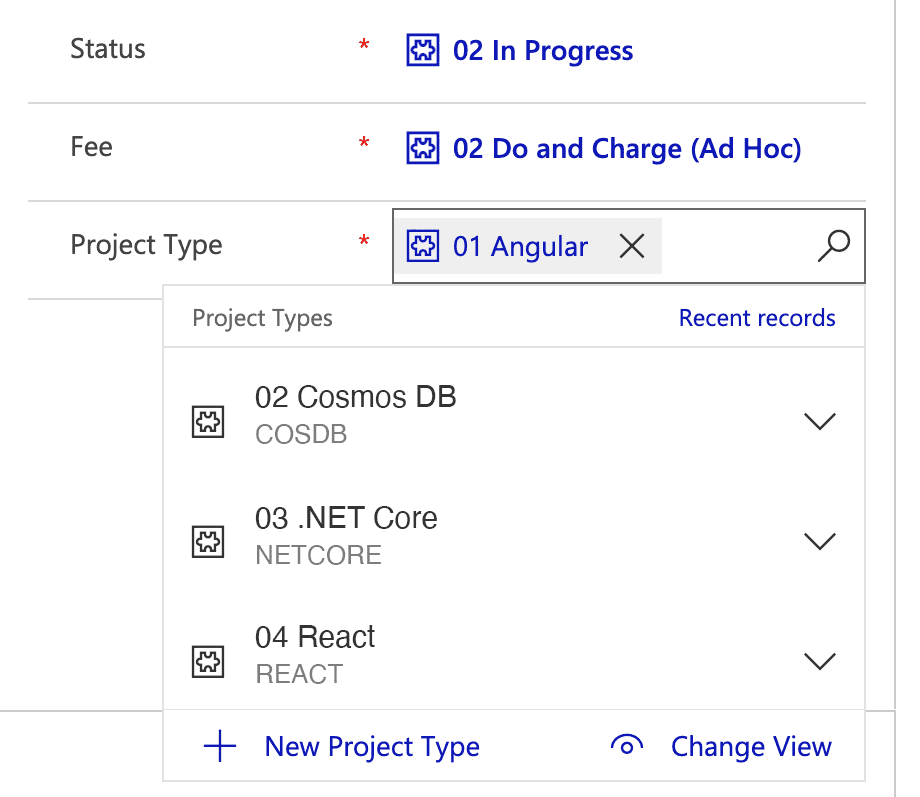
Figure: Bad example - Able to select only one Project Type on Dynamics 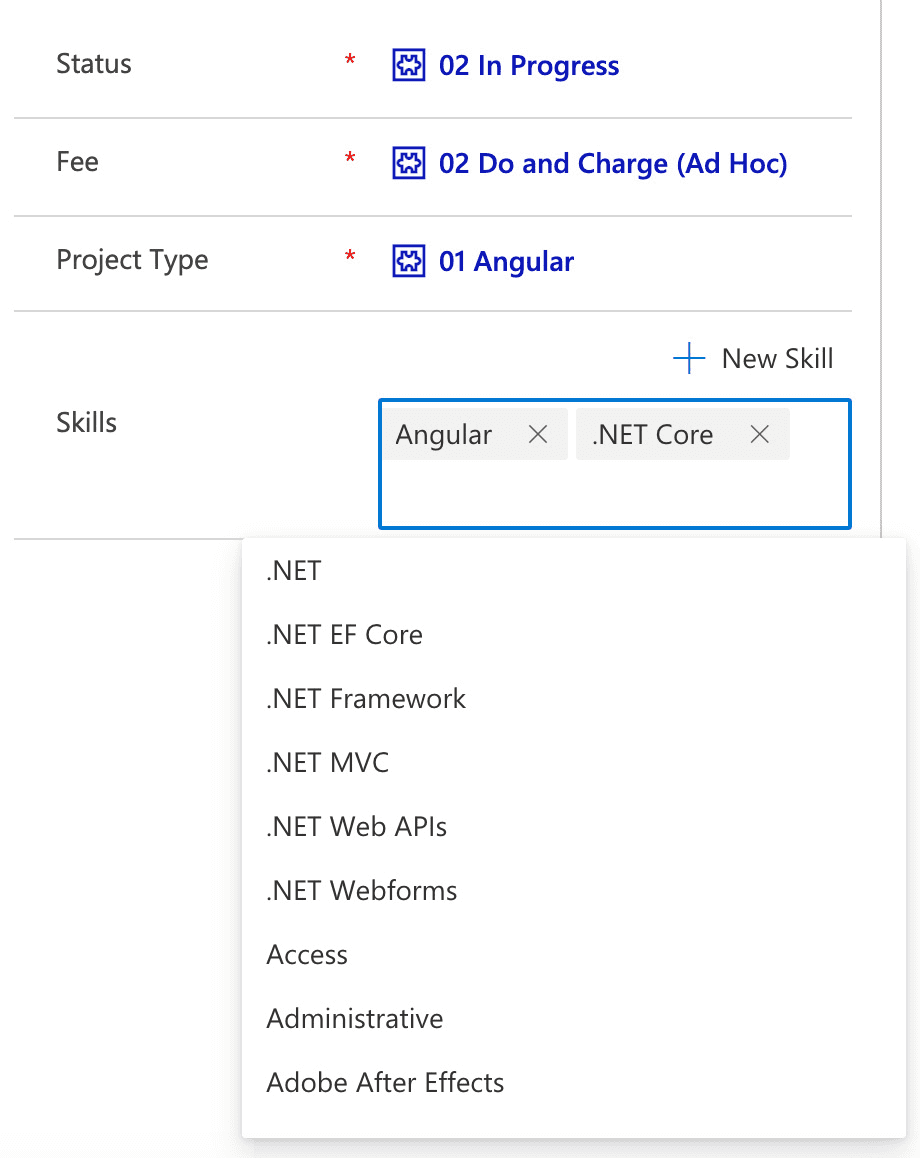
Figure: Good example - Able to select multiple Skills from combo box on Dynamics Case in point, a project form that has a field called "Skill” (that includes technologies). When a user is entering their project the technologies used may include some Angular, heaps of .NET, and a database like Cosmos DB. When you only have one choice, the obvious thing they can do, is pick the technology that they presume will take up the most development time. Maybe they choose .NET and never think of it again.
Then the problem is later down the track... there is no record of the front end (being Angular) nor the database (being Cosmos DB). Then you have the poor marketing people making uninformed decisions, spending their promotional $$$ based on missing data. If they can't tell which front end tech is growing or dying, they are spending money like a crapshoot in the casino!
⚠️ These bad decisions have enormous impacts on the growth of the business!
Dynamics isn't as customisable as your average React or Angular website and there are some prohibitive restrictions. For example, M:M relationship records can only be added, updated and viewed via grids.
Use the power of PCF controls to customize Dynamics 365 and provide more flexible functionality.
PCF controls let you use your favourite web technologies to develop customized components. You can use React, Angular, Bootstrap, web apis and more 😎. You no longer have to worry about learning new and confusing frameworks, you've got the power back in your hands!
Figure: PCF controls helps you easily generate intuitive interfaces, enhancing your Dynamics 365 apps PCF controls in action
PCF Gallery is a fantastic place to find all kinds of PCF controls that fit different use cases.
PCF controls allow multi-select power. Learn more on The Power of Multi-select – Multiple Options on Data Entry Forms - Adam Cogan's blog.
PCF's can be also be used with Microsoft Teams to improve communications with clients.
Don't make any changes to the test server, it can break your deployment process of your plug-in.
Develop only on your development server.
If you export your customizations from your CRM Development server, put them under TFS source-control, so that TFS is your central repository for everything, and you have all the advantages of a source control system.
Instead of configuring your plug-in manually in the registration tool, export all settings and import them on the other server.
Make sure you put your plug-in customization file under source control
The Microsoft CRM customization tools make it no longer necessary for you to hack ie. write triggers, stored procedures and .aspx pages. In fact if you were to do any of these your CRM is unsupported. Changes will not be preserved in any upgrades or fixes and Microsoft will not attend to any of your support calls until you revert your CRM back to a supported state.
The common ways to customize are:
- Use the designer to add Entities and Forms (aka Tables and Forms)
- Write SQL Reporting Services Reports
- Write workflows with the CRM designer
- Write workflows with VS.NET and .NET 3.0 WF (new since CRM 4.0)
- Write callouts with VS.NET (the extension points made available)
The diagram below briefly outlines what are possible supported methods of customization.
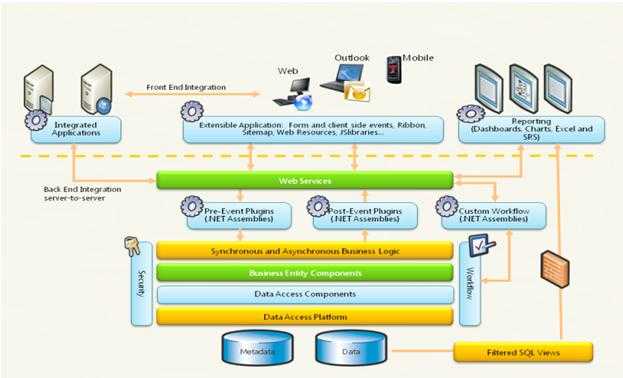
Figure: Microsoft CRM Customization Architecture Refer to P19 of the CRM Customization Manual Course 8525A for a more in depth discussion.
PS: For CRM 3.0 you can't find everything on the web - you will need the CRM Customization Manual Course 8525A - you have to buy it from Microsoft :-(
The name of default CRM logo is 'masthead.jpg' which is located under directory '_imgs' of the CRM web folder. To customize it, rename this file to, say, 'masthead_backup.jpg' and put your company logo named as ''masthead.jpg'. Done!
Figure: Change CRM company logo Export each single entity customization and keep each entity customization in a separate file, like:
- Account_11022009.xml
- Contact_11022009.xml
This way, if an entity is changed or broken on the Live environment, you can re-import the customization for this entity again, without breaking other entities on live environment.
Instead of exporting each single entity, you can also export only your customized entities in 1 step, and afterwards select what entities to import
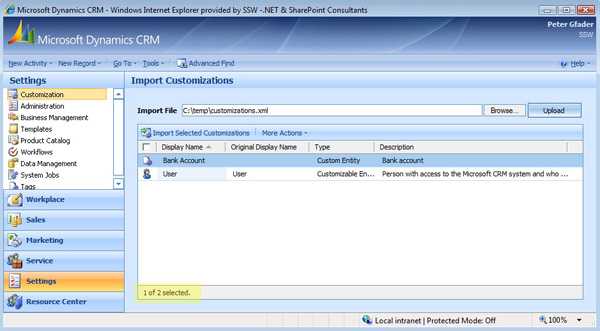
Figure: You can select the single customization to import Keeping track of CRM customization changes is just as difficult as back-end database changes. We have a rule Is a Back-end structural change going to be a hassle? which provide you an example how you should keep track of back-end changes. You can apply this rule to CRM changes and use a naming convention on each customization backup file to identify and keep track of your changes.
Your customization file name should be:
[IncrementalNumber]_[Entity]_[Date].zip, for example: 001account29042009.zip
The file's name can tell you which entity you made changes and which date the changes were made. The incremental number will provides us step by step instruction on how to produce the current CRM system from a vanilla Microsoft Dynamics CRM.
CRM2011 has significant improvements in this area with Solutions. In CRM 2011 we use versioned solutions along with source control.
In default view for Associated Contact you cannot see the email address, it would be better to customize it as an extra column.
Figure: Associated Contact View without the email address 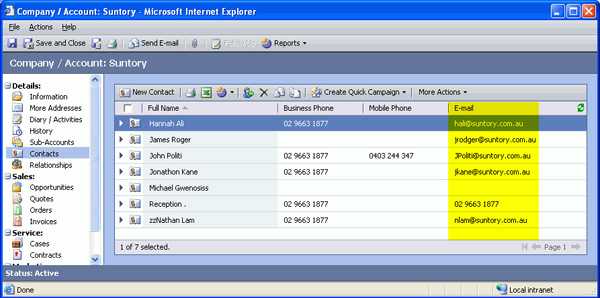
Figure: Associated Contact View with the email address It is easy to do this by import the customisations xml files.
Sometimes less is better, CRM customizations are cumulative, this means that a customization that you import will override your existing schema. So if you're only working on for example Account entity, you should only export the Account entity's customization and any related entities in any new relationship that you have added to the schema. This avoids unexpected overriding existing entity's customization that potentially can break your CRM system.
Account entity has relationships with pretty much every other entity in CRM.
You could also export all the customizations and then just import the customization and the related ones that you have made changes. However, this requires you taking an extra effort to take note of which customizations that you have made changes.
In CRM2011, there is dependencies as solution items. It depends on the circumstances whether to make it a managed or unmanaged solution. E.g. ISV v.s. one man shop.
If you are an ISV and shipping solutions to the marketplace, you have no choice but to use managed solutions. If you are a CRM consultant and building a repeatable industry solution that you want to service many customers with, use managed solutions. If you are an enterprise development shop and building a departmental xRM application that is going to have multiple installations in different orgs, use managed solutions. If you are building integration components for back-office systems, use managed solutions for those.
*In all other cases, use unmanaged solutions*.
Generally you will add Javascript to the form to give client side validation.
Given JavaScript is difficult to debug and doesn't get precompiled this can save a lot of time rather than re-publishing all the form changes and having to reload and refresh the forms manually.These events can be trigged using the Preview menu from the form customization environment.
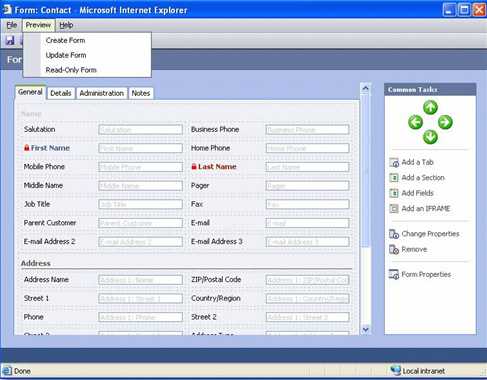
Figure: Test your Javascript via the Preview menu in the Custom Forms Designer When the XML schema is published it re-generates the underlying SQL and .aspx code. If trouble hits, a "refresh" or "rollback" to an uncorrupted schema is always a backup plan. A versioning scheme is also required to keep track of different versions of the XML schema at different points in time. To make a backup of the schema from within Microsoft CRM navigate to Settings -> Customization -> Export Customizations. Browse to the location on your personal hard drive where the .XML file is to be stored.
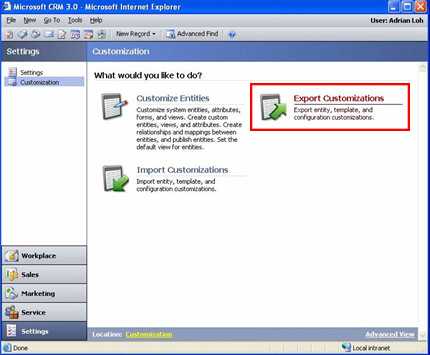
Figure: Export customizations as backup Tip #1: Export only the customizations of entities that you customize and keep each entity customizations in a separate file, see the rule:Customization - Do you export only the customizations of entities that you did customize?
Tip #2: Put the date on the file names and while you are working you will be doing this multiple times a day.
Tip #3: don't save this on the Dev Virtual Machine.
In CRM 2011 we use Solutions and TFS Source Control.
Step 1 - What data?
- Don't take all the data for the first release - Usually there are huge amounts of data in legacy systems - take only the most important firstly.
- Using the planning spreadsheets included with the Microsoft CRM Data Migration Pack - they are excellent for specifying data migration field mappings.
Step 2 - Sync or import?
- Syncing and keeping the old system live is the preferred option
- Consider writing .NET callouts - or consider Scribe Insight
The goal is that CRM developers **to not ** move from Dev to Test and to Production manually. Basically, we don't want a developer to touch Test or Production servers. The testers can run the .bat file. See SSW rules to setup packages.
How should developers work?
- All development done in a Virtual Server
- Use TFS and VS.NET 2003 (since working with VS.NET 2003 you need to TFS adapter for 2003)
- Backup your customizations.xml
- Put into TFS (see rule: Do you put your exported customizations and your plug-in customization under source-control during deployment?) - check it in and replace the file (avoid it customizing workflow in 3.0 because it deploys better in 4.0 - but if you do then you need to backup your workflow changes also)
Create a Deployment.bat like this
REM (deploy the callouts - Part 1)

REM (restart IIS of CRM TEST Server - BASILISK)
iisreset BASILISK

REM (copy callouts dlls onto CRM TEST Server - BASILISK)
copy Microsoft.Crm.Platform.Callout.Base.dll "\\BASILISK\C$\Program Files\Microsoft CRM\Server\bin\assembly"
copy SSW.TimeProIntegrationCallouts.dll "\\BASILISK\C$\Program Files\Microsoft CRM\Server\bin\assembly"
copy callout.config.xml "\\BASILISK\C$\Program Files\Microsoft CRM\Server\bin\assembly"

REM (deploy the callouts - part 2)
REM Stop the WorkFlow Service (as we need to remove the lock on the .dlls)
REM Start it
REM (avoid workflow in v3 - see comment above C but if you do you need to)
REM Manual - use Import wizard
REM (avoid server side validation logic in v3)
REM  Deploy a 1.1 web service
Deploy to Test Server
- Import the customizations.xml
- Run .bat file
Deploy to Production Server
- Import the customizations.xml
- Run .bat file
As per our rule Do you know when to use CheckBox?. Checkboxes should be used instead of the option group since the answer is a boolean type.
Figure: Bad Example - By default CRM uses option group for contact's and account's contact methods. You can change the option group to checkboxes by:
- From CRM, go to Settings | Customizations | Customize Entities
- Double-Click "Contact" entity
- Click "Form and Views"
- Double-Click "Form" to edit contact form
- Click "Administration" tab
- Select a contact method field, i.e. Email
- Click "Change Properties"
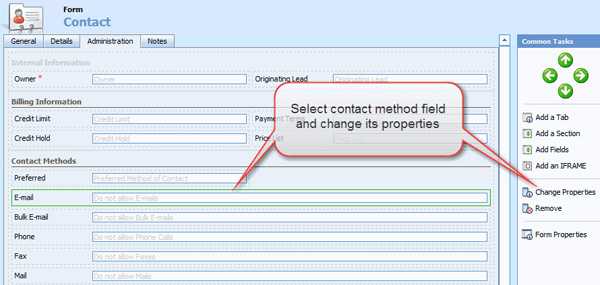
Figure: Select and change the email field's properties. - Click "Formatting" tab
- Change layout from "Two Columns" to "One Column" and select "Check box" as control formatting
Figure: Change layout and control formatting of email field to one column type and check box. - Repeat steps 6-9 for other contact method
- Repeat steps 3-9 for account entity
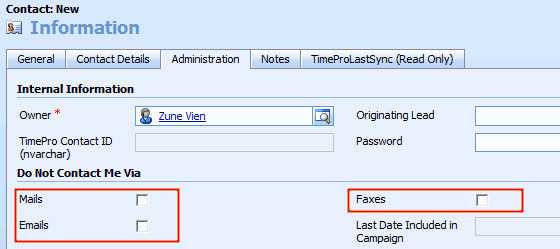
Figure: Good example - Checkboxes are used for contact methods because they're clear and simple. There are a few tools you can use to easy your CRM development:
- XRMToolbox - a free toolbox bundles many tools, such as solution transfer, fetch xml editor etc
- D365 Developer Extensions - a free Visual Studio extensions, making publishing web resource
- XRMToolkit (aka CRM Solution Manager) - a powerful toolkit for VS. Not free
Currently in preview (as at May 2020) Common Data Service supports direct SQL Access to Dynamics entities. This is huge for many Dynamics scenarios, in particular using it for direct query Power BI reports.
As this feature is in preview (as at May 2020) you'll need to enable it, and it's not recommended for production environments. With that out of the way follow the steps at the Microsoft Docs page: Use SQL to query data (Preview)
Supported operations and data types
The list of supported SQL operations includes:
Batch operations
- SELECT
- Aggregation functions (i.e., Count() and Max() functions)
- UNIONs and JOINs
- Filtering
Any operation that attempts to modify data (i.e., INSERT, UPDATE) will not work as this is a read-only SQL data connection. Common Data Service option sets are represented as <OptionSet>Name and <OptionSet>Label in a result set.
The following Common Data Service datatypes are not supported with the SQL connection:
- binary
- image
- ntext
- sql_variant
- varbinary
- virtual
- HierarchyId
- managedproperty
- file
- xml
- partylist
- timestamp
When configuring your email settings for Dynamics CRM, make sure you configure Serverside Sync.
As per CRM Tip of the Day https://crmtipoftheday.com/979/start-planning-farewell-party-for-email-router/, the CRM Email router is to be deprecated. You should use the Serverside Sync now instead.
Figure: Bad Example - Deprecated Mail routed Enabled 
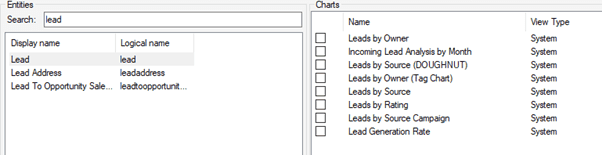
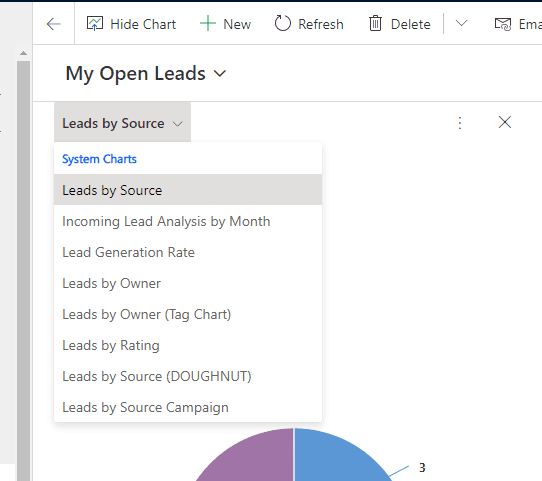
Figure: Good Example - Serverside Sync configured as per https://technet.microsoft.com/en-us/library/mt622063.aspx Model-driven apps allow you to create multiple charts per table, ordinarily, the first chart is the default chart when opening the charts pane. Setting a system-wide default chart takes a bit more work.
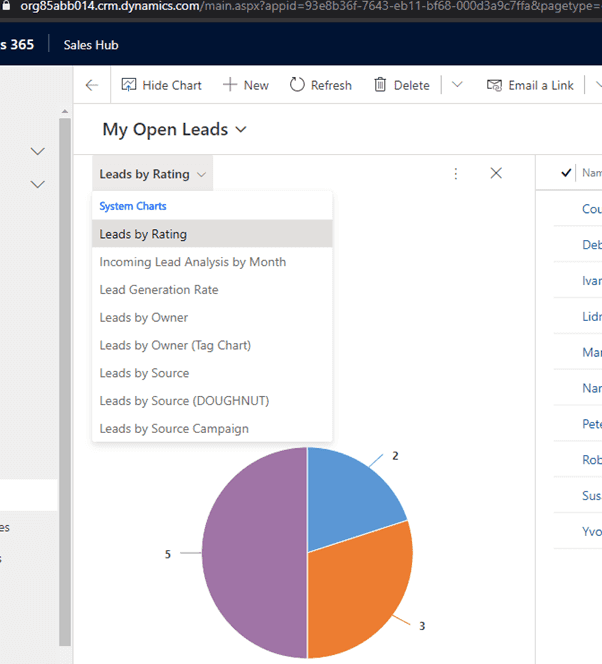
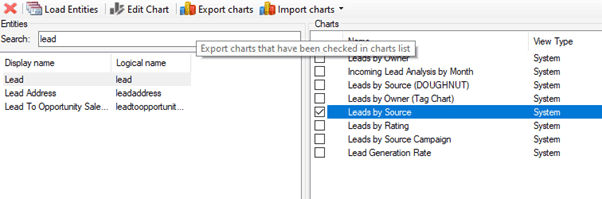
Figure: The first chart in the list is the default In the example above “Leads by Rating" is the be the default system-level chart of the Lead table. Some additional work is required to change the default. The easiest way of doing this is with XRMToolBox and the Advanced Chart Editor plugin.
- Open the Advanced Chart Editor, Load Entities, and Navigate to the table
- If changing the default chart to Leads by Source, select chart and export it
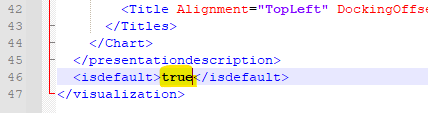
- Open the exported XML file in the text editor of your choice, and change the isdefault element to “true" and save the file
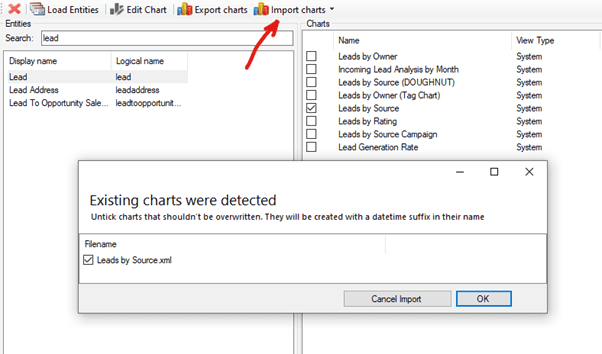
- Import the modified XML back into the Advanced Chart Editor and publish the changes
- Refresh the Table view, the updated chart should be the default chart in the list
Note: If the chart that was modified to be the new default is not at the top of the list, check the first chart in the list by exporting it and confirming the isdefault element is set to false.
Where there are two charts with the isdefault element set to true, these default charts will be at the top of the list and sorted alphabetically.
For example, if “Lead by Rating" and “Lead by Source" are both set as default then they would both be at the top and sorted alphabetically. The remaining charts would then be sorted alphabetically.
This can be desirable in some instances.
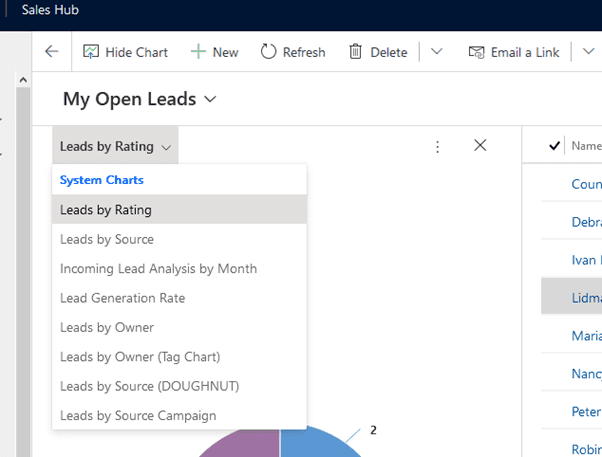
Figure: Two sorts, first alphabetical sort for the defaults, second alphabetical sort for the remaining charts Office 365 products eg. Teams, SharePoint, Exchange use User Profile Service as their source of truth. Therefore, if you use them in your organization, the information needs to be up-to-date.
The User Profile is simply a layer of information on top of Active Directory properties. As long as Azure AD is up to date (i.e. in sync with you On-Premises AD), the information in the User Profile Service will also be. You can then add new custom properties to store information such as extra phone numbers or skills coming from a predefined list. User Profile does not, however, allow complex custom scenarios.
Where should the source of truth be?
A: Simple - If you are happy with just names and address and simple pick lists then User Profiles work great.
Office 365 User Profile Service is a good tool at managing fields related to users, but it does not offer any functionality to maintain related data such as responsibilities and projects. Therefore it cannot be used as a single source of truth if you have complex profile data. Think of all the stuff you see on LinkedIn. Maybe this will change in the future now that Microsoft owns LinkedIn.
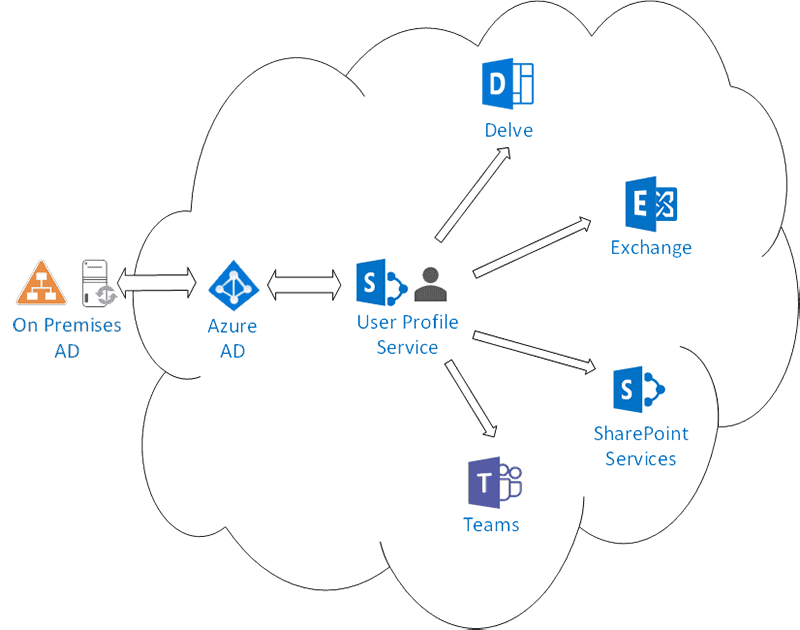
Figure: AD, UserProfile and O365 Services interactions Tip: Keep User Profiles up-to-date with hyperfish.com
B: Rich - If you want richer relationships eg. Many skills, many languages, past projects and roles on them etc. then you want to add an external 'Source of truth' Eg. Dynamics 365, Salesforce etc. that supports that kind of relationships.
Companies want bots to answer more than just simple questions. If you have rich data then your bot can answer questions like "Who worked in Education and knows French". This is unfortunately not possible with AD/UserProfile custom fields and properties. In those instances, the alternative is to use Dynamics 365 (or SalesForce) as a single source of truth; and then sync back the data to simple fields in User Profile.
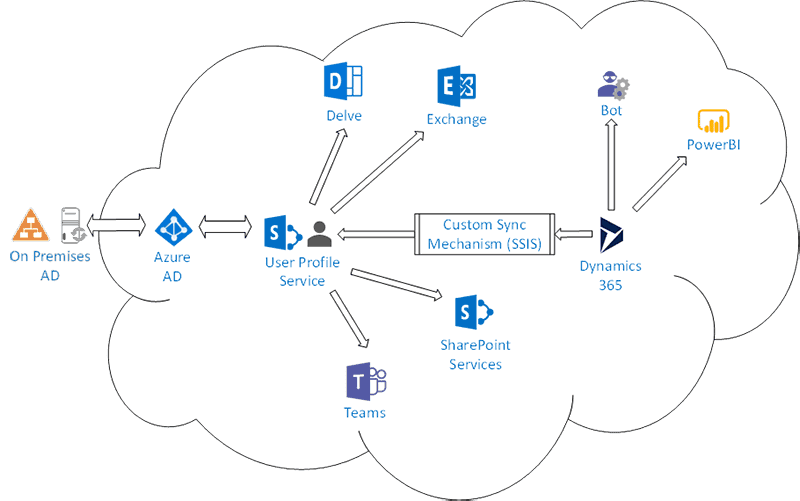
Figure: CRM (Dynamics 365) used a source of truth
In this scenario, a custom sync mechanism (i.e. SSIS pipeline) will have to be implemented. Both Dynamics 365 and User Profile Service exposes APIs that can read and write properties/fields for such a system. Then other external systems such as the public employee pages, Power BI reports and bots can query Dynamics 365 directly.Note: you cannot use https://www.hyperfish.com (as it would be overwritten)
Note: Delve profile pages can only read from user profiles. Delve is a nice UI over User Profiles, but it should not be mandated to use. You will find it will not be heavily used.
Delve is more useful in companies where the “discovery” aspect is needed.
TODO: [screenshot of Dynamics 365 – skills]TODO: [screenshot of Delve – skills]
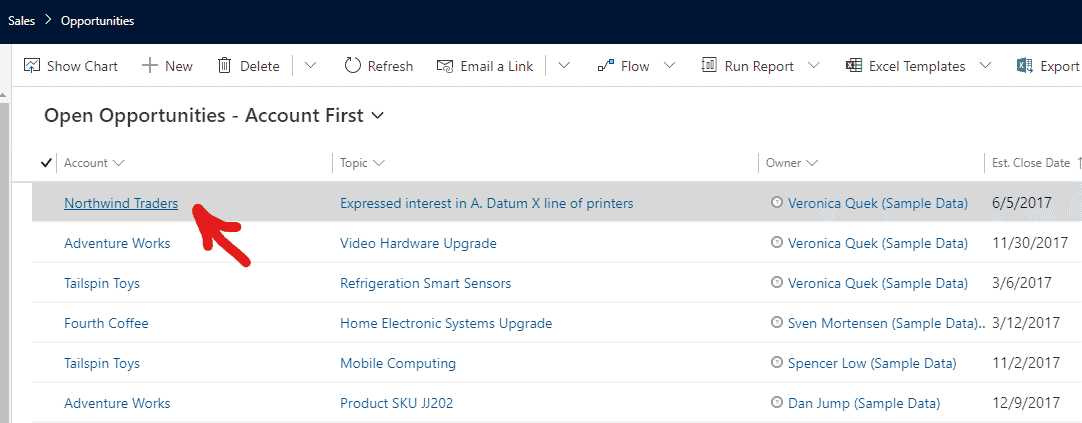
When modifying existing or creating custom views in Dynamics (or Model-driven PowerApps) always pay special attention to the first column. The first column should always contain the Primary Field for the entity that the view is based on. For example, all views for Opportunities should use Topic (name), Contacts should use Full Name (fullname) as the first column.
The reason for this is the Primary Field in a view displays as a hyperlink to the underlying record. It is very convenient and natural to click the first item in the view, as this will then take you to the record. If any other field is used the user will either need to double click the row to navigate to the record (non-lookup) or will be taken to a completely different entities record (lookup field).
Some examples below:

Figure: Bad example - A lookup field is the first column In this example, Account is the first column in the view, the natural tendency is the click the first column, and seeing that it's a hyperlink further confirms to the user that this is something they can click on. Clicking the first column ("Northwind Traders") would navigate to the Northwind Traders Account form and not the Opportunity form for Northwind Traders.
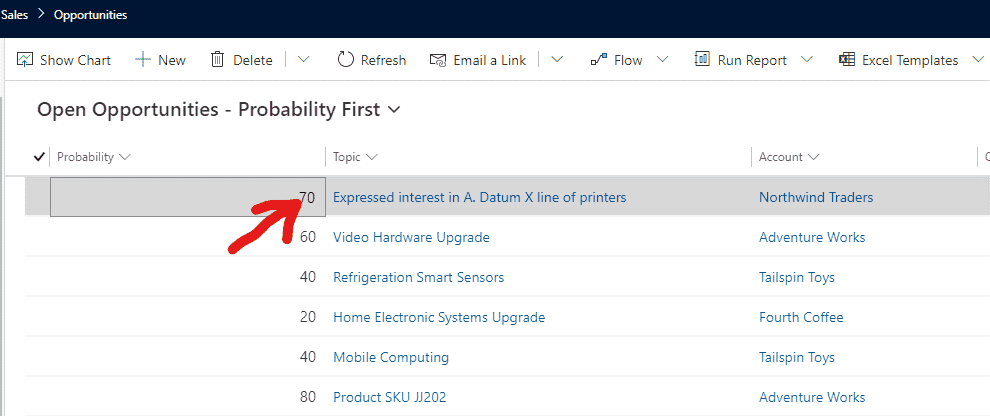
Figure: Bad example - A regular field is the first column In this example Probability is the first column in the view, again users tend to click the first column in the view. In this example, a single click would select the entire row (with tick box selected to the left of the grid), and a double click on the first column would navigate to the Opportunity record.
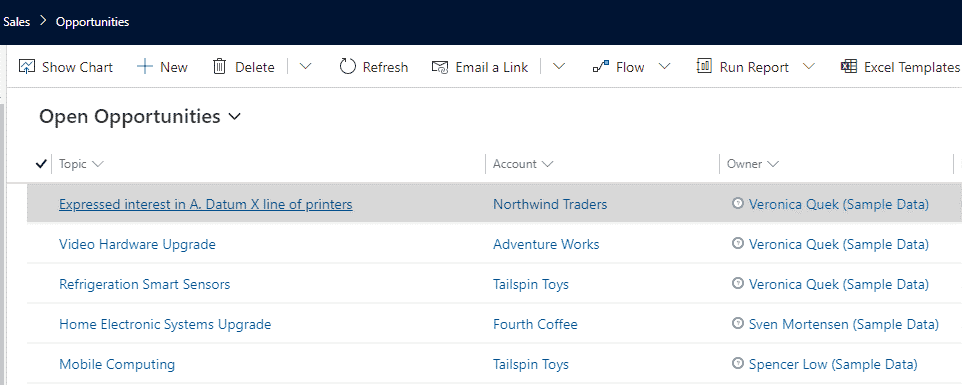
Figure: Good example - Primary Field is the first column In this example, the Primary Field is the first column of the view, and single-clicking the first column view navigates to the opportunity record as expected.
Understanding column ordering in view is important and making sure the first column in a view is always the Primary Field will make it much easier for your users.
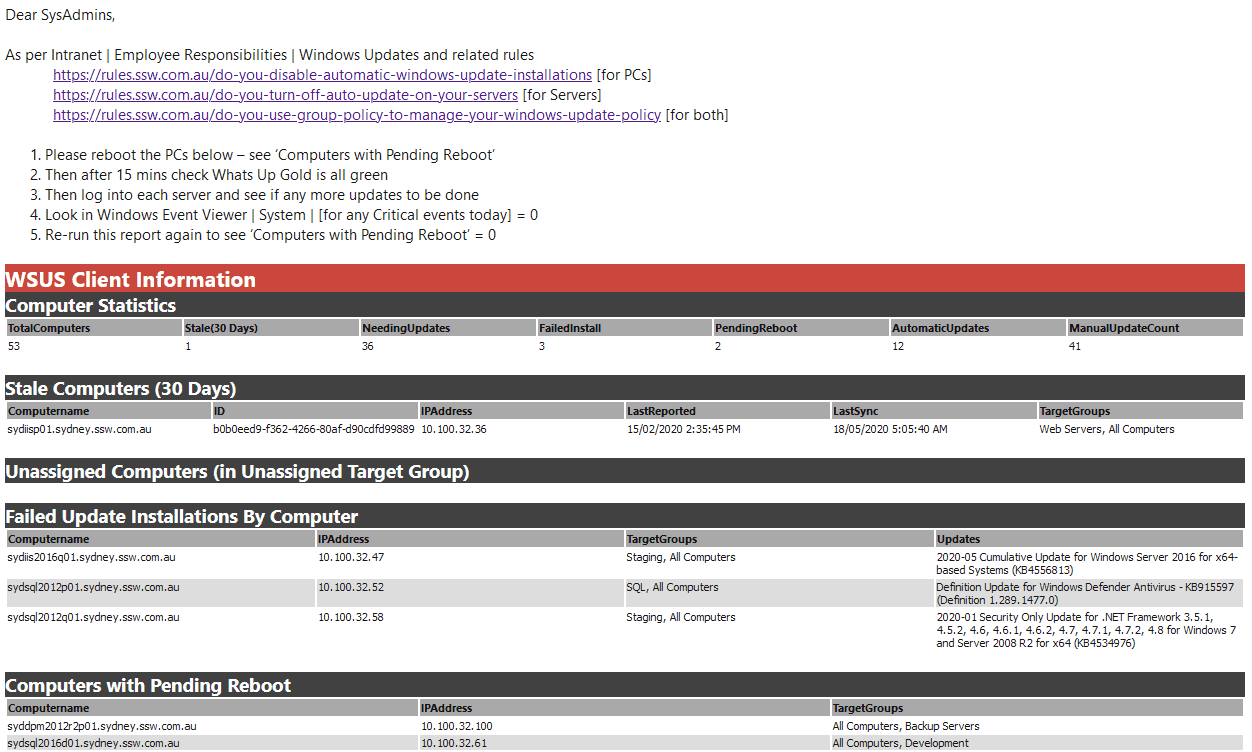
It is not a good idea to have Windows Update automatically updating your servers. There are a few reasons.
- The hotfix could bring down a production environment. (This issue previously happened)
- In fact, even in a development environment, this could be hours of lost work as the development team struggles to understand why only some of the developers' servers magically and mysteriously broke overnight.
- Windows Update could restart your server, or put your server in a state where it requires restarting - preventing any urgent MSI installs without bringing down the server.
Windows Update remains the best thing for end-users to protect their systems. But in a server, especially a production server environment - Windows Update patches are just like any new versions of the software that's built internally. It should be tested and then deployed in a controlled manner.
So recommendations for managing updates are as follows:
- Use WSUS to approve/deny updates for your servers.
- Update Staging/Development servers first to see if any issues arise from the updates.
- Roll these updates out to Production once confident there are no issues.
- Windows Updates may be critical and should be kept relatively up to date.
- Do all of this on a schedule - have an email sent to your SysAdmins to remind them to review and reboot needed machines:
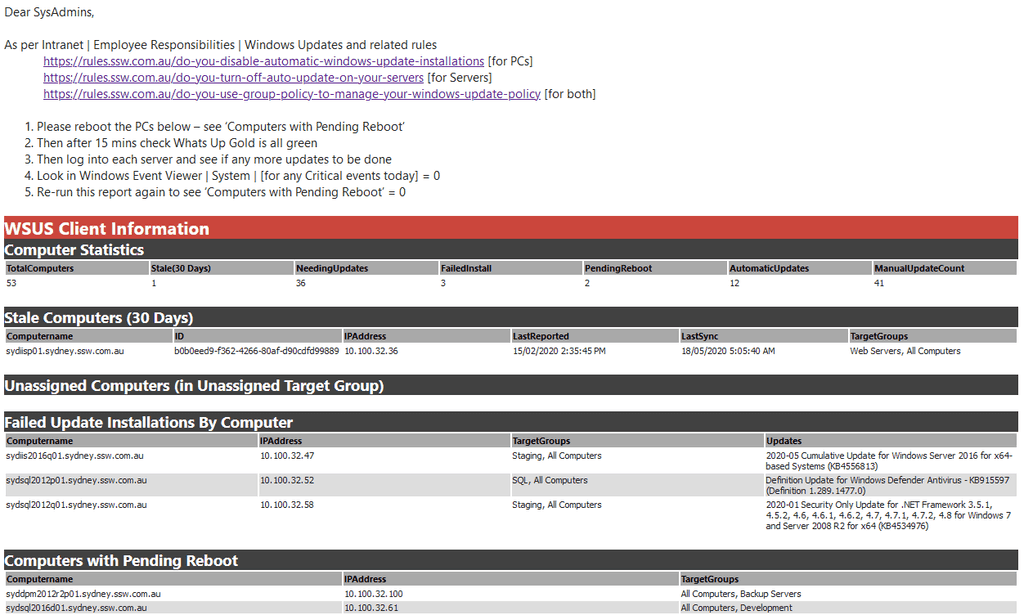
Good Example: Scheduled email showing clear action points and WSUS stats Related Rules
- Do you enable automatic Windows Update Installations? [for PCs]
- Do you use Group Policy to manage your Windows Update Policy? [for both PCs and Servers]
Are you still managing your Dynamics solution changes manually? Manually exporting and importing solutions across environments? Manually exporting unmanaged solutions to commit to source control. If so, read on, because there is a better way!
Dynamics (and model-driven Power Apps) use solution files to store and apply changes across environments. Using the Power Platform Build Tools for Azure DevOps will let automate manual tasks like:
- Exporting unmanaged solutions and committing to source control
- Generating managed solutions for use in downstream environments such as Testing and Production
- Deploying solutions to downstream environments
- Provisioning or de-provisioning environments
Want to learn more?
Check out the guide on GitHub. The guide demonstrates:
- Configuring Azure DevOps
- Build the 'Capture Pipeline' (Export solution)
- Build the 'Build Pipeline' (Generate Build Artifact)
- Build the 'Release Pipeline' (Deploy to Production)

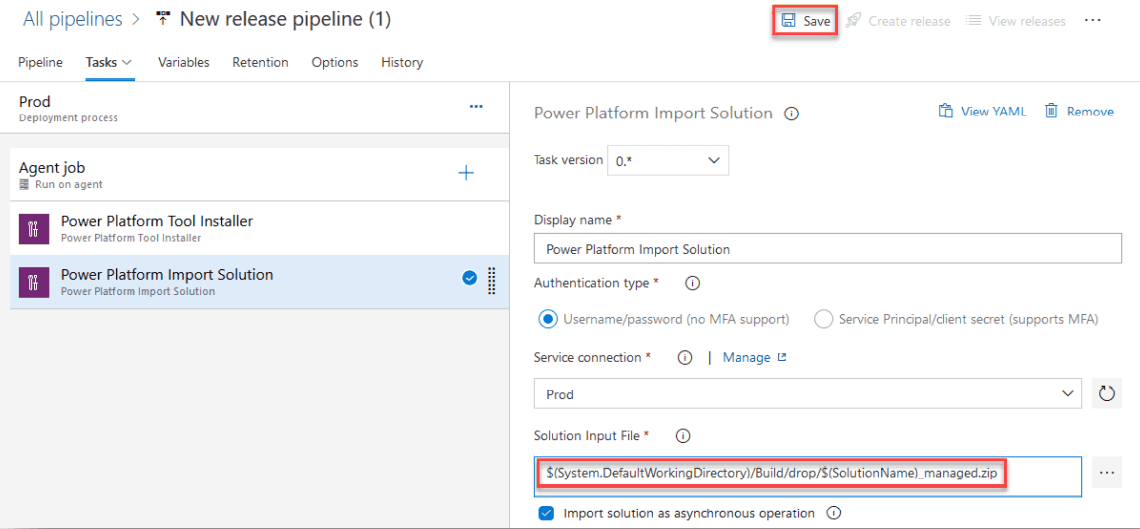
Figure: Sample Azure Pipeline to export solution and commit to source control 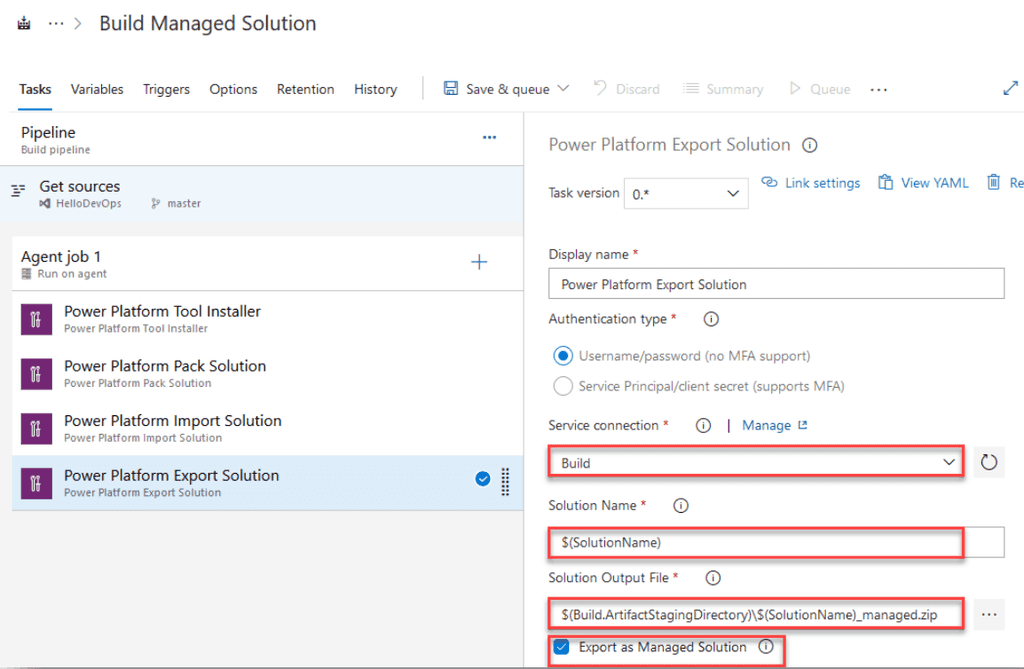
Figure: Sample Azure Pipeline to create a managed solution from source 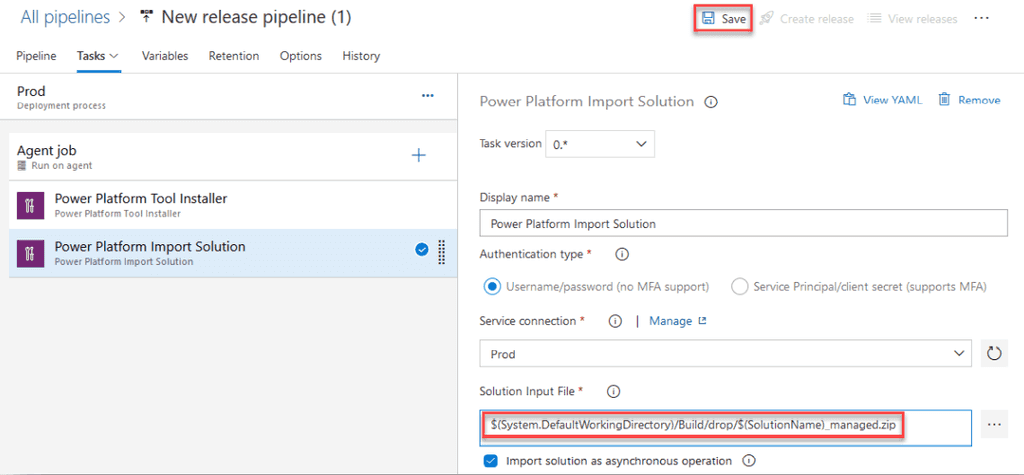
Figure: Sample Release Pipeline to deploy the managed solution to production Dynamics uses a solution as a logical container to hold all customizations for a given function or sub-function. It is very important to have a versioning strategy around changes and when to increment versions.
Increment the version *every time* a change is made and add a new line at the top of the description field containing:
- New version number
- Developer initials
- Change notes, can changes, removals, additions to the solution
This gives you a quick and easy reference for the changes that have happened in the solution. Following this standard means comparing solutions across environments is a painless process.

Bad Example: Version 1.0.0.0, No changelog 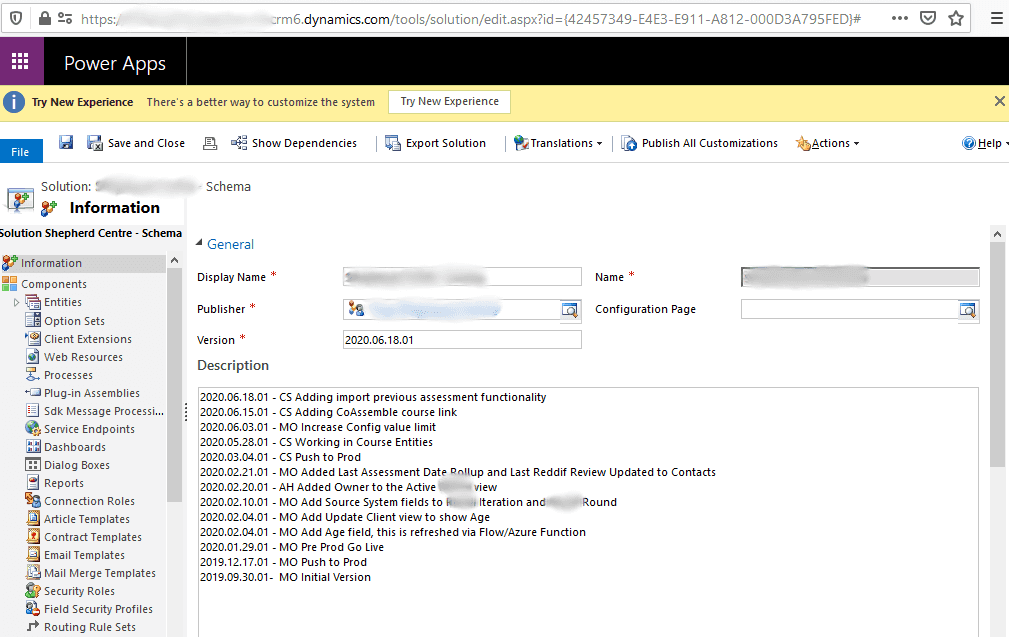
Good Example: Solution has up to date versioning with detailed changelog How do you show a tooltip or a note to a Dynamics user?

Figure: How to show a tooltip like this in Dynamics? Option 1 - Description attribute
Advantages:
- Out of box feature. No customizations needed
Disadvantages:
- Not obvious to see - users are often unaware they can hover on the label to see the note

Figure: The out-of-box description attribute can be used as a tooltip. But it's not obvious to see Option 2 - PCF control
Advantages:
- Flexibility - can customize any style or behaviour
Disadvantages:
- Need more time to develop or install a package
- Introduce a dependent package to the system

Figure: Use a PCF control to show a note and link to a web page Option 3 - Description field + Emoji (Recommended)
Add an emoji in the label to remind people to hover to see the tooltip.

Figure: Add an emoji on the label to remind to people it's a tooltip