Rules to Better Newsletters - 3 Rules
Optimize your newsletter strategy with these key rules, focusing on effective subject lines and proper techniques for sending newsletters through Microsoft CRM.
There are different ways of sending newsletters using the Microsoft Dynamics CRM 2016:
- Campaigns
- Quick Campaigns
- Mail Merge on Marketing Lists
This rule will show you how to send a newsletter using the last method, the mail merge.
By default, Microsoft Dynamics CRM 2016 does not come with good functionality on inserting custom unsubscribe links to your newsletters - that's why we are going to look at how to add a custom unsubscribe link in each email.
Prerequisites:
- Microsoft Dynamics CRM 2016 for Microsoft Office Outlook (Outlook client) is installed and set up
- Microsoft Outlook is running and set up
Option 1 (recommended)
Basic coding knowledge (VBA) required - you will have to configure the macro that generates and inserts your custom unsubscribe link. If you don't feel comfortable doing this, have a look at Option 2 below.
Depending on how many contacts you are going to send the newsletter to, you should think about setting up a VM or using an external provider for sending the emails.
-
Go to Main | Marketing | Marketing Lists
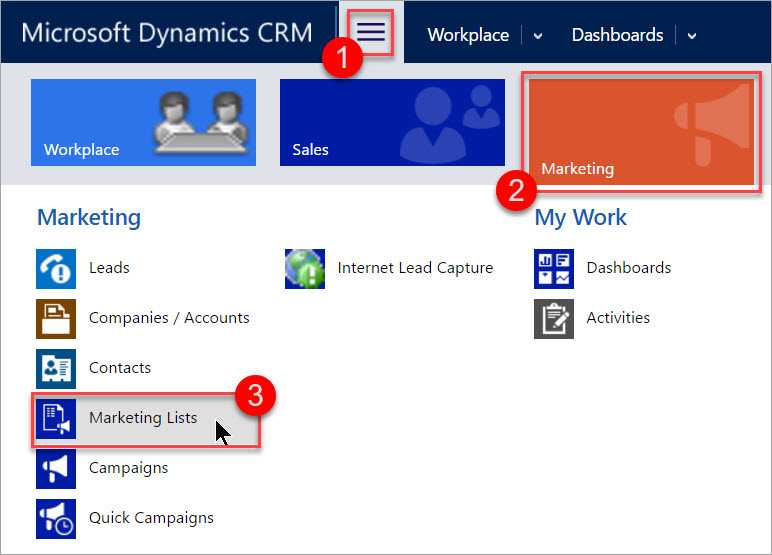
Figure: This is where you can find your Marketing Lists in Microsoft Dynamics CRM 2016 - Open the Marketing List you want to send the newsletter to by clicking on it (you should be using a dynamic list)
-
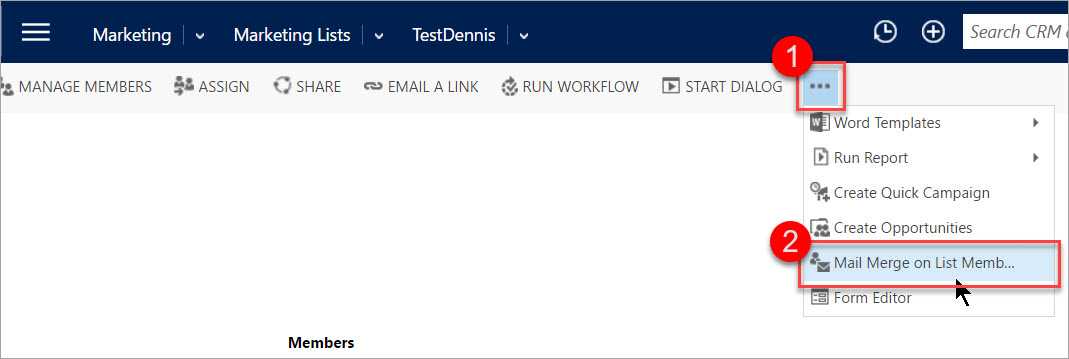
Go to ... | Mail Merge on List Members (in the menu bar)
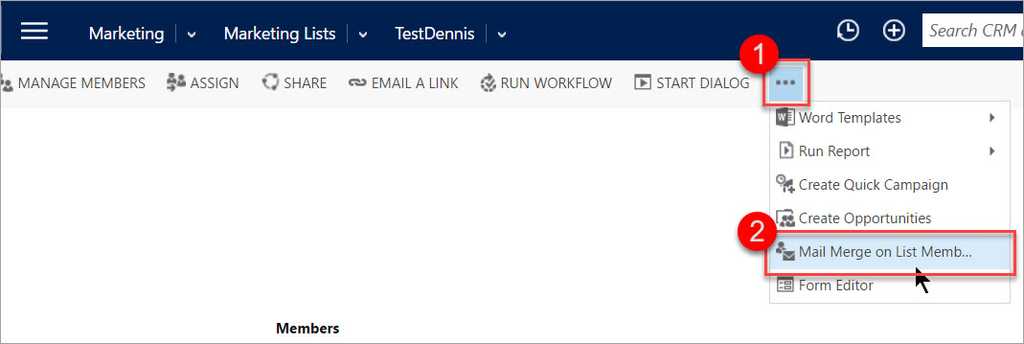
Figure: Click the ellipsis button to reveal the Mail Merge option -
Select Email as the mail merge type, choose your starting document, (optional) select data fields to use, and download the .docx
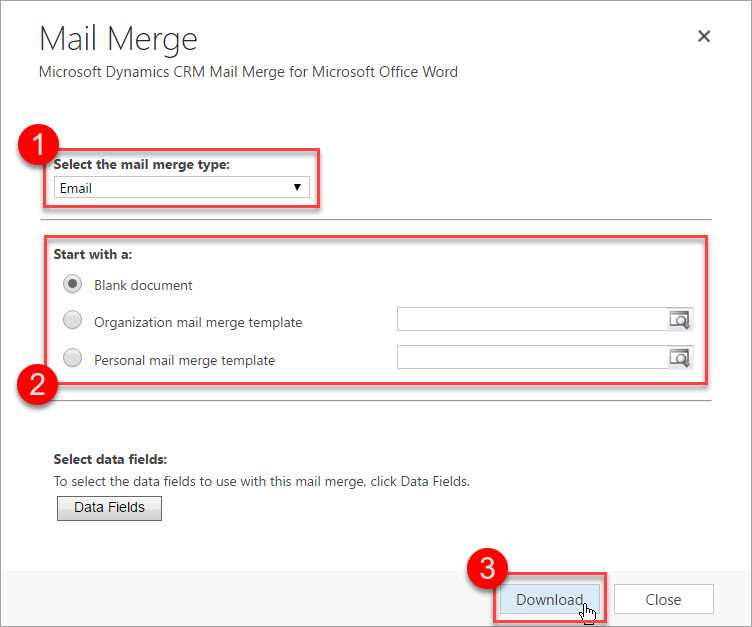
Figure: This is an example of a configuration to start with -
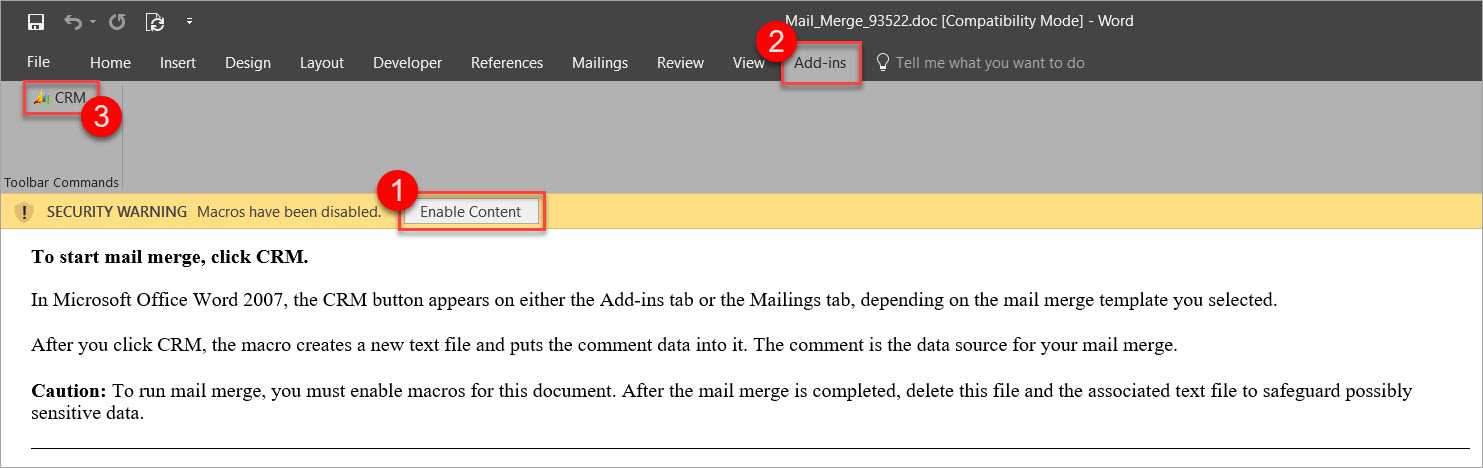
Open the document in Word and follow the instructions in the document to start the Mail Merge
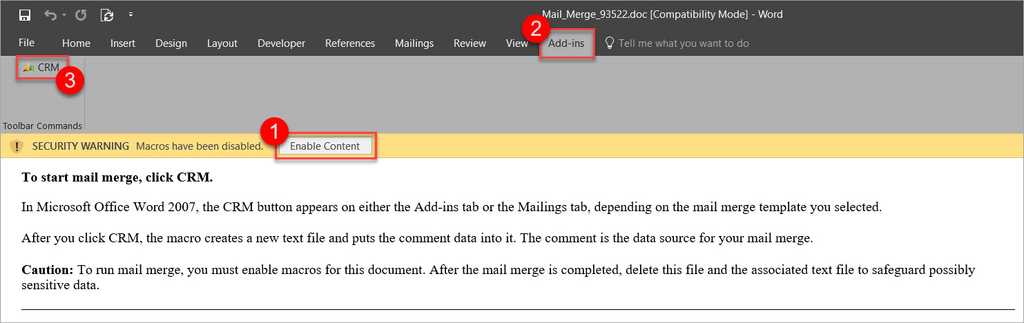
Figure: Follow these steps to start working on the mail merge -
Exclude contacts and press OK
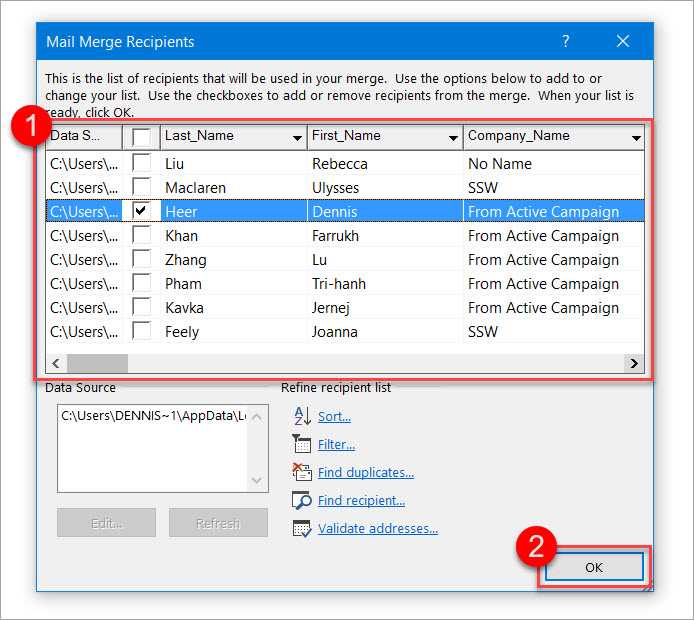
Figure: Choose the recipients for your mail merge and proceed -
Copy and paste your newsletter from Internet Explorer to Word (IE because it seems to not break the style)
For a nicer editing experience (especially with HTML newsletter), switch to the Web Layout view by clicking View | (Views) | Web Layout in the ribbon bar.
-
If necessary, go to File | (Info) | Convert to update the Word document to the newest version - this will solve styling issues while not breaking the mail merge
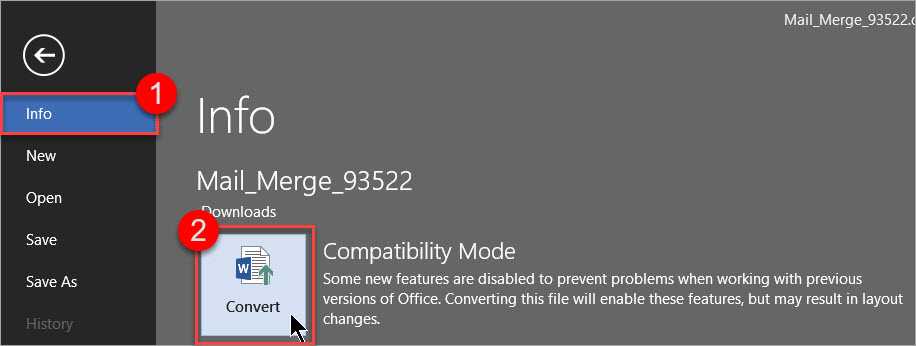
Figure: Convert the mail merge document to the newest version -
Modify and run the following macro to replace the word "UNSUBSCRIBE" in the newsletter with a custom hyperlink.
For help on adding a macro to Word see the Microsoft Office Support website.
Sub InsertNewsletterLink() ' ' InsertNewsletterLink Macro ' ' 'Finds and adds a hyperlink where the UNSUBSCRIBE tag is placed With Selection.Find .Forward = False .Wrap = wdFindAsk .Text = "UNSUBSCRIBE" .MatchWholeWord = True .Execute End With ActiveDocument.Fields.Add Range:=Selection.Range, Type:=wdFieldHyperlink 'Switch to alternative view so we can modify the content of the hyperlink "manually" ActiveDocument.ActiveWindow.View.ShowFieldCodes = _ Not ActiveDocument.ActiveWindow.View.ShowFieldCodes With Selection.Find .Forward = True .Wrap = wdFindStop .Text = "HYPERLINK" .MatchWholeWord = True .Execute End With Selection.InsertAfter " ""https://www.ssw.com.au/ssw/NETUG/Unsubscribe.aspx?email=<<email>>" 'Insert word mail merge fields on <<email>> and <<contact>> With Selection.Find .Forward = False .Wrap = wdFindStop .Text = "<<email>>" .MatchWholeWord = True .Execute End With ActiveDocument.Fields.Add Range:=Selection.Range, Type:=wdFieldMergeField, Text:="EMAIL" Selection.InsertAfter "&id=<<contact>>" With Selection.Find .Forward = False .Wrap = wdFindStop .Text = "<<contact>>" .MatchWholeWord = True .Execute End With ActiveDocument.Fields.Add Range:=Selection.Range, Type:=wdFieldMergeField, Text:="CONTACT" Selection.InsertAfter """" Selection.MoveRight Unit:=wdCharacter, Count:=1 'Remove the additional MERGEFORMATs For counter = 0 To 1 With Selection.Find .Forward = False .Wrap = wdFindStop .Text = "\* MERGEFORMAT " .MatchWholeWord = True .Execute End With Selection.Delete Next counter 'Switch back to normal view so we can change what the hyperlink looks like to the user ActiveDocument.ActiveWindow.View.ShowFieldCodes = _ Not ActiveDocument.ActiveWindow.View.ShowFieldCodes With Selection.Find .Forward = True .Wrap = wdFindStop .Text = "Error! Hyperlink reference not valid." .MatchWholeWord = True .Execute End With Selection.Text = "UNSUBSCRIBE" Selection.Font.Bold = False Selection.Font.Underline = wdUnderlineSingle Selection.HomeKey Unit:=wdStory End Sub-
Follow the steps in the mail merge sidebar on the right-hand side of Word
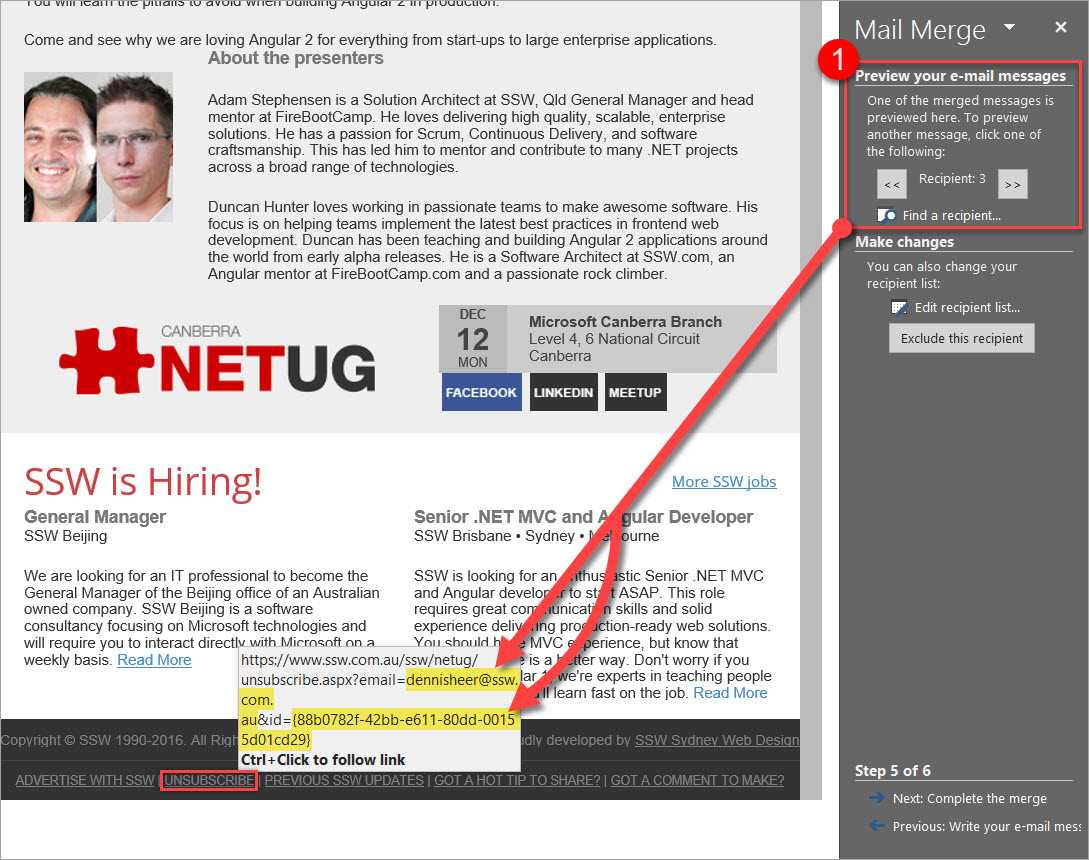
If you are using mail merge fields, like the contact names, you should preview your message for some contacts.

Figure: The highlighted part will change for every recipient -
Send the mail merge newsletter to the email address property of every contact by selecting the following
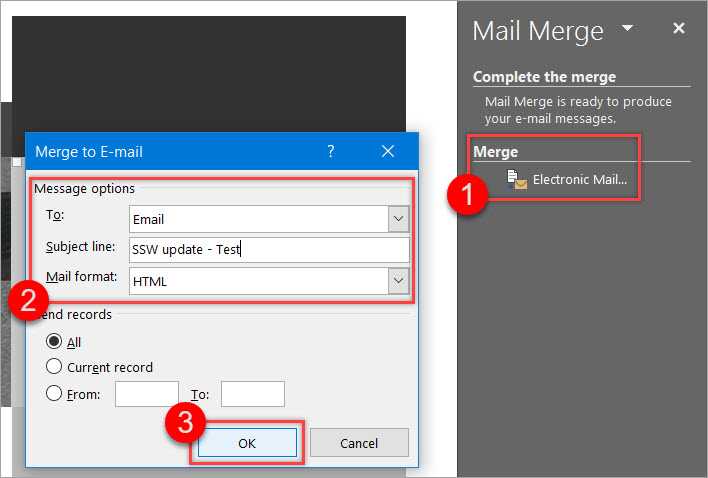
Figure: Example configuration for the email that is about to be sent
Option 2
You don't need any coding knowledge here - but this means you will have to generate your custom unsubscribe link manually and copy and paste it into the mail merge document. Make sure to set it up it correctly before copying.
If there's anything to be learned from spammers, they know how to get your attention. Spammers use very tabloid-based, or headline-grabbing subjects, to try and coerce you into opening that email. But don't make your email subjects tabloid-tacky, instead follow a good broadsheet paper's style of attention-grabbing lines.
Figure: Make your email stand out! Just as we are told, 'Don't judge a book by its cover', we sometimes judge an email by its subject.We send and receive so many emails each day, therefore it's important to use the email subject to grab your recipient's attention.
Choosing the right subject can give an email a sense of urgency or importance and allows the user to quickly glance through the inbox to assist with prioritization.This is especially important when trying to get your clients and suppliers to take notice of your email.
Subject: 🕑 Reminder about event
Figure: Bad example - Easily missed, can't get the main information without reading the email
Subject: 🕑 6:30PM Tonight! See you at the User Group
Figure: Good example - Definitely going to read this email
The best way of doing this is to ensure that your subject includes either a:
- Action point E.g. "6.30 TONIGHT! See you at The Oaks Hotel..."
- Result of a task you were asked to do E.g. "Charles Merton - 5 min of feedback".
You'll note from this that including the date and time in the subject gives immediacy to the email.
Warning: Never leave the subject blank! It's like writing a book and failing to give it a name!
Good subject examples
Always use a descriptive email subject to make it easier to find later. Use emojis and prefixes to give context straight away.
Consulting
Subject: 🕑 Northwind - Future - Meeting to get your software solution rolling, next Monday 2PM
Dinner
Subject: 🍴 Dinner Tonight, 6.30PM at The Oaks
Bugs
Subject: 🐛 BUG - Northwind form - Button not working
Call someone
Subject: 📱 SSW User Group - This month needs a speaker - Call Tom Howe pronto!
Feedback on a product
Subject: 🎨 Northwind app - User Interface feedback
Test please
Subject: 🧪 Test Please - Product Name v1.11
Of course, we also use a structured approach for emails - especially when sending them internally.
We use the following format for the subject internally and encourage clients and external contacts to use this format as well.
Subject: {{ EMOJI }} {{ PROJECT TOUCHED }} - {{ BUSINESS AREA TOUCHED }} - {{ SHORT DESCRIPTION }}
Example:
Subject: 📧 Northwind – IOP – Customer.aspx - Add email address validation
The advantage of this is that when you sort by the subject in Outlook, you get all of the emails grouped together, and it is easy to recognize the client/product, because the subject contains the relevant information.
Tip: When referring to a website, it's a good idea to include the URL in the email subject.
Additionally, you should be able to determine which emails are the most important. Using a meaningful subject with keywords makes it easy to identify and categorize emails without actually opening them (and it also makes it easy to find them in "Sent Items"). When emails are really important, write IMPORTANT in the subject. Other emails considered important or urgent should have the following in the subject field:
- BUG
- INCOMPLETE
- URGENT
Other words to be used are:
- TIMESHEETS
- INVOICES
- PROSPECT
- TO-DO - for tasks pending
- FYI - information you want to keep around for a while, for yourself or for others (never for a task)
- FUTURE - ideas for the future
- IGNORE - for the rare occasion when something is requested and you really don't want to do it yet
- Product name - Registered User Support
- Product name - Pre-Sales Support
- Project name
- Client name
Remember: For external emails, it is acceptable to change an email subject in certain circumstances.
For internal emails, the subject should generally not be changed as it will break the threading of emails.
Newsletters should always use absolute references to all links and images within the HTML. Relative paths don't contain the server information so external users see a broken link/image - the outside email application won't find the where the file is.
<a href="/ssw/Company/ContactUs.aspx "><img src="/SSW/images/SSWLogo.png" /></a>Figure: Bad example - Using relative paths for both link and image on a newsletter
<a href="https://ssw.com.au/ssw/Company/ContactUs.aspx "
  ><img src="https://ssw.com.au/SSW/images/SSWLogo.png"
/></a>
Figure: Good example - Using absolute paths for both link and image on a newsletter