Rules to Better SharePoint for End Users - 12 Rules
Want to get your organization using SharePoint to collaborate? Check SSW's SharePoint consulting page.
When adding a friendly URL, please avoid using specific characters like
+ : # & , ) ( ! \ } { @ / = $(and so on) due to these reasons:- When adding a friendly URL, we meant to make it friendly and easy for the user to read and remember, and these characters add complexity
- Some characters are unsafe characters, they will be encoded, which end up making the URL really messy and ugly. Example: double quote (“) will be encoded as %22.
SharePoint
Some characters are reserved characters, which may not be supported by some features, based on our experience, “+" is not supported in “canonical" to redirect from http to https.
http://ssw.com.au/rules/when-to-use-+1Figure: Bad example - This URL will throw a 404 error rather than redirecting to https://
http://ssw.com.au/rules/when-to-use-plus-1Figure: Good example - Redirect works fine if the URL doesn't include “+"
When naming documents and images, use descriptive words and kebab-case (where you separate words with hyphens) to make your files more easily discoverable.
✅ Choose the right words
The file name and its title is regarded more highly by search than the content within documents. Also, the file name is what is displayed in search results, so by making it descriptive you are making it easier for people to identify the purpose of your document.
Once you have chosen the best words, make it readable and consistent in formatting:
❌ Avoid spaces
Monthly Report.docx
Figure: Bad example - File name using spaces to separate words
As far as search goes, using spaces is actually a usable option. What makes spaces less-preferable is the fact that the URL to this document will have those spaces escaped with the sequence %20. E.g. sharepoint/site/library/Monthly%20Report.docx. URLs with escaped spaces are longer and less human-readable.
Know more on Do you remove spaces from your folders and filename?
❌ Avoid CamelCase
MonthlyReport.docx
Figure: Bad example - File name using CamelCase doesn't have spaces but also doesn't contain any separators between words
This is a popular way to combine words as a convention in variable declarations in many coding languages, but shouldn't be used in document names as it is harder to read. Also, a file name without spaces means that the search engine doesn't know where one word ends and the other one begins. This means that searching for 'monthly' or 'report' might not find this document.
❌ Avoid Snake_Case
Monthly_Report.docx
Figure: OK example - Underscored (Snake_Case) URLs have good readability but are not recommended by Google
Underscores are not valid word separators for search in SharePoint, and not recommended by others. Also, sometimes underscores are less visible to users, for example, when a hyperlink is underlined. When reading a hyperlink that is underlined, it is often possible for the user to be mistaken by thinking that the URL contains spaces instead of underscores. For these reasons it is best to avoid their use in file names and titles.
✅ Use kebab-case
monthly-report.docx
Figure: Good Example - File name uses kebab-case (dashes to separate words)
A hyphen (or dash) is the best choice, because it is understood both by humans and all versions of SharePoint search.
You may use Uppercase in the first letter in Kebab-Case, however it's important to keep consistency
Extra
- Add relevant metadata where possible
If a document library is configured with metadata fields, add as much relevant information as you can. Metadata is more highly regarded by search than the contents within documents, so by adding relevant terms to a documents metadata, you will almost certainly have a positive effect on the relevance of search results.
- Ensure filenames are unique when tracking files with Git
Within a team, there may be a mix of operating systems being used by its members. For users on MacOS or other OS's that have case-sensitive filenames, it's crucial to ensure that filenames are unique. For example, don't use 'File.txt' if 'file.txt' already exists. This is especially important if these files are being tracked with Git, as it can cause issues for users on Windows, which has case-insensitive filenames.
SharePoint search is a powerful tool for discovering information. Here are some tips to make sure you are getting the most from it. There are two things to consider regarding SharePoint search; firstly, how you save information to SharePoint to be more easily discoverable; secondly, how to perform searches within SharePoint.
Here are some tips for performing searches:
Know how to navigate SharePoint search – watch this video
- Use the categories (top)
- Use the filters (right navigation / faceted search)
- Use the scope to go wider
- Use the specific properties (see below)
- People - Use Delve indexed properties (i.e. Skills)
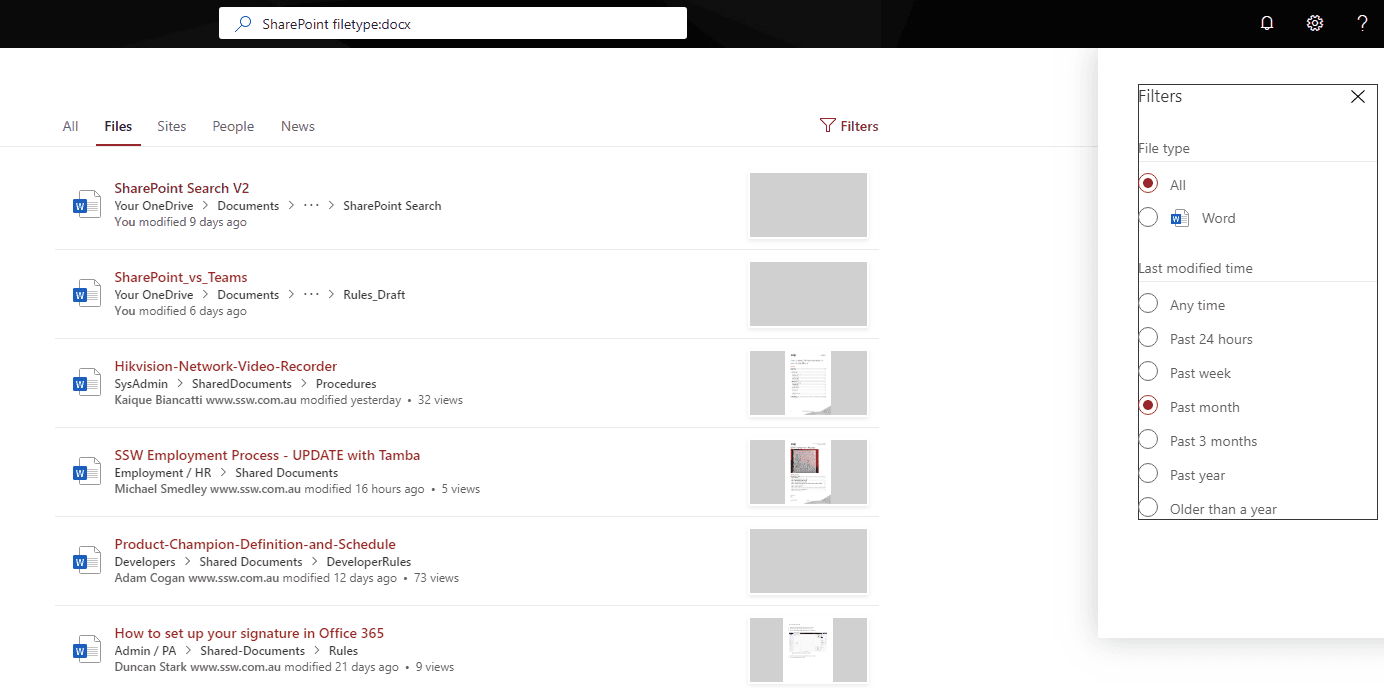
Search a specific property
If you are familiar with the structure of the metadata in the content you're searching, you can restrict your searches to a property with the syntax <property>:<search term>. E.g. to search the filename field for the term "report", you would use "filename:report".
Example of properties you can use (common ones);
- Filetype:
- CreatedBy:
- ModifiedBy:
- Title:
More: https://docs.microsoft.com/en-us/office365/securitycompliance/keyword-queries-and-search-conditions
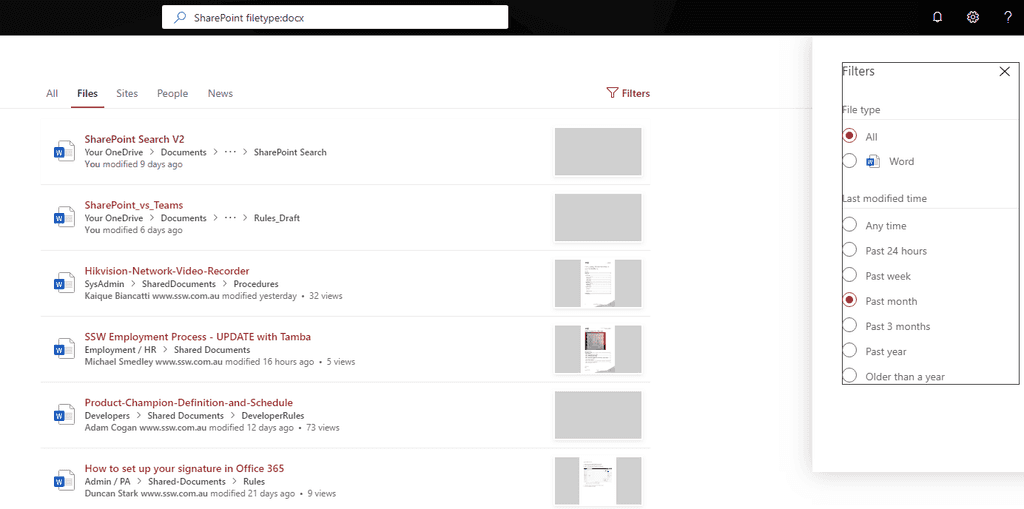
Figure: Example of using Filetype: filter
Use Boolean OR and AND operators Similar to Google and Bing, you can use OR and AND Boolean operators. E.g. "sharepoint AND search".Note: OR and AND must be capitalized, however, the case is irrelevant for actual search terms.
Use an asterisk (*) wildcard for partial matches
This can be useful if you know that certain words are used together, e.g. Fire* will return results for FireBootCamp.
Note: Because of word stemming which is enabled by default in SharePoint 2019, 2016, and 2013, you do not need to use wildcards to find variations on words. For example, searching for "computer" will return results that contain "computers", so you do not need to search for "computer*".
Use double quotes to find specific phrases
E.g. search for "social media" to make sure you get results for social media, as opposed to results that simply contain the words "social" and "media" in the same document.
If you find a mistake on a SharePoint page, you should find who made the change before you fix it. That way you can inform the person of their mistake.
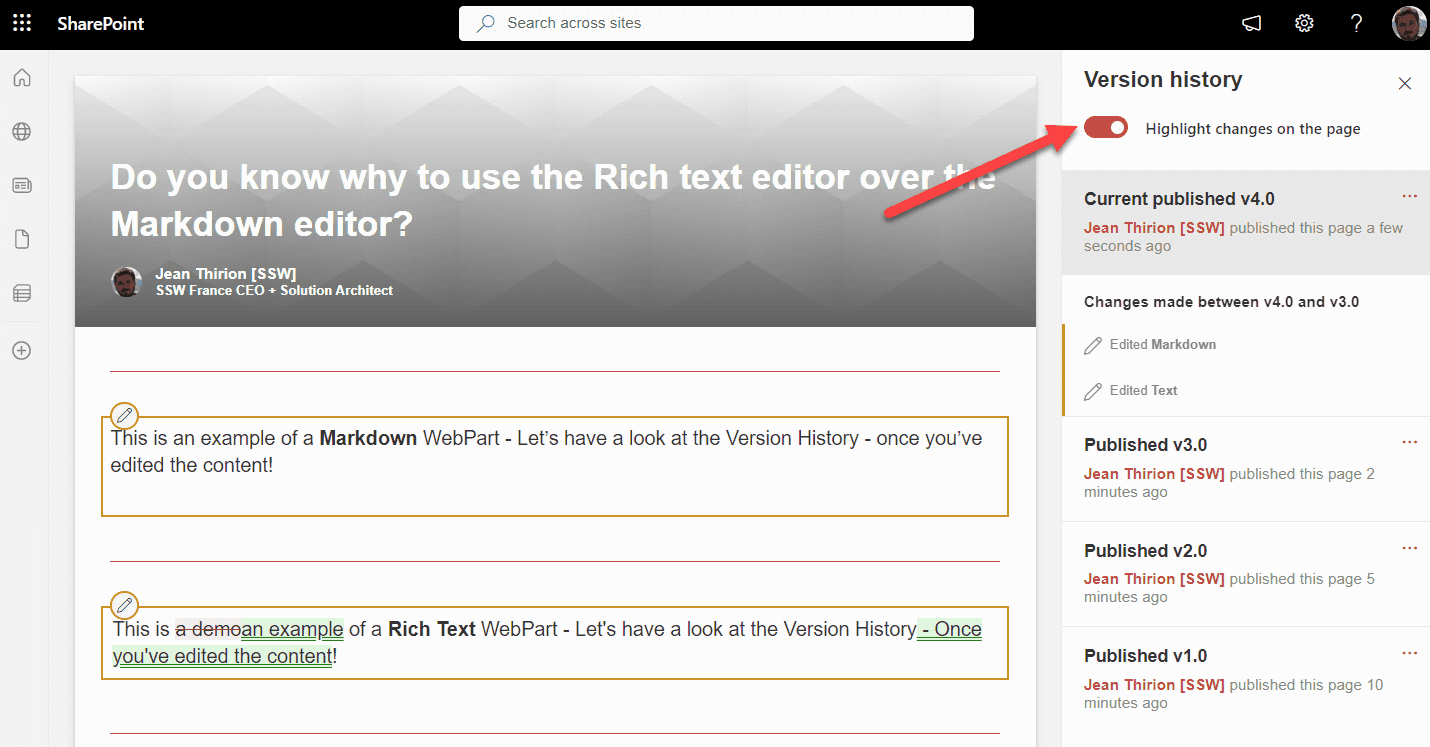
As long as you are using the Text Webpart (aka the Rich text editor), you can easily see the exact changes made in each version of the page. See the advantages of the Text Webpart in this rule: Do you know why to use the Rich text editor over the Markdown editor?
Viewing changes on a SharePoint page
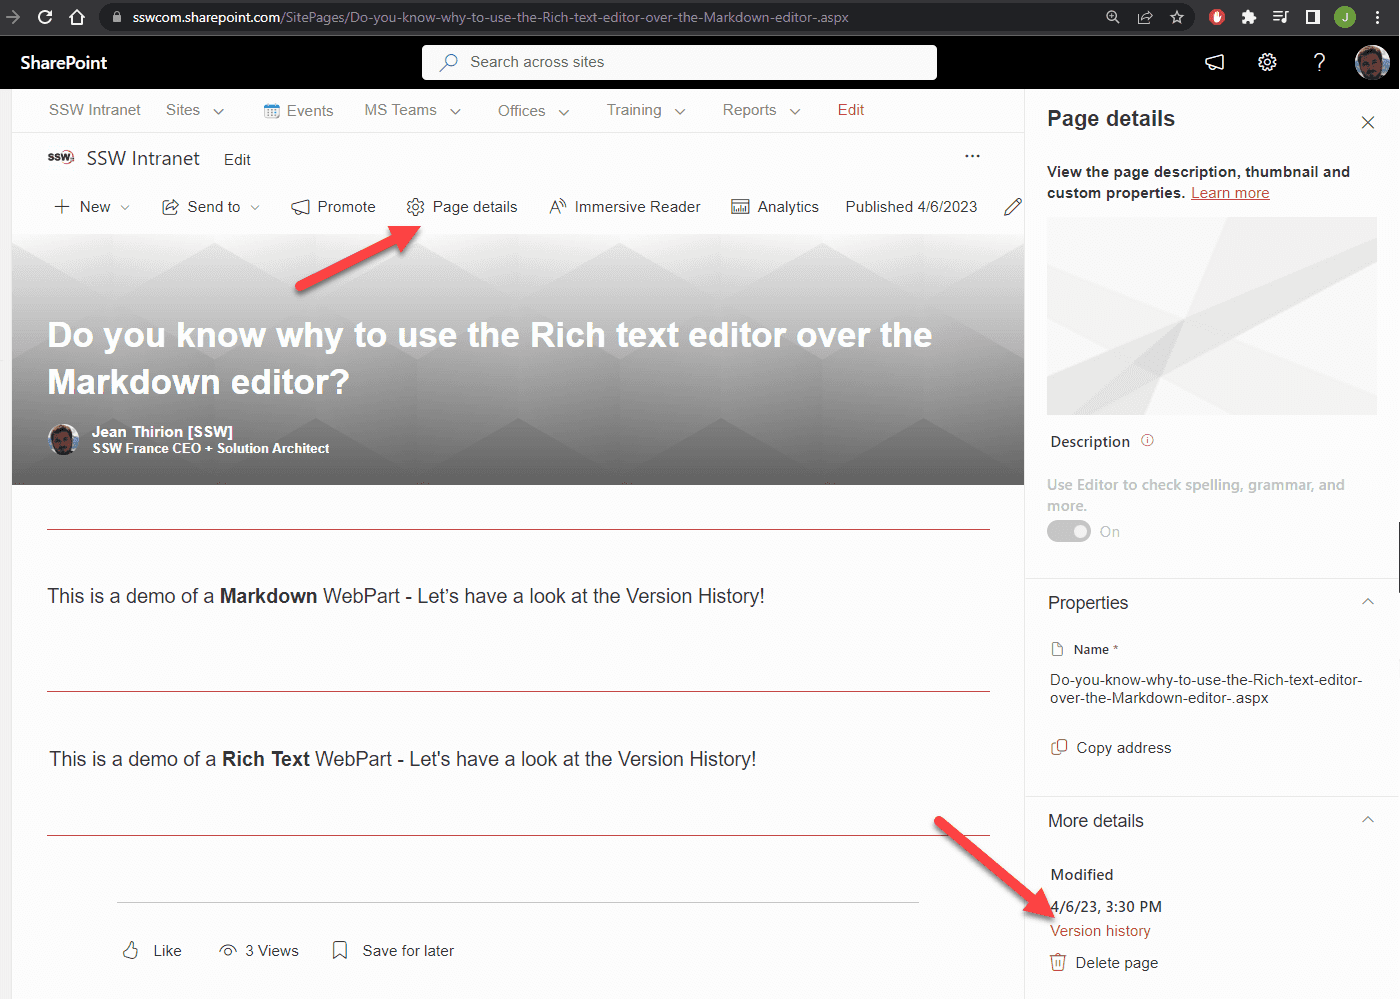
- On the page you want to check, click on Page details
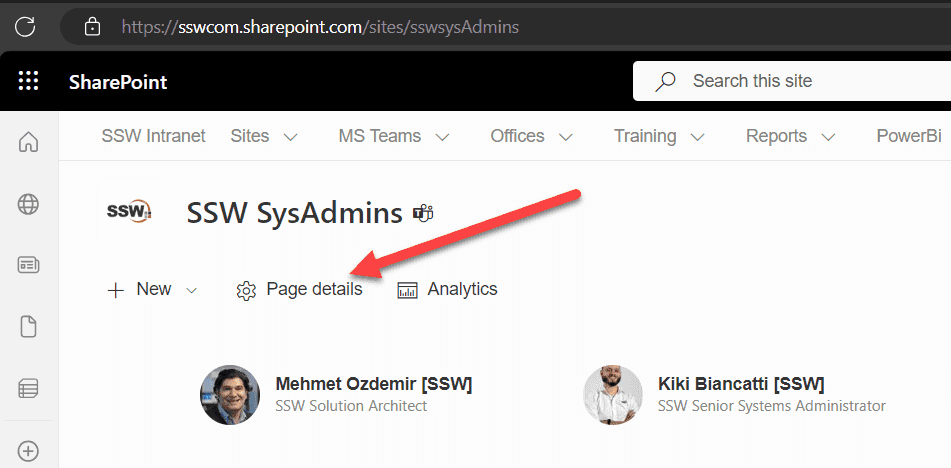
Figure: SharePoint | Page details - Click on Version history
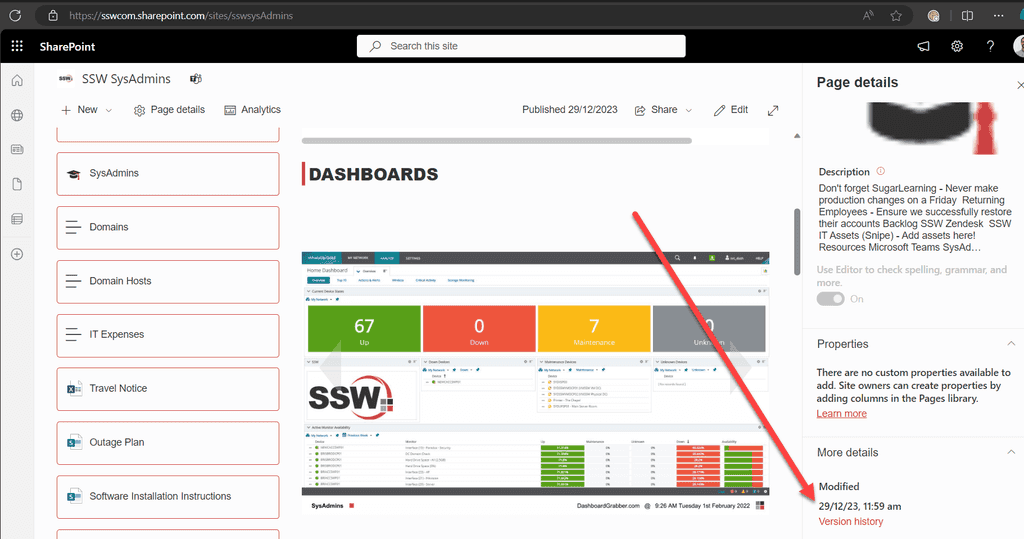
Figure: SharePoint | Version history - Make sure Highlight changes on the page is on
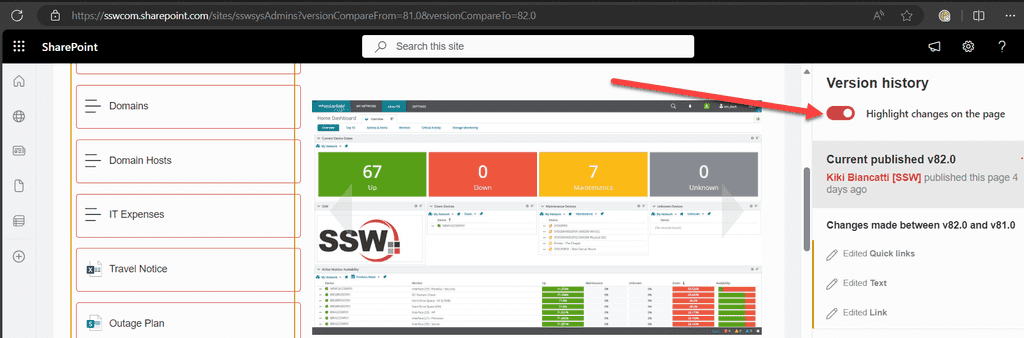
SharePoint | Highlight changes - View the changes
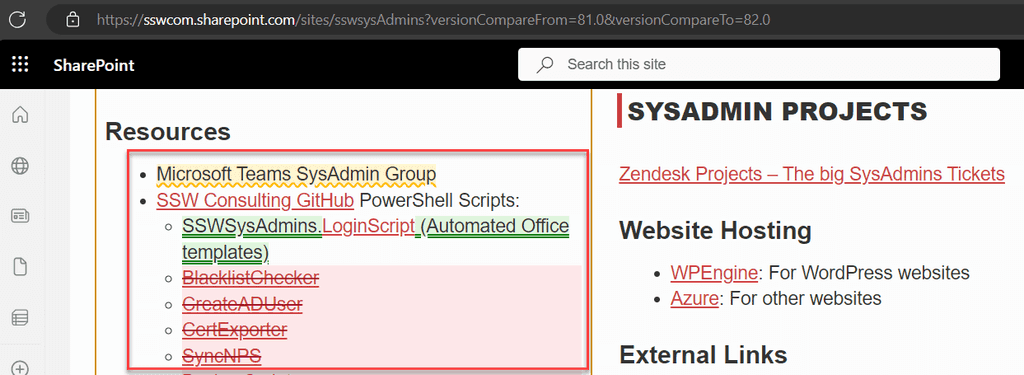
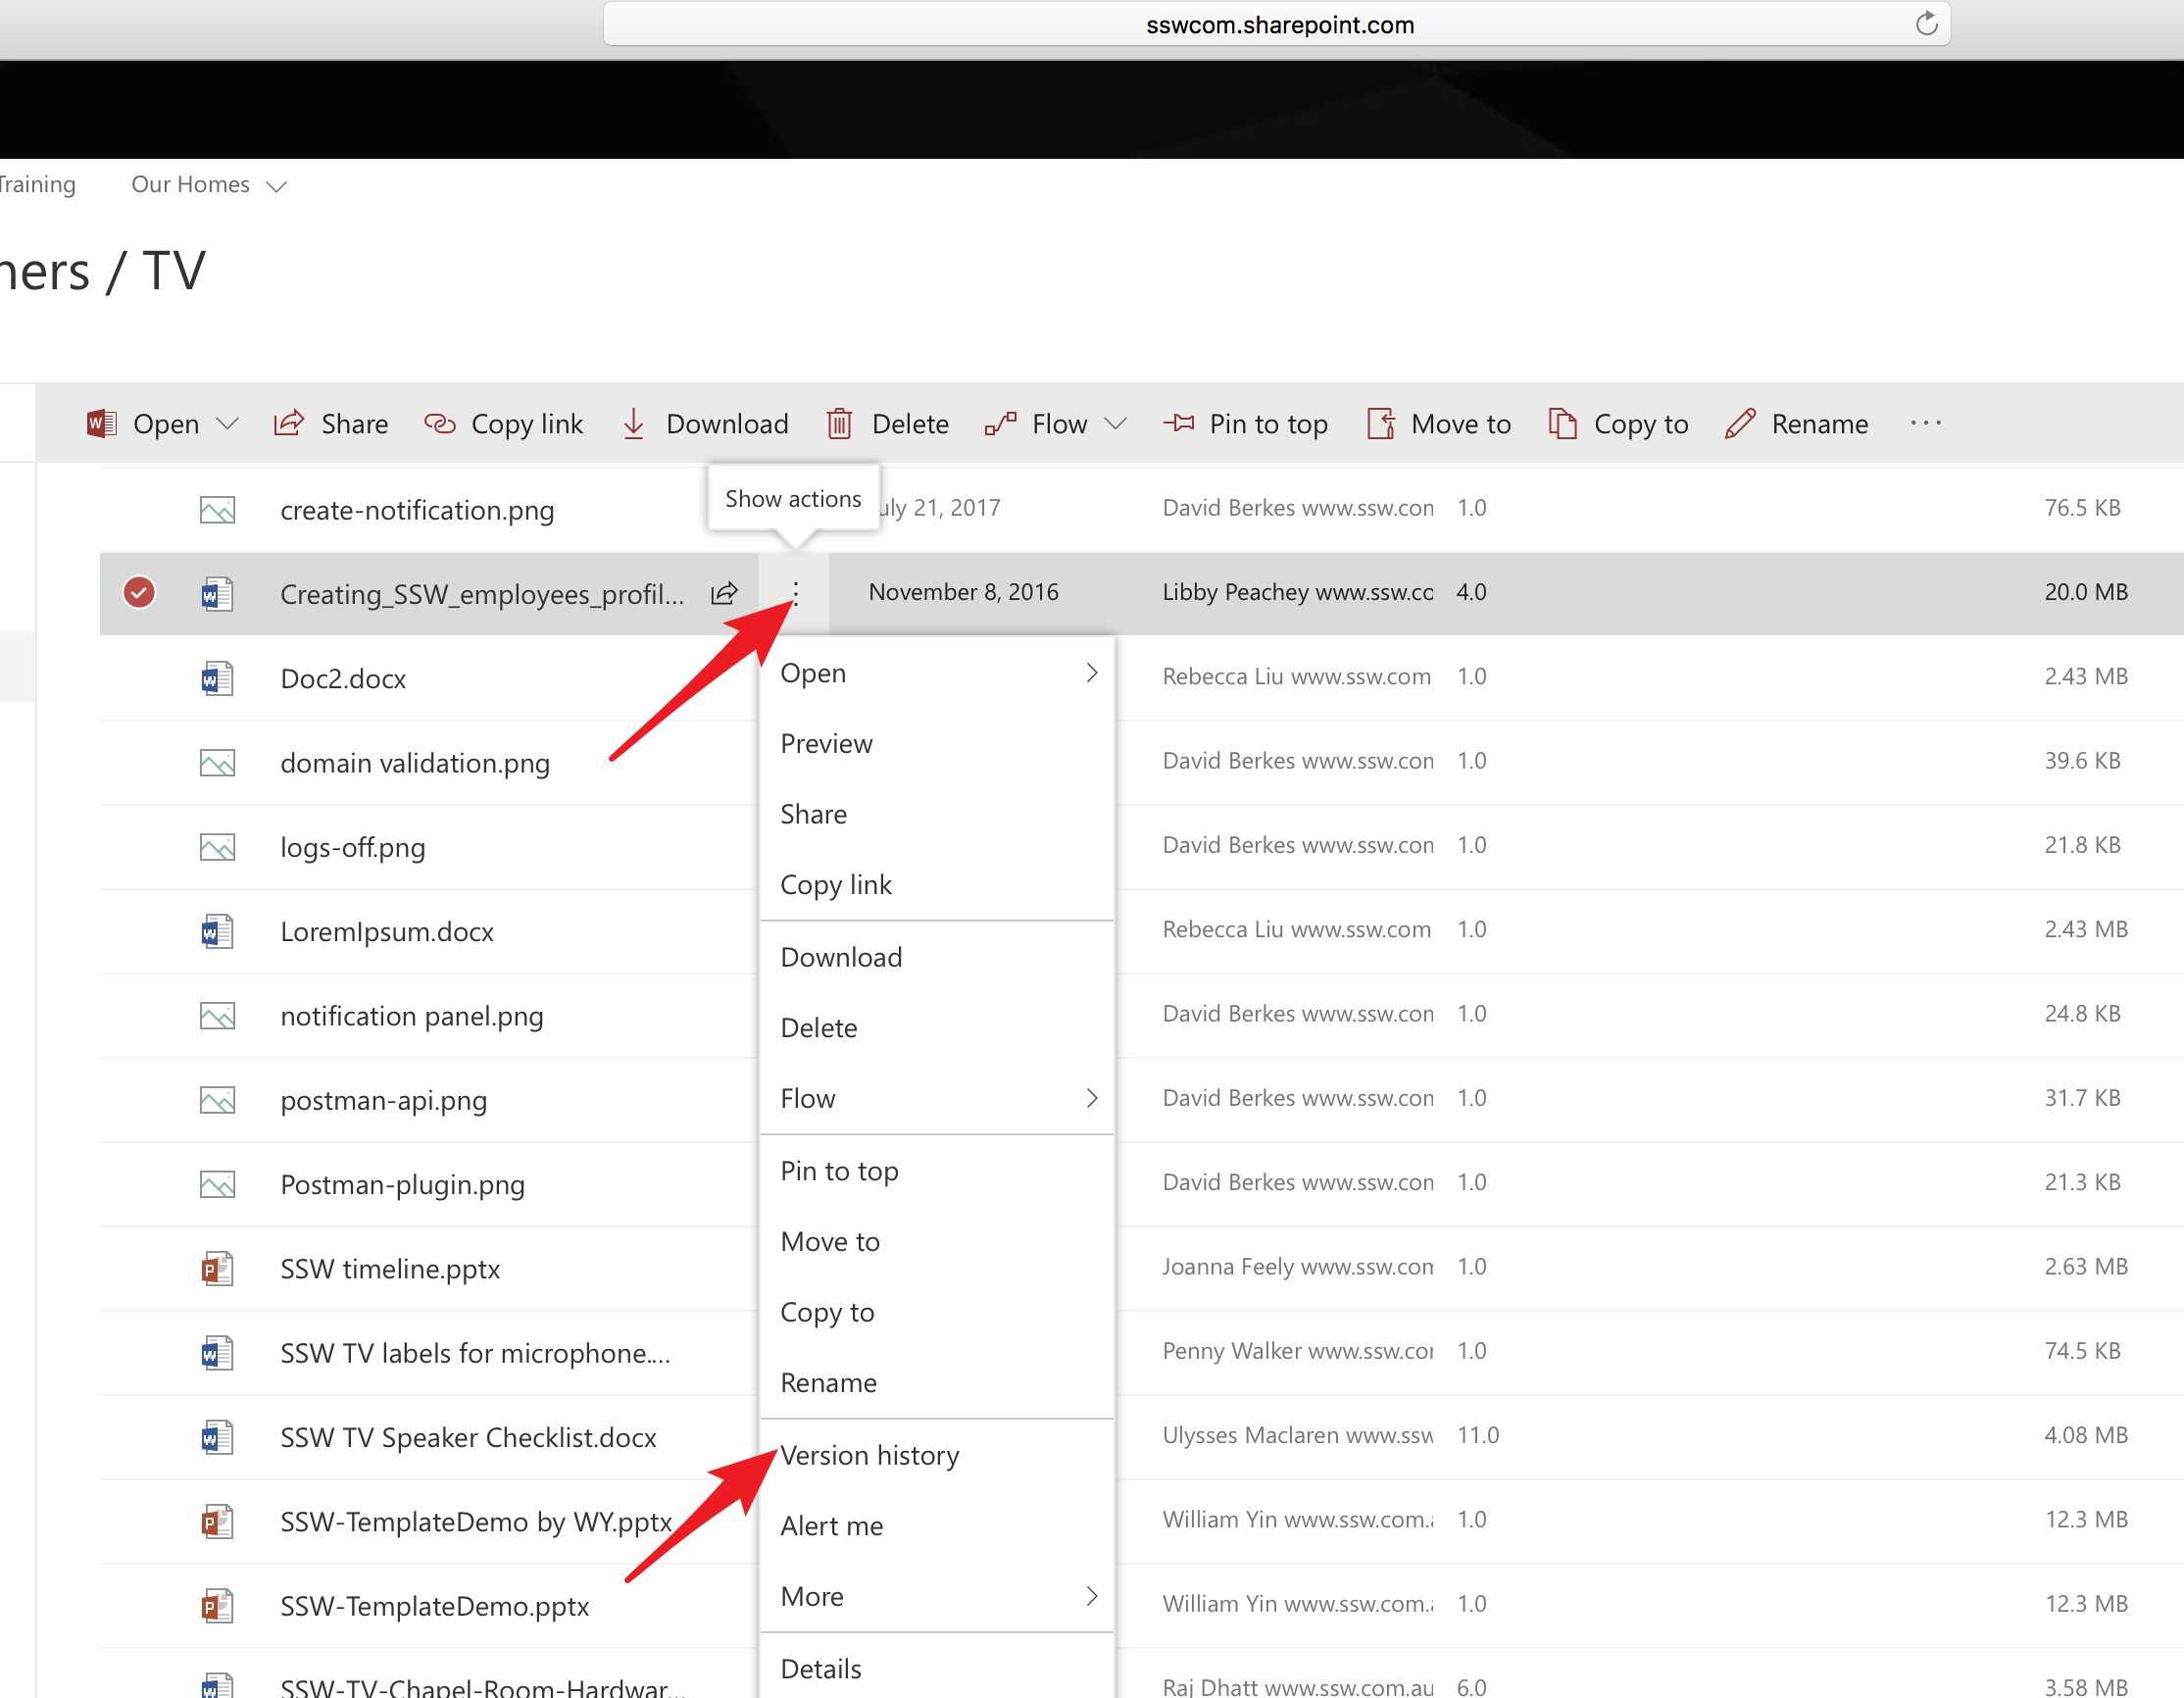
Figure: SharePoint | View color-coded changes Viewing changes to documents in SharePoint Online
- For the document you want to check, click on the 3 dots (Show actions)
- Click Version history
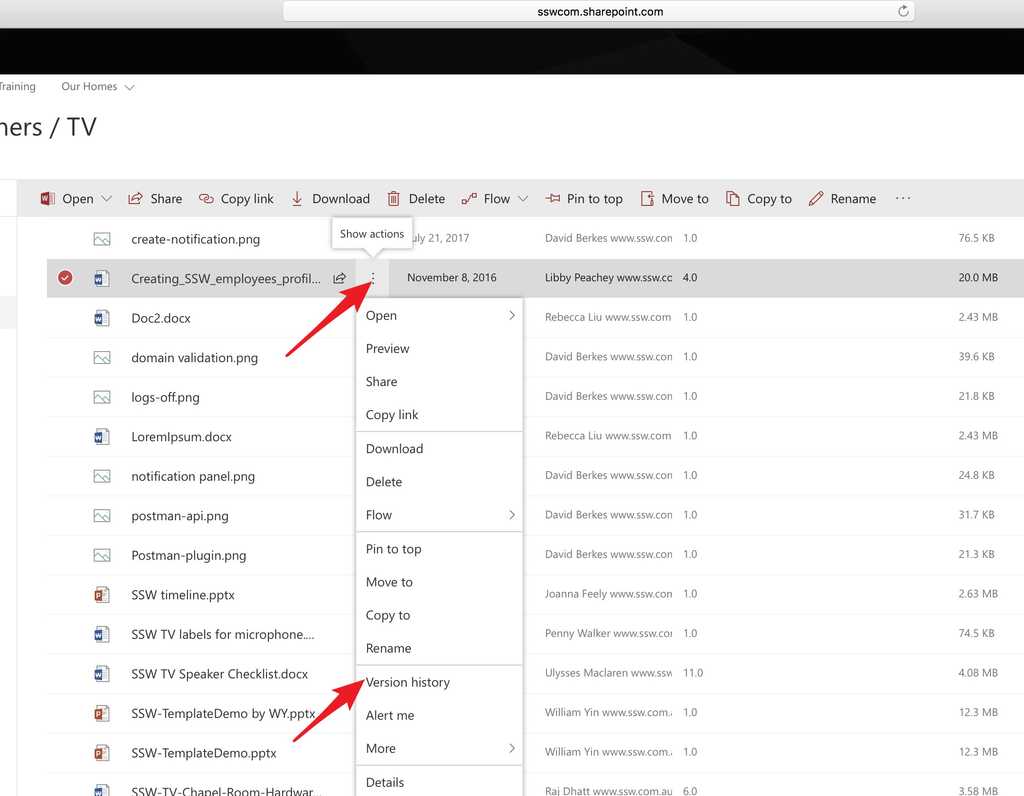
Figure: Show actions | Version History 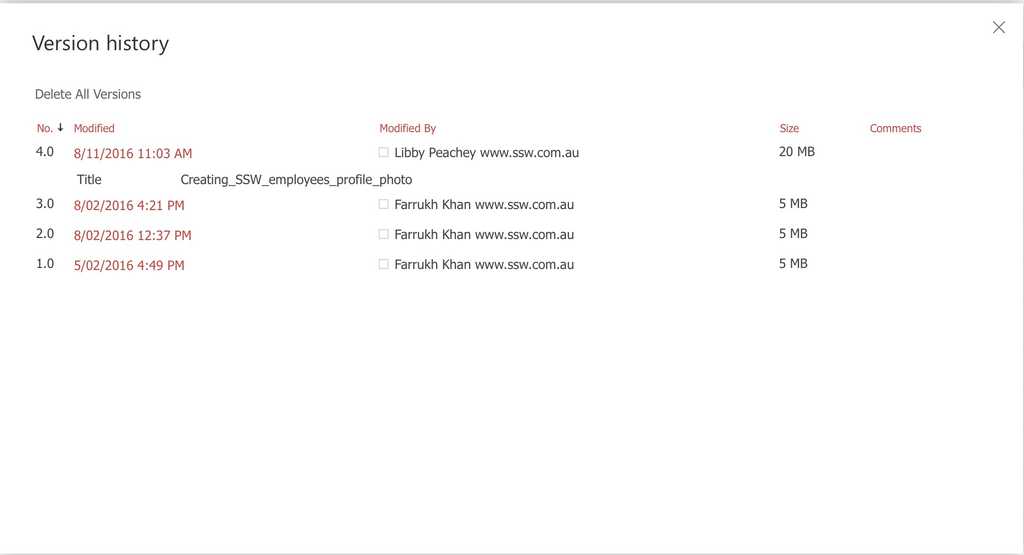
Figure: Version history listed Related rules
If you want to see how this is done in Azure DevOps, read Do you know the benefits of using source control?
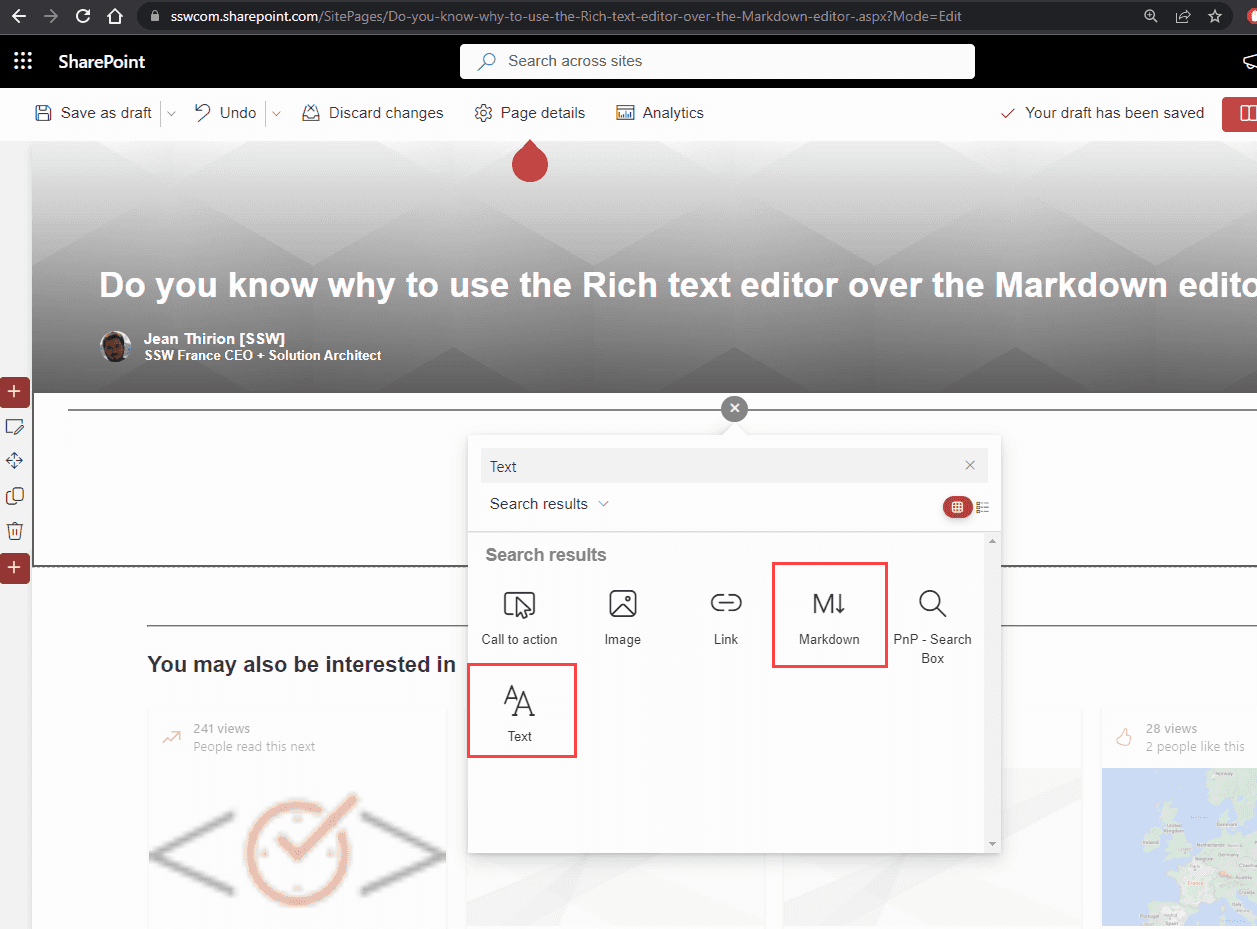
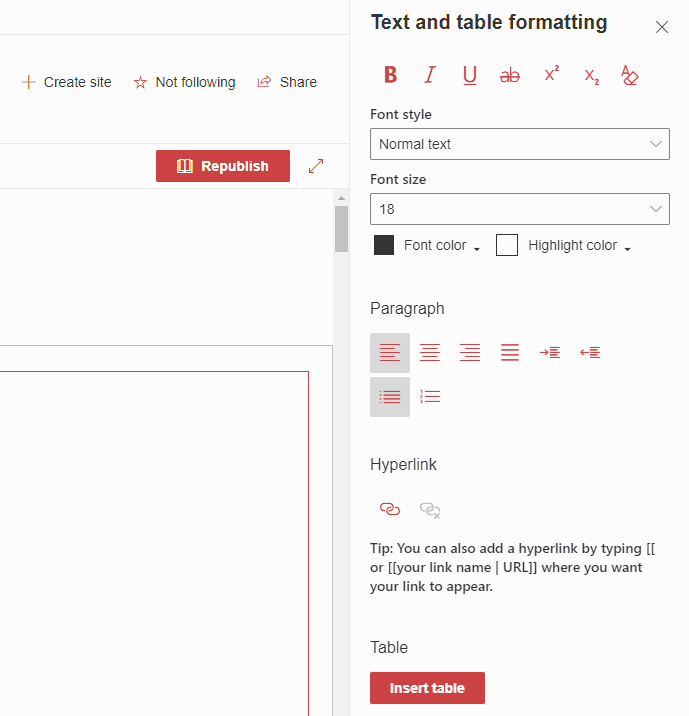
When creating a SharePoint Modern page, you can use many different webparts to enrich your content - Videos, Embedded PowerBI, and many more.
When you want to add plain text to a page, you have two choices: Text (or Rich Text) Webpart, or Markdown WebPart.

Figure: The two common types of Text WebParts - "Text" and "Markdown" Whenever possible, you should use the Text WebPart as it offers a much nicer editing experience, but more importantly provides a detailed Version History.
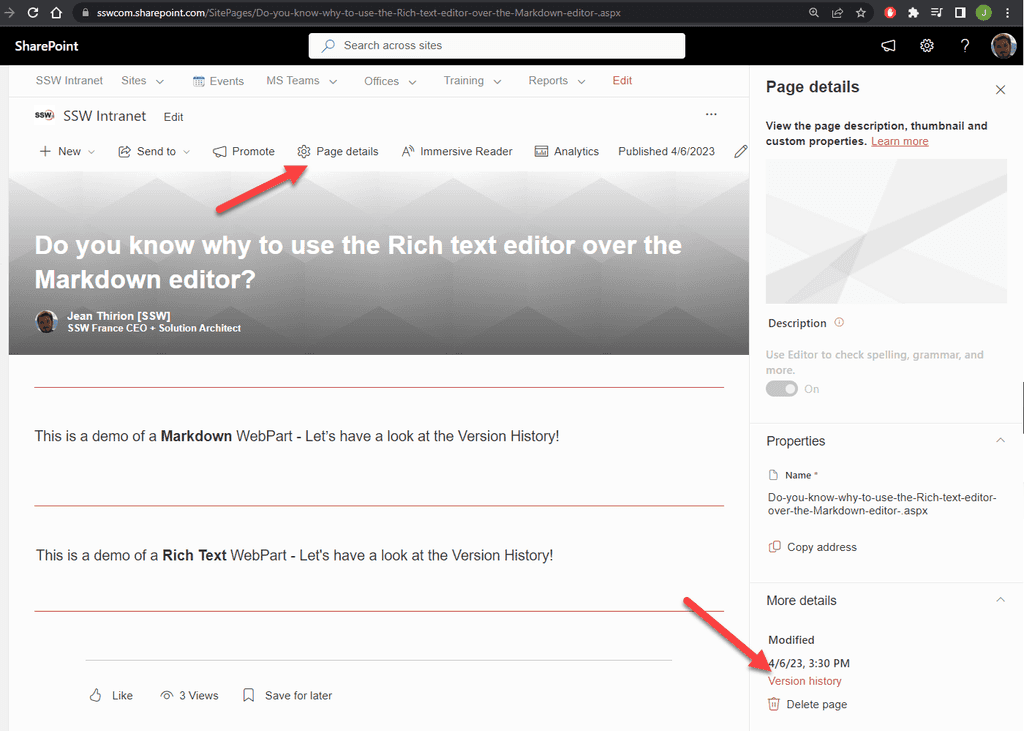
Figure: You can navigate to the page version history through "Page Details" | "Version History" 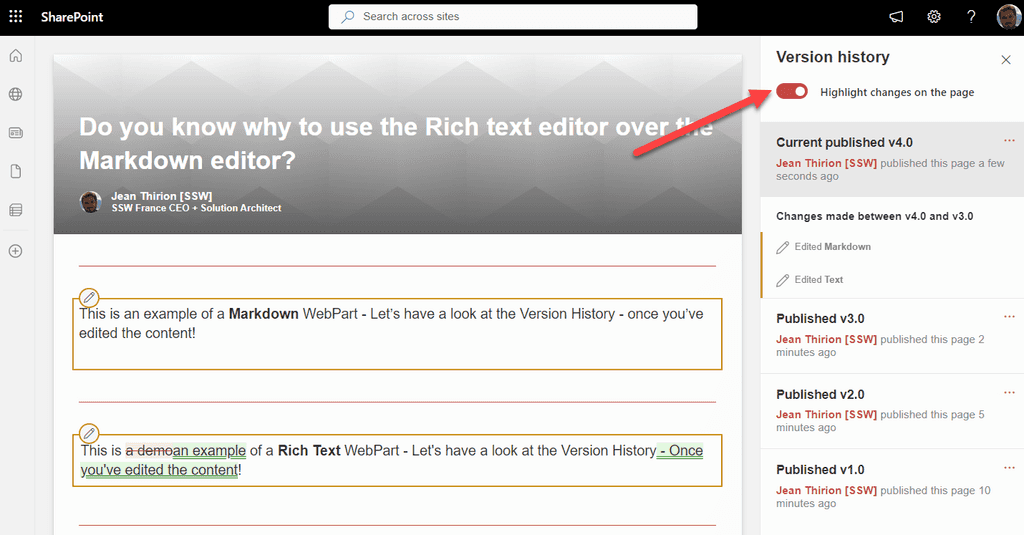
Figure: Good example - Turn on Highlight changes on this page so you can see the detailed changes in an easy-to-read format 
Figure: Bad Example - Markdown WebPart - No detailed history, all I can tell is that something changed on that component 
Figure: Good example – Rich Text WebPart - I can very easily tell what's been added/removed from the content Document libraries in SharePoint 2016 are much better. The keyboard shortcuts are:
- Alt + N - N ew
- Alt + E - E dit
- Alt + U - U pload
- Alt + M - M anage
- Alt + S - S hare
- Alt + Y - Synchronization
Read more at https://support.office.com/en-us/article/Keyboard-shortcuts-for-SharePoint-7dec847a-4f2a-47f6-9964-0ea1fba45160
Watch Adam Cogan explaining why you should use "Open with Explorer" over OneDrive (formerly called SkyDrive):
/***** Update on Jul 2018 ******/
With the latest version of OneDrive,
- It maps the folder in a second and shows the document previews without actually download the files. Files will be downloaded when you double click them or set their parent folder as “always available locally”, then they will show a “green tick” in "status" column to indicate that the files are available locally.
- You can select sub folders you want to sync on your computer.
Considering the above two points, plus "Explorer view" is being decommissioned by Microsoft Mordern pages, we'd recommend you to use OneDrive over "Explorer view" now.
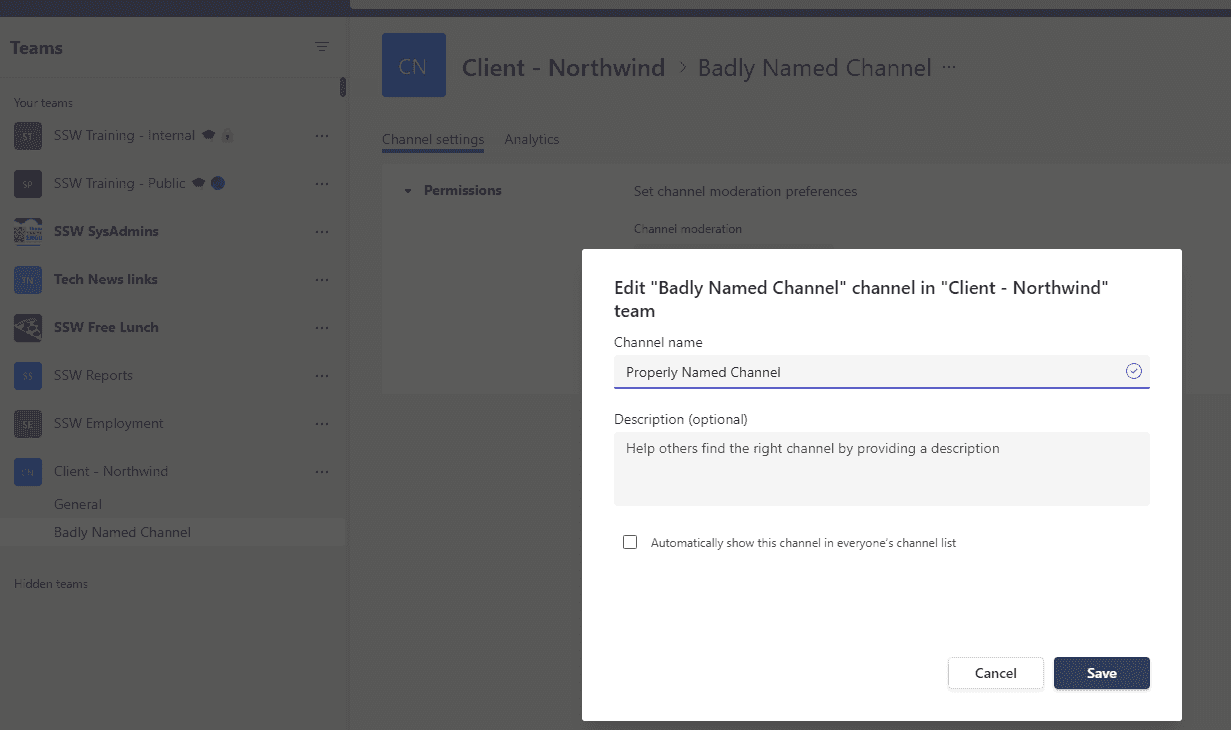
Have you ever made a spelling mistake when you named a Teams channel? Have you then tried to rename the Channel? If so you will notice that the underlying SharePoint folder is still named incorrectly.
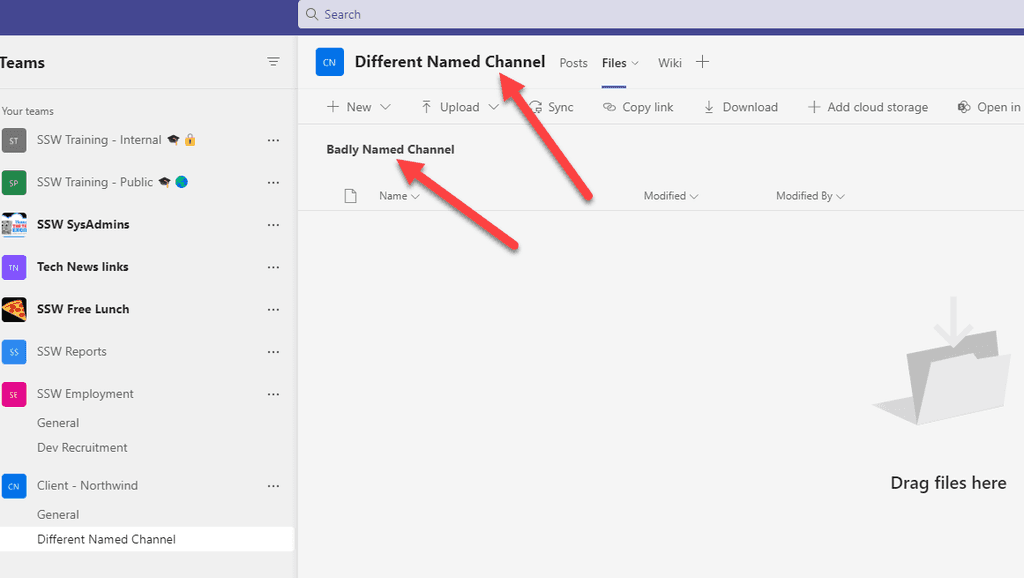
Figure: Unwanted name on channel There is a workaround to rename the folder correctly.
- Rename the Team channel
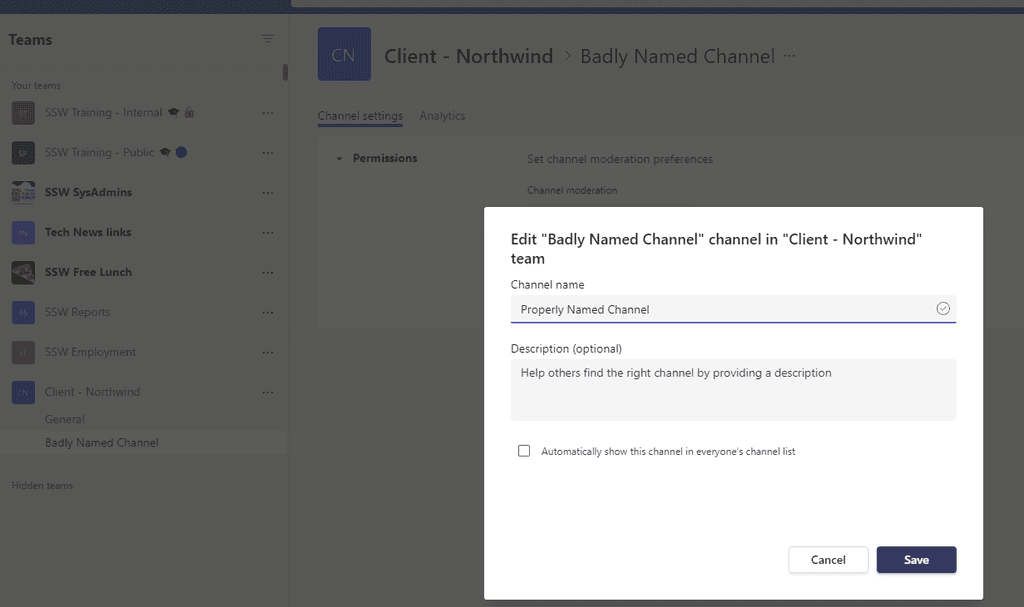
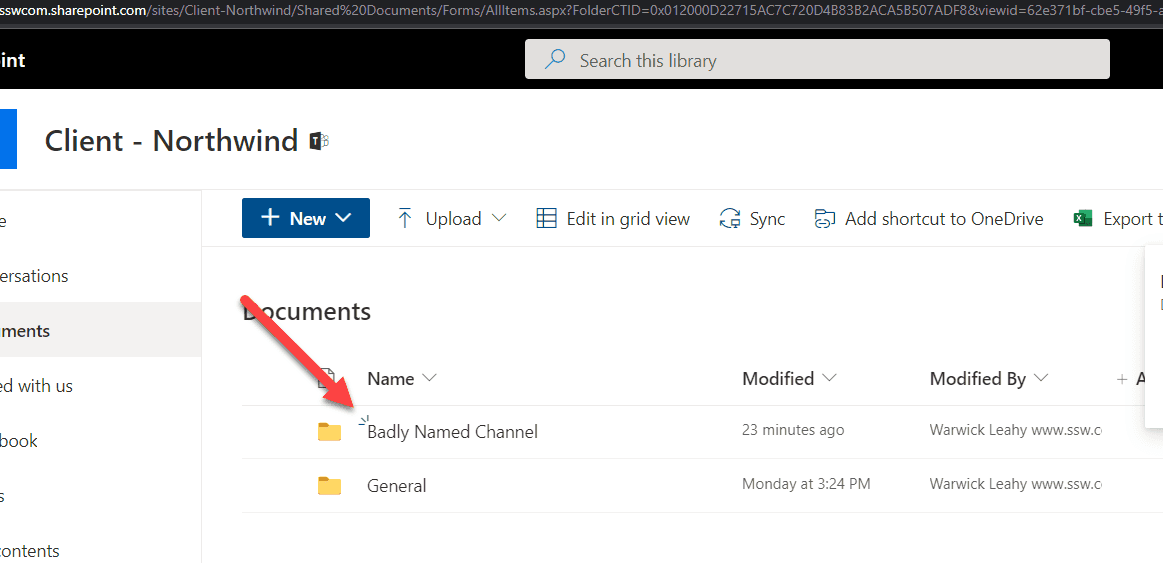
Figure: Renaming the channel Note: This hasn't changed the name of the folder in SharePoint!

Figure: The folder name didn't change yet - Delete the channel
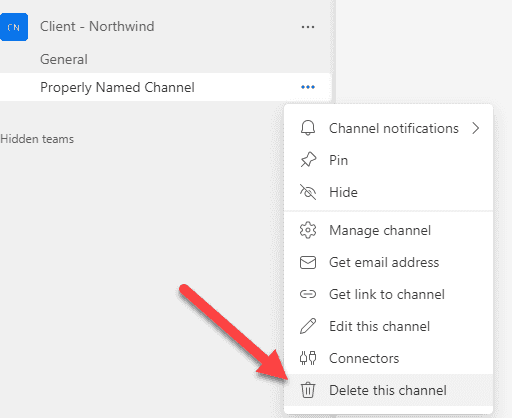
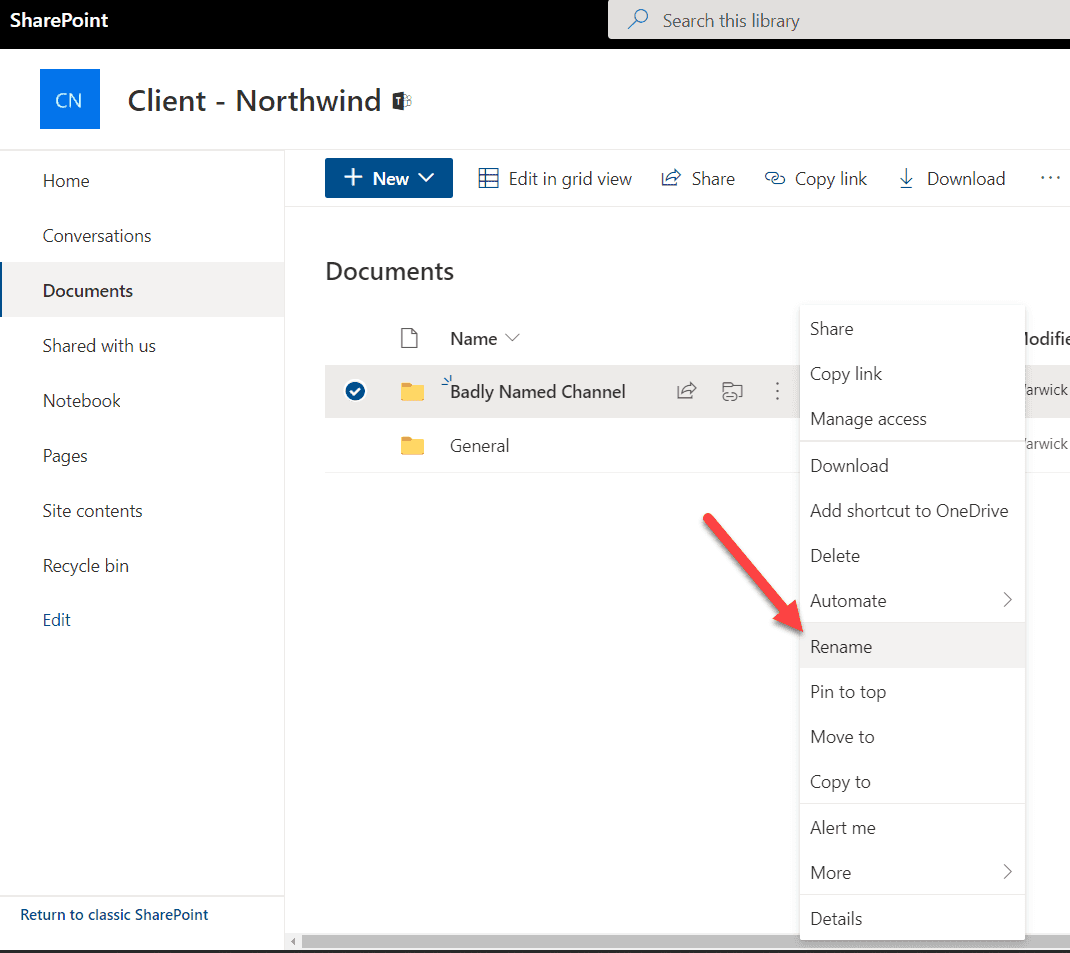
Figure: Delete the channel - Now, in SharePoint, rename the folder
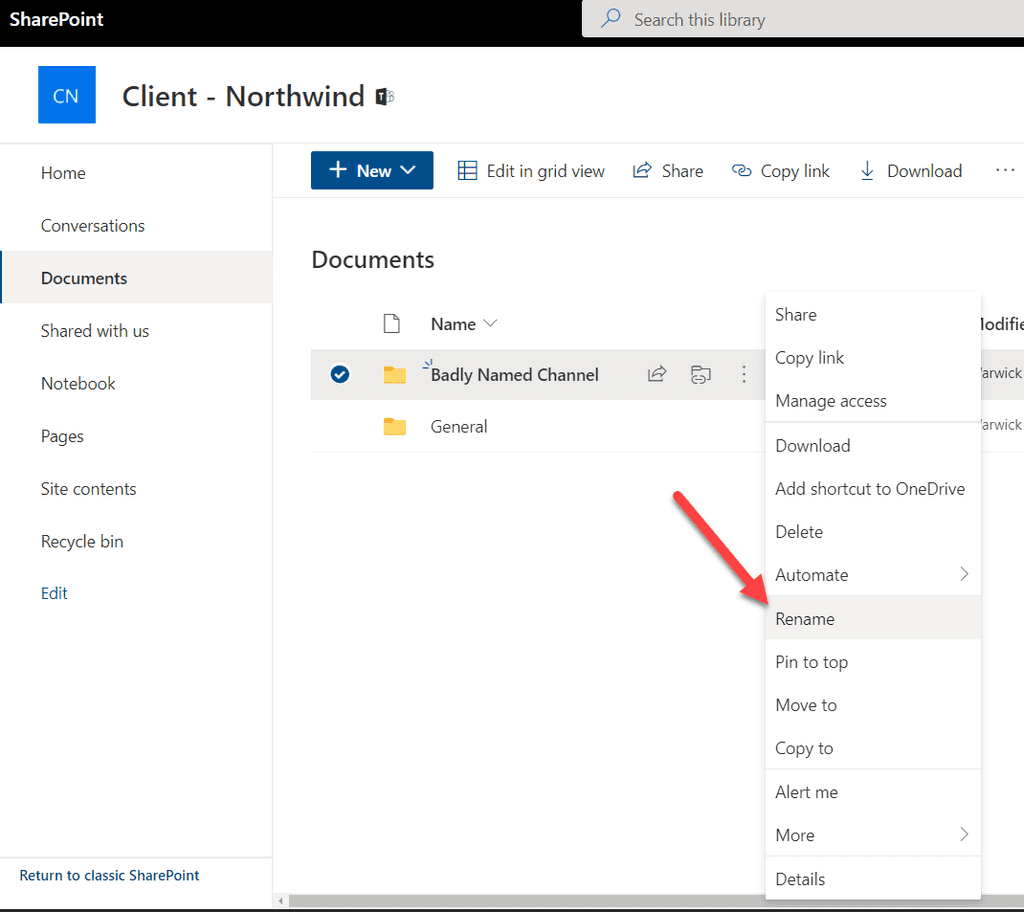
Figure: Renaming the folder in SharePoint Note: Make sure that you rename the folder exactly the same as you named the channel.
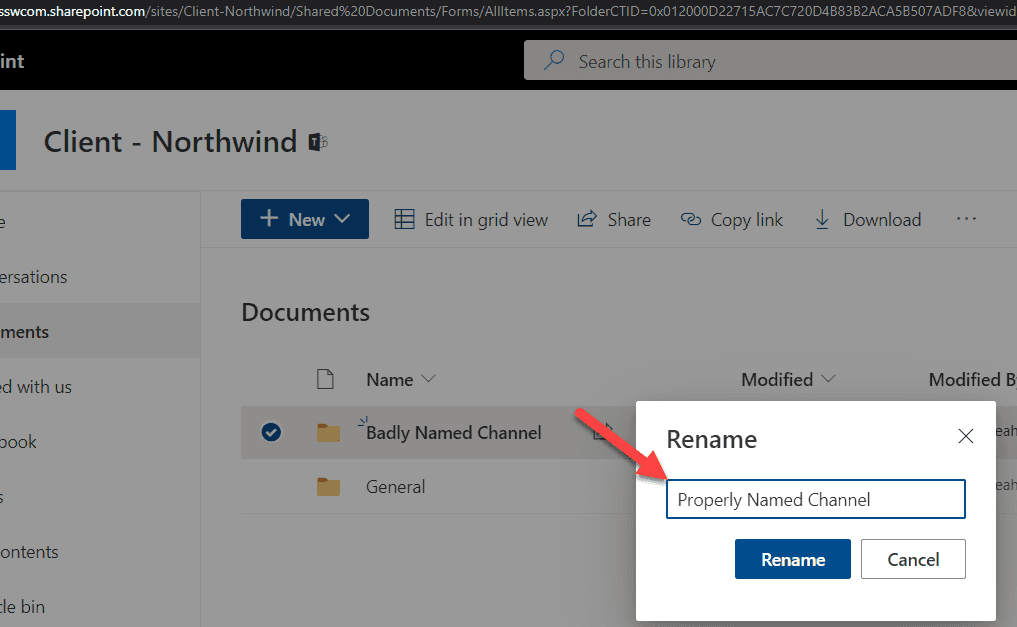
Figure: Make sure the name is the same as the channel -
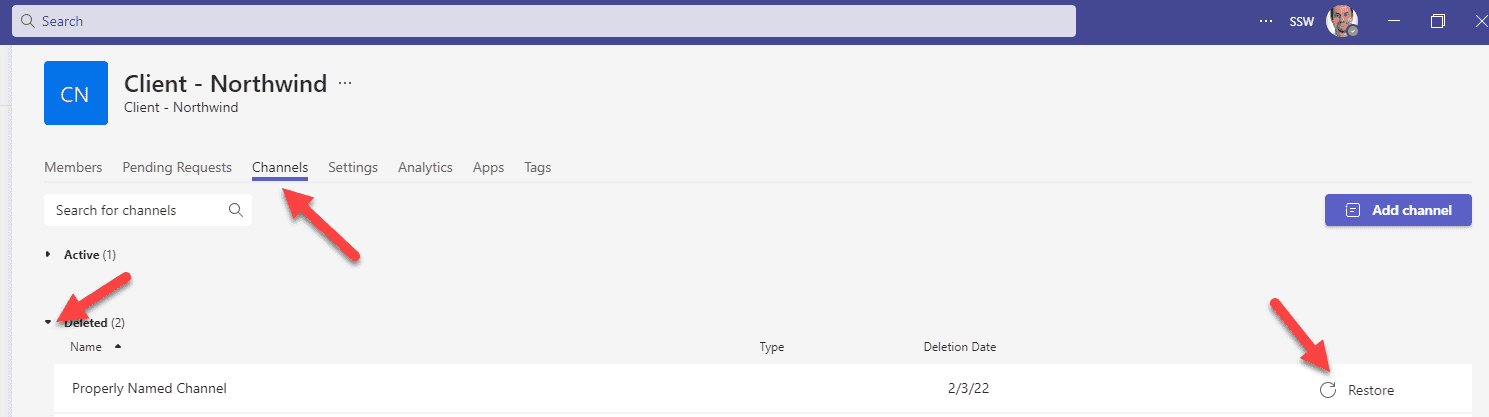
Click the ellipses beside the Team name | Manage Team
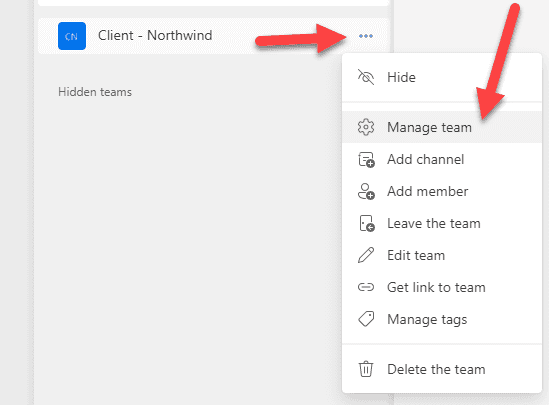
Figure: Manage the Team -
Click Channels | Select the arrow beside deleted | Choose restore beside the channel that you wish to restore

Figure: Restore the channel
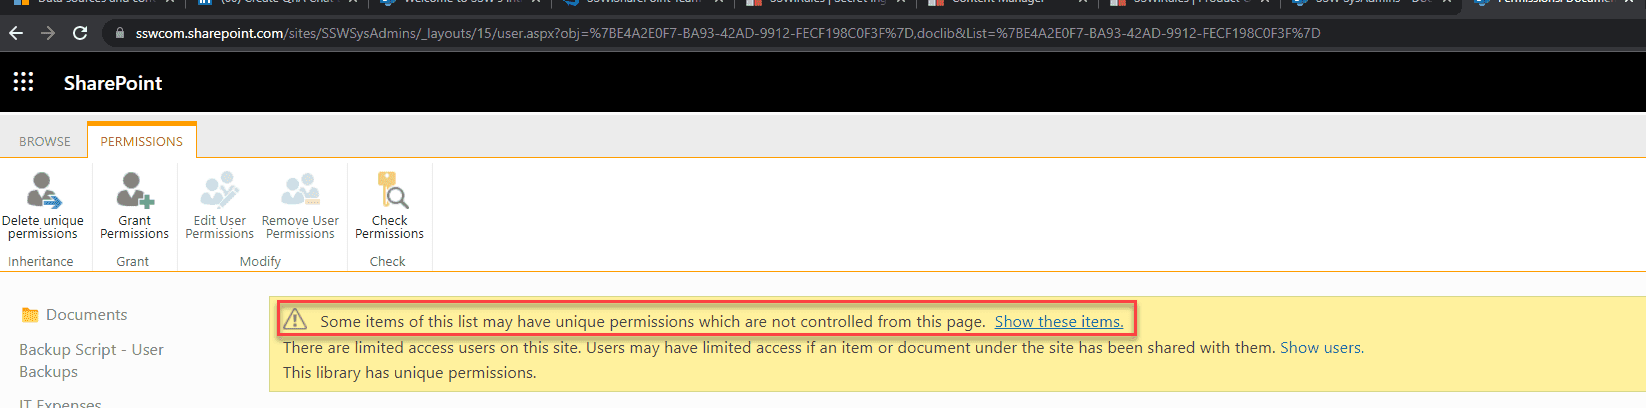
If you are checking your sites permissions regularly you will probably notice a lot of unique permissions being applied.
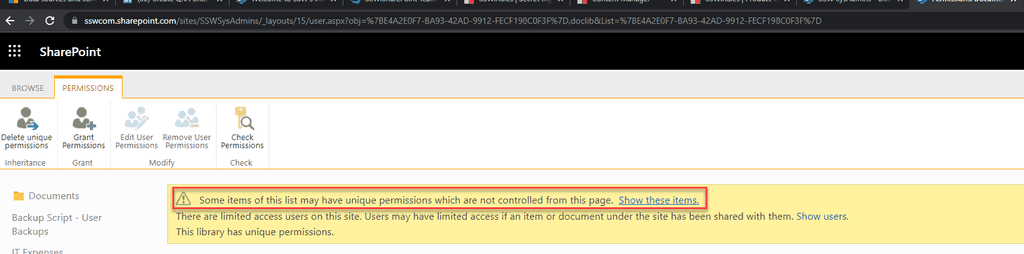
Figure: Some items may have unique permissions The default "Copy Link" setting in SharePoint is usually set to "People from your organization can view this document". This creates a unique sharing link each time it is used, giving people access to the file even if they didn't already.The consequence in SharePoint is that unique permissions are applied to the individual items breaking permission inheritance. It also has performance implications. Links should instead be created with the "People with existing access" setting.
To fix the issue you need to change the default sharing method. There are 2 ways to do this - manually via the GUI or programmatically via PNP.PowerShell.
Method 1 - Manually via SharePoint Admin GUI
- In the SharePoint Admin site select the SharePoint site and click Sharing
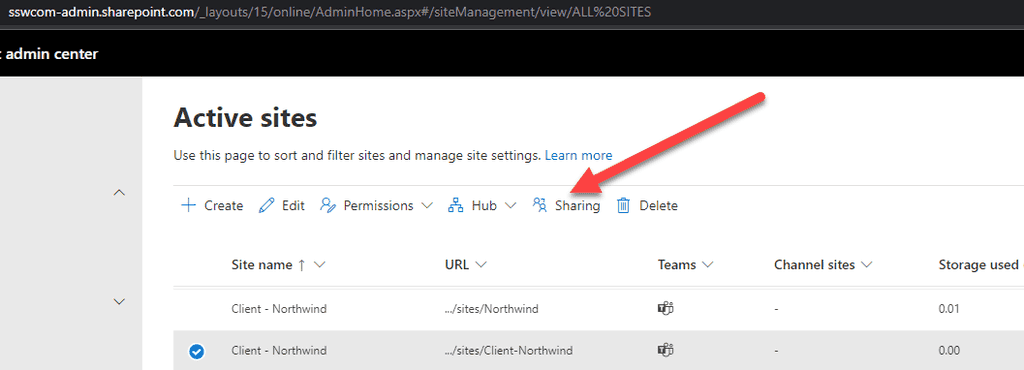
Figure: Select Sharing - Untick same as organization-level setting | Select People with existing access | Click Save
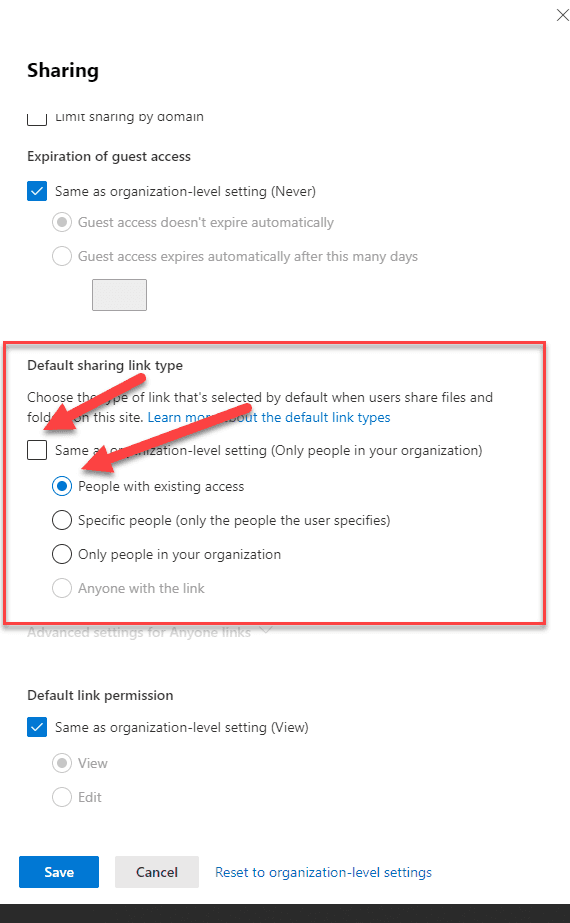
Figure: Select people with existing access - Repeat for each site
Method 2 - Programmatically via PNP.PowerShell
- Run the following PowerShell script to change this default for all sites associated to your SharePoint Hub-Site - This script could be extended to include all sites in your tenant.
#Variables
$AdminCenterURL = "https://sswcom-northwind.sharepoint.com"
$HubSiteURL = "https://sswcom.northwind.com"

#Connect to PnP Online
Connect-PnPOnline -Url $AdminCenterURL -Interactive

#Get the children of the main HubSite
$Hub = Get-PnPHubSiteChild -Identity $HubSiteURL

foreach ($Url in $Hub)
{
    #Remove the "Same as organization-level" setting. Can be set to anything Internal, None or Direct.
    Set-PnPTenantSite -Url $Url -DefaultSharingLinkType Internal

    #Set the Default Link type to be Existing Access
    Set-PnPTenantSite -Url $Url -DefaultLinkToExistingAccess $true
}
Figure: PowerShell to change default link sharing behaviour that affects security
- In the SharePoint Admin site select the SharePoint site and click Sharing
It's important for all your SharePoint Sites to be as consistent as possible. This helps users' navigation through new pages as they know exactly where to look.
Following these simple rules makes this really easy:
- Put your preferred navigation in the same place (usually on the left-hand side)
- Keep the headings consistent
- Use icons for each type of link, so users easily know what to expect when clicking on a link (E.g. A Microsoft Word document is going to open a Word document) Aldo, a link to "Home" looks the same on every page.
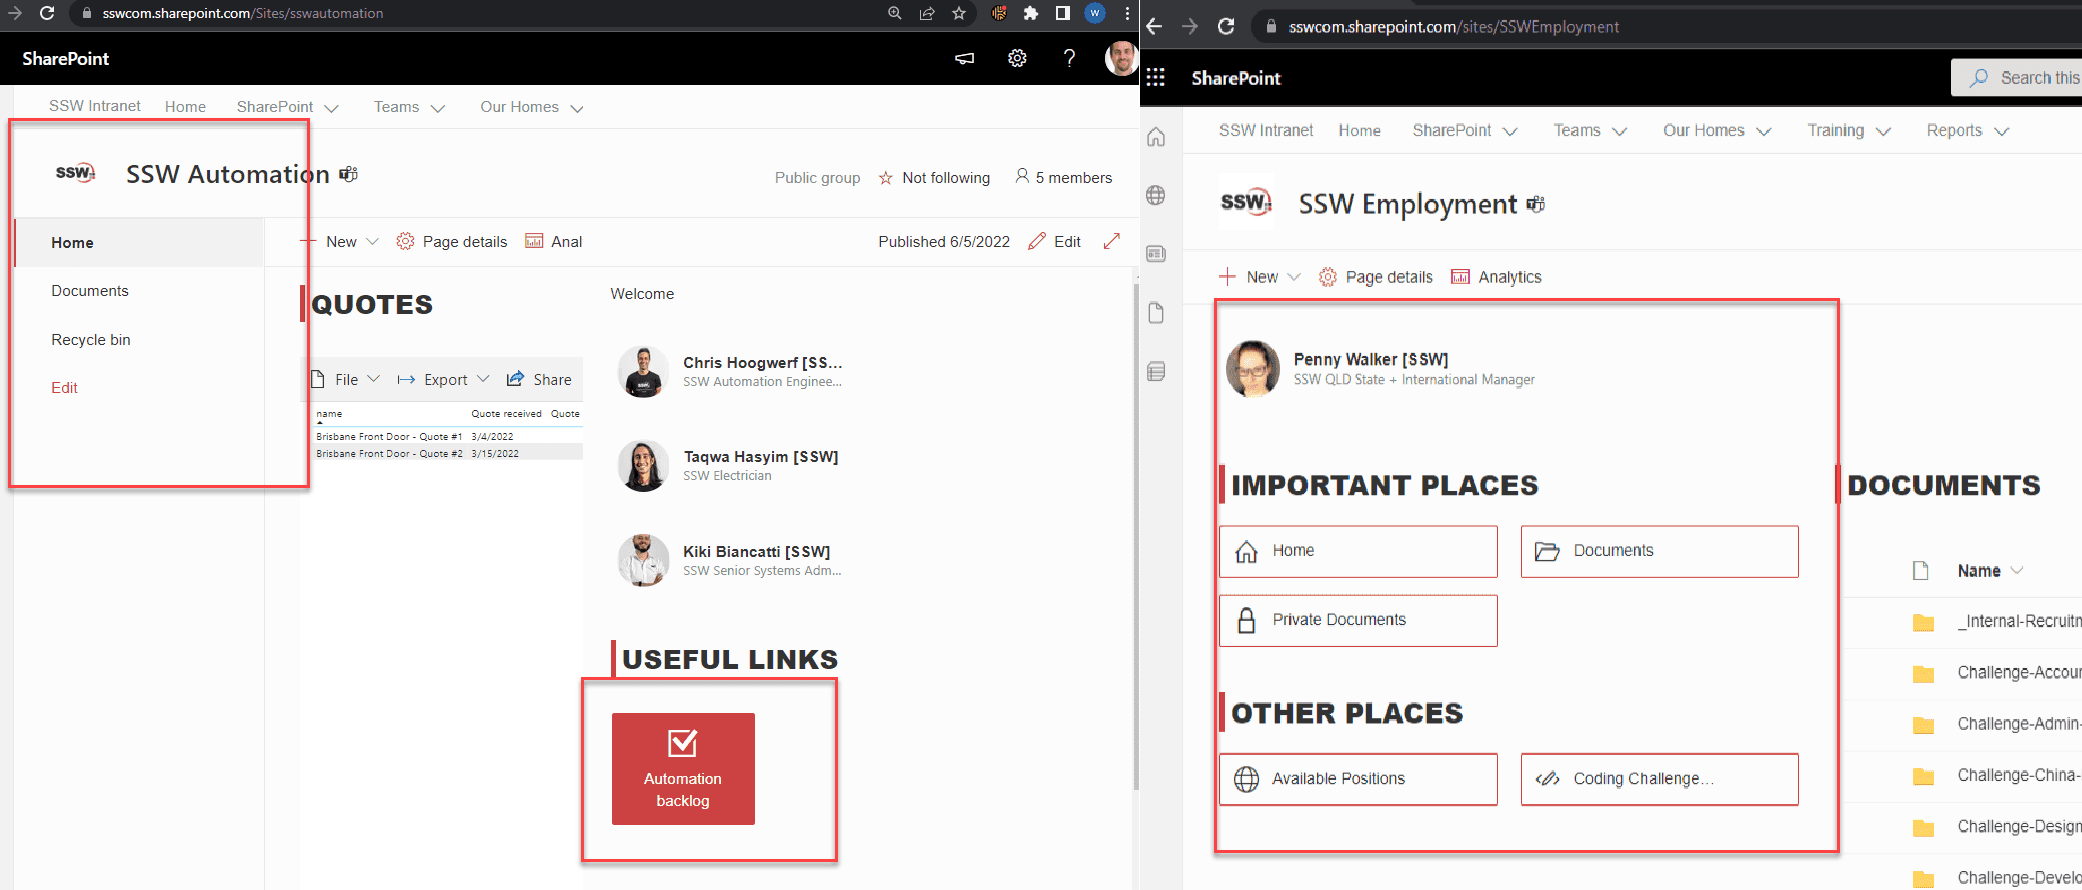
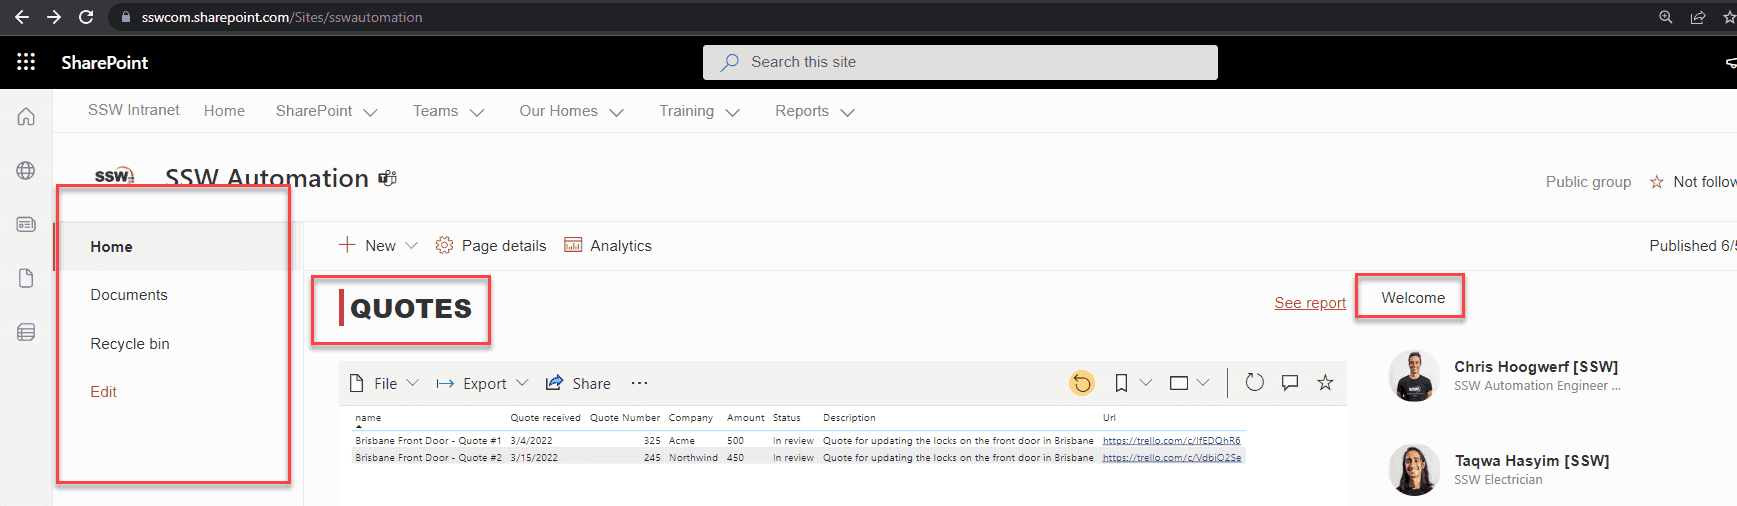
Navigation consistency between pages
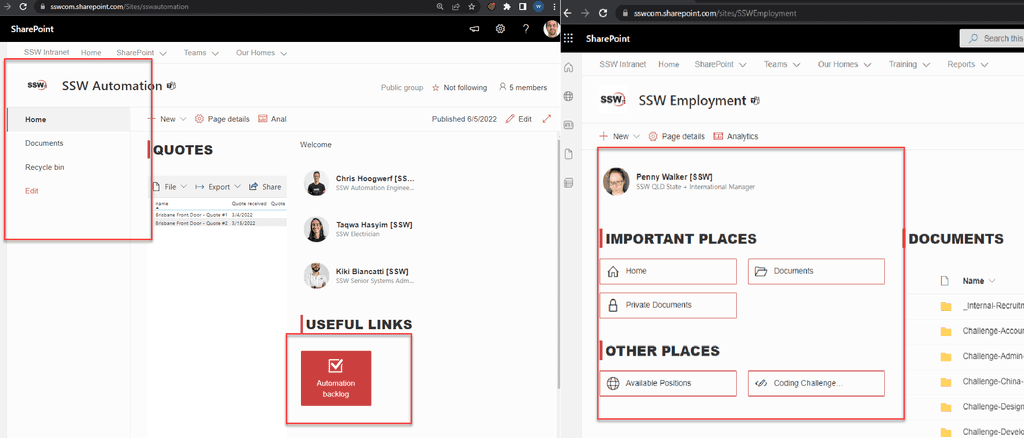
Figure: Bad example - The page on the left has totally different navigation to the page on the right 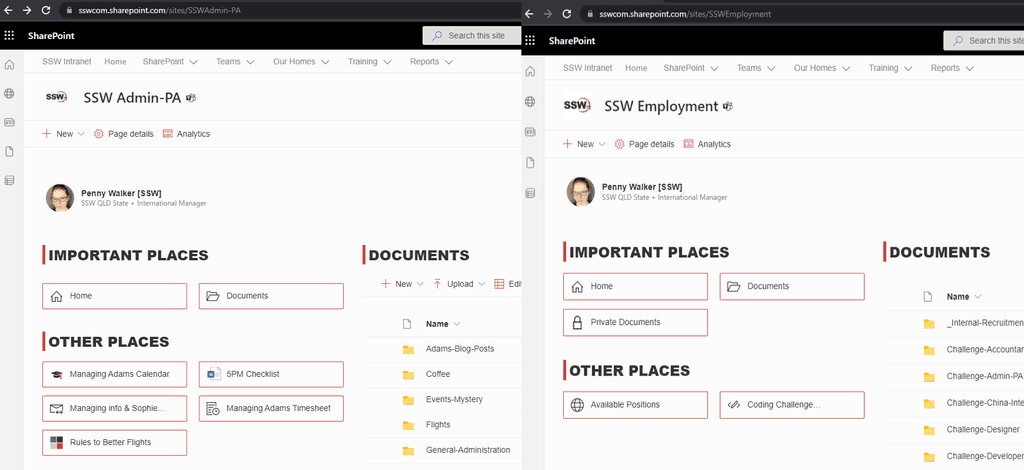
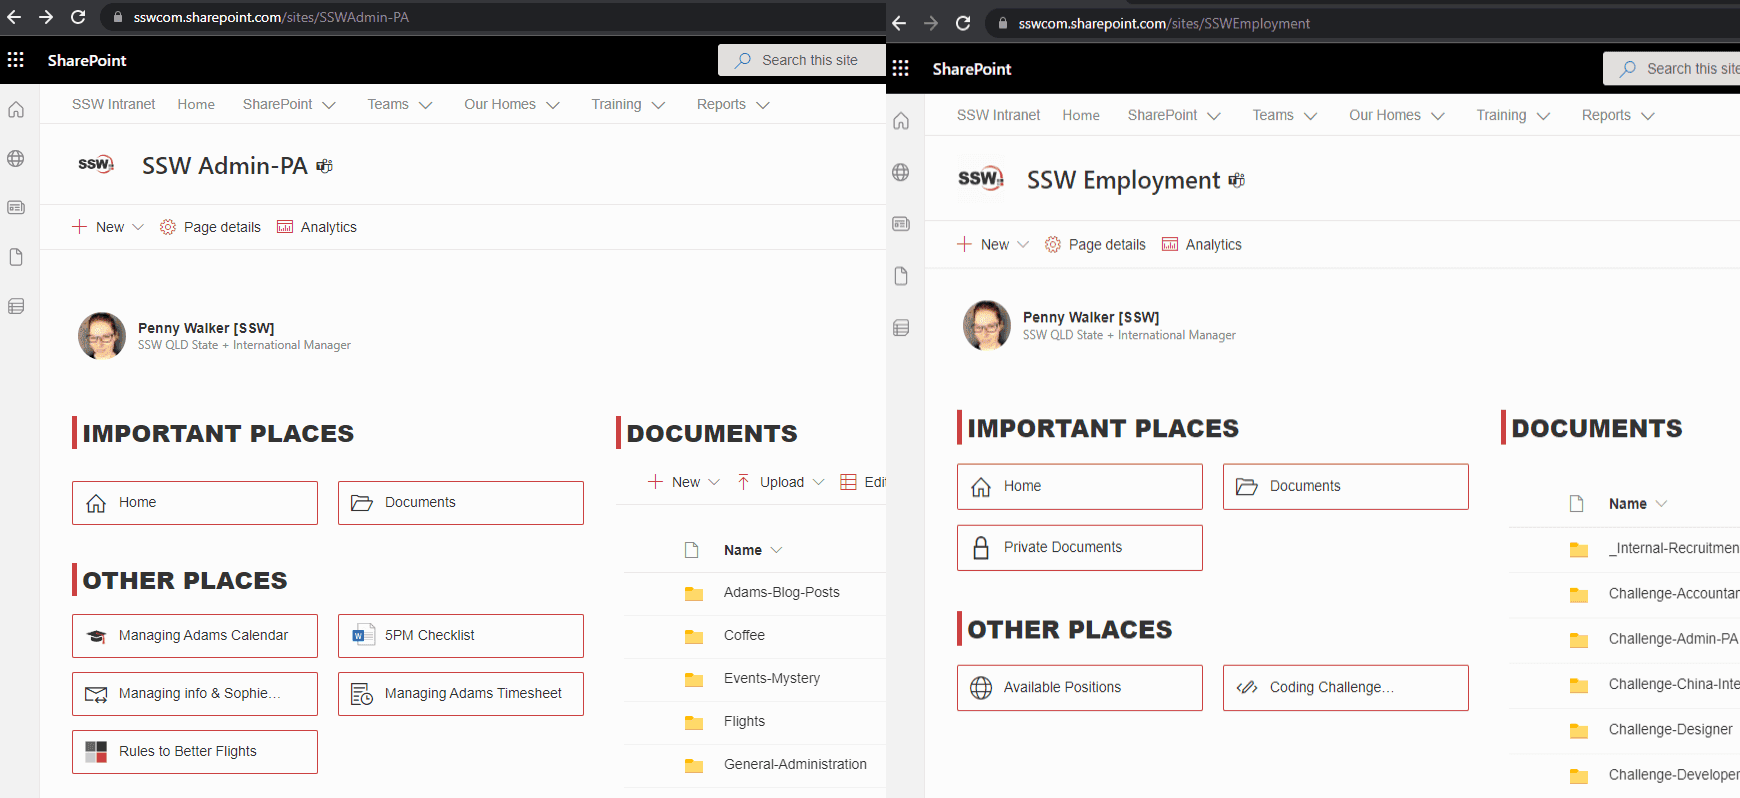
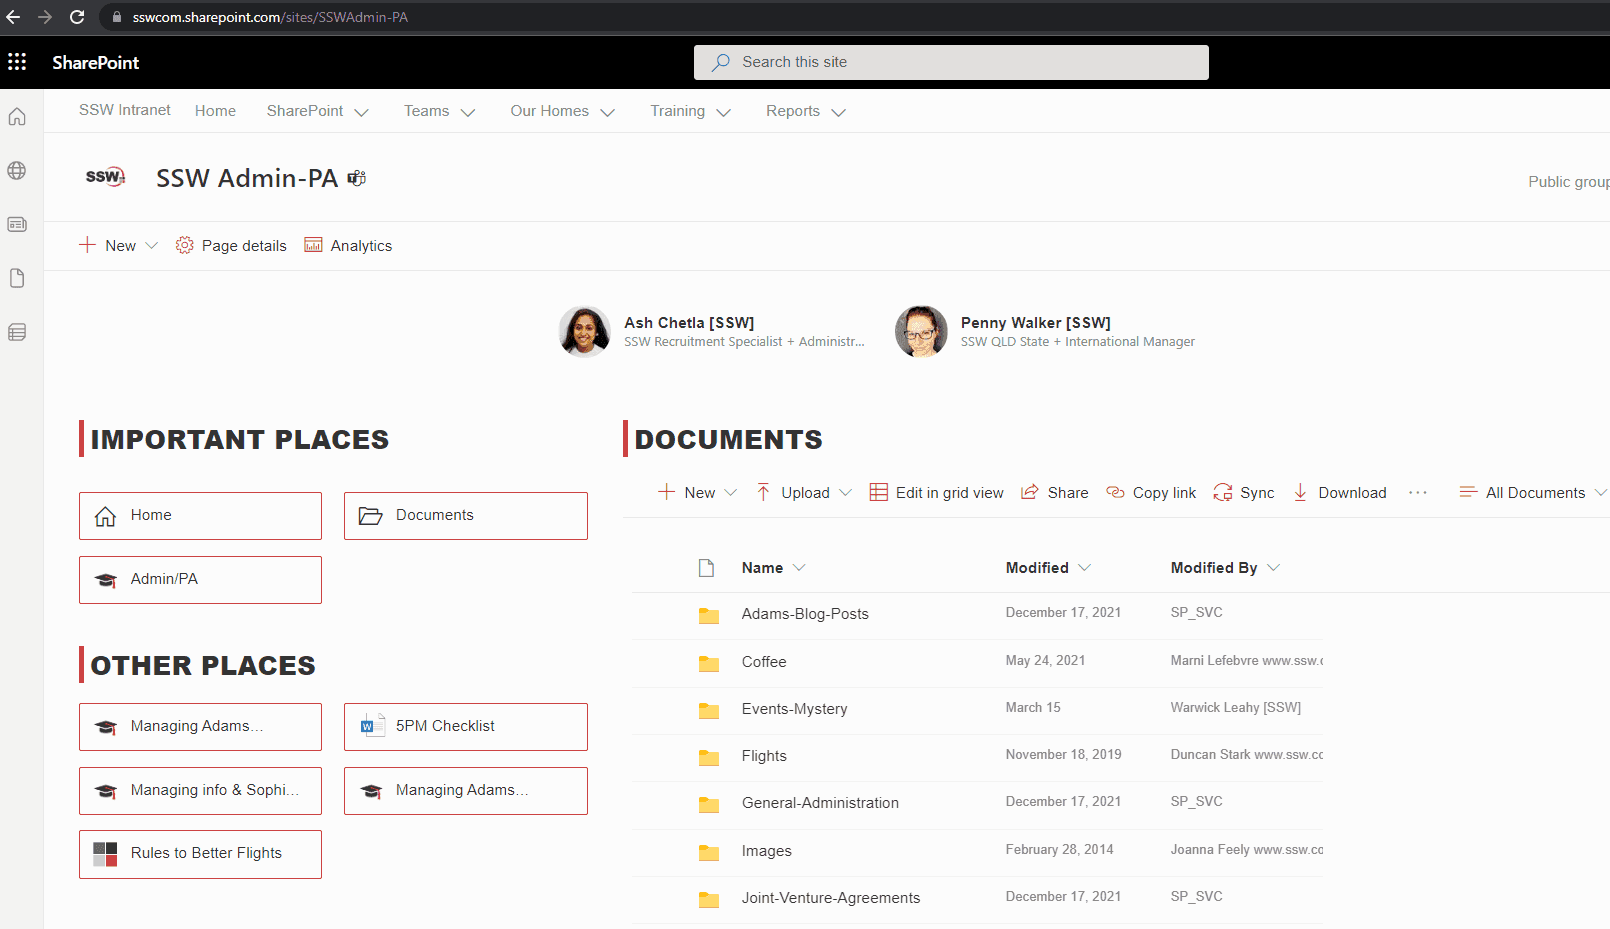
Figure: Good example - Both pages looking consistent - common navigation elements in the same spot Headings and icons consistency within a page
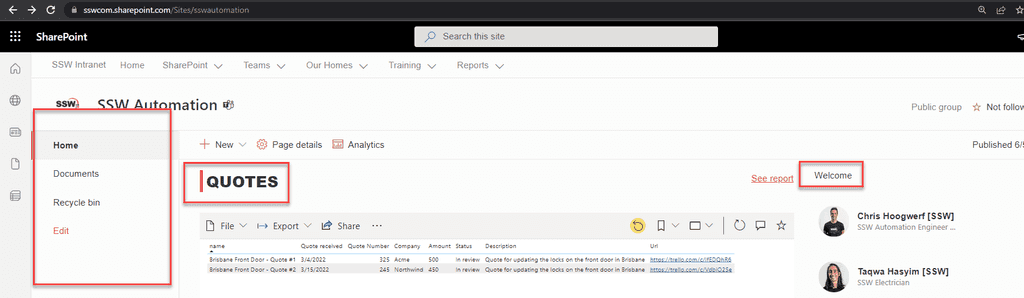
Figure: Bad example - There are no icons to help users on the left navigation + the headings are the different 
Figure: Good example - Icons help users to know what files each link open on the left navigation + the headings are the same One of the annoying things with SharePoint document and page libraries is that users often accidentally leave checked out files, that prevents others from modifying them.
Suggestion to Microsoft: send an email to the user to remind them they have outstanding checkouts potentially blocking other users.

Figure: Here Greg Harris has not checked in a file There are 2 ways to remind users of their "checked out files":
- Solution A: Use Powershell scripts (see PNP.github.io sample)
- Solution B: Custom application report (Includes some low-code work) E.g. SSW.Dory
Solution A. Powershell scripts
- Create a new PowerShell Script
#Config Variables
$SiteURL = "https://crescent.sharepoint.com/sites/marketing"
$CSVFilePath = "C:\Temp\CheckedOutFiles.csv"

#Connect to PnP Online
Connect-PnPOnline -Url $SiteURL -Credentials (Get-Credential)

#Get all document libraries
$CheckedOutFiles = @()
$DocumentLibraries = Get-PnPList | Where-Object {$_.BaseType -eq "DocumentLibrary" -and $_.Hidden -eq $False}

#Iterate through document libraries
ForEach ($List in $DocumentLibraries)
{
    Write-host "Processing Library:"$List.Title -f Yellow

    #Get All Checked out Files of the library
    $FilesCheckedOut = Get-PnPListItem -List $List -PageSize 500 | Where {$_["CheckoutUser"] -ne $Null}

    #Collect data from each checked-out file
    ForEach ($File in $FilesCheckedOut)
    {
        $CheckedOutFiles += [PSCustomObject][ordered]@{
            Library         = $List.Title
            FileName        = $File.FieldValues.FileLeafRef
            CheckedOutTo    = $File.FieldValues.CheckoutUser.LookupValue
            Location        = $File.FieldValues.FileRef
        }
    }
}
#Export Checked out Files data to CSV File
$CheckedOutFiles
$CheckedOutFiles | Export-Csv -Path $CSVFilePath -NoTypeInformation
To run the script against your entire tenant, see PNP.github.io sample
- Run the PowerShell script
- Go chase after the users.
Solution B. Custom application report (Includes some low-code work)
Learn more: SSW.Dory
To make reminding users easier, we have created a Power Automate flow called SSW.Dory that will find checked out files and send out a notification email to all the naughty people automatically every day.
To: Dave Subject: SSW.Dory | 🔷 SharePoint files need your attention Hi Dave,
You currently have the following pages checked out in SharePoint:
- {{ LIST OF URLS }}
- If you are no longer editing these files, check them in!
Note: You should check in at least daily, as per rule SSW.Rules | Do you confirm there is no checked out data?. - Reply to this email with something like:
‘Done - x files checked in’
Note: See all files you have checked out at {{ LINK TO CHECKED OUT LIST }}
-- Powered by Power Automate, Job: SSW.Dory
Figure: An example of the reminder email that all users receive
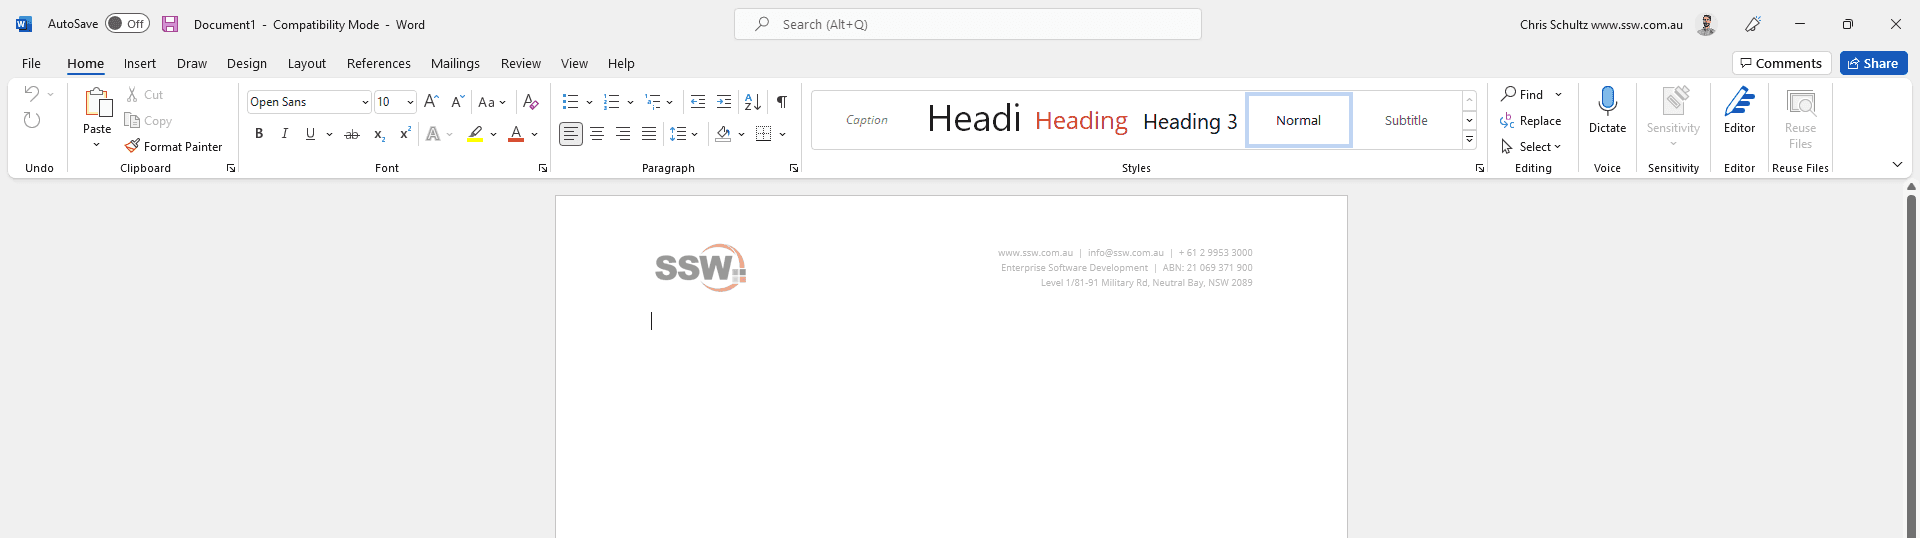
In the past, Wiki pages were a great way to store content in SharePoint. These days, with advancements in browser and smartphone capabilities, Word Documents are a better place to store content.
Many articles, like this one from 2017, talk about the benefits of using Wiki Pages over Word Documents - however, these benefits are no longer relevant.
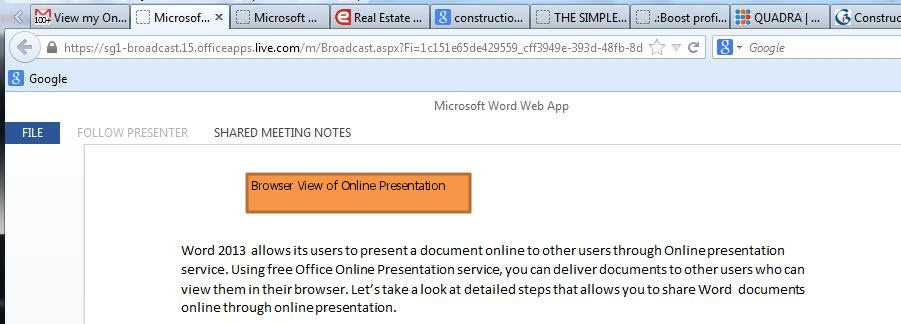
Figure: We've come a long way since Word 2013 Online Presentation Let's have a quick look at some of the points that the article above used:
Accuracy - It's easy to see the Modified date of documents in SharePoint, so you can tell if the Document is the most current one (of course, it should be the only one).
Load Time - In the past, this was an issue. These days, browsers have no problem loading Word Documents.
Mobile - Mobile browsers also do a pretty good job of opening Word Documents, and there are the Office and OneDrive apps to make it even easier.
Note: If you want to create an actual Wiki within SharePoint, Modern Pages may be the way to go - but for general content, Word Documents are best.
Advantages of Word Documents
- One main advantage of Word Documents is the editing capabilities – most people are familiar with the rich document editing features of Word. Documents can be created in the desktop app as it has the most editing capabilities, and can be easily edited in the web version - which is still very good! The SharePoint wiki page editor has fewer features, and can be harder to use.
Limited SharePoint formatting 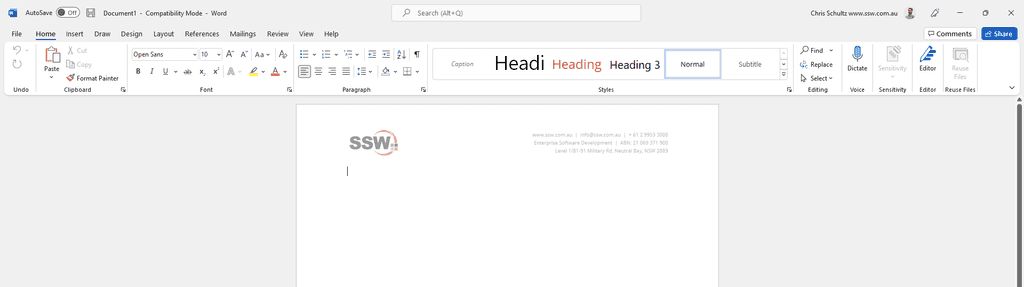
Microsoft Word's well-known, feature rich formatting options - Versioning is one of SharePoint's strongest features - and it works really well with Word Documents.
- Many people are using Microsoft Teams, and storing files in there - sometimes not using SharePoint at all. While Teams still uses SharePoint in the backend, it is much easier to browse through Documents than link and view Wiki Pages.
Figure: Browsing files in Teams - OneDrive allows you to sync files from SharePoint libraries to your computer. This is very useful if you need offline access, or if users prefer to work from files within File Explorer in Windows, or Finder on macOS. This works really well with Word Documents, but is not possible with wiki pages.