Team Foundation Server (TFS) is the fully integrated solution to manage projects, giving developers, testers and management a single source of truth for all project needs.
Project Managers and stakeholders will love
TFS's integration with code/SQL/SharePoint which provides a dashboard with project reports, giving them greater visibility of the project status and burn down lists
The easily customization of the data using Excel Web Services
Developers will love
TFS 2010 for the SQL and SharePoint Server Explorer and the integration of viewing, creating and deploying
That they don't have to try to interpret a bug report from a tester, and then they have to reproduce it. Why? Because of Intellitrace, which allows you to double click and open to the exact line of code with the variables set.
Seamless source control
No waiting for compiling and tests to run. The integration with the build server (continuous integration) is the biggest productivity boost you can give a developer
SharePoint Wiki
Testers will love
The many ways of automating their manual tests via:
Web tests
Performance tests
And the jewel in the crown, Coded UI Tests
The fact they never have to spend time reproducing a bug before documenting it
And it gets better, they don't have to document it because testing tools recorded what they did
Later on, when they decide to go with Lab Manager they will never spend time setting up that special environment (say running windows 95 and IE6)
Team Foundation Server (TFS) is the fully integrated solution to manage projects, giving developers, testers and management a single source of truth for all project needs.
In ASP.NET deployment is a simple xcopy. Or you can right click the website project and "Publish website" in Visual Studio.
Figure: Publish website in Visual Studio
In SharePoint the way to deploy a set of changes is via a solution package.
SharePoint provides additional layer and infrastructure on top of ASP.NET - part of this layer is the support for administrators (who may not be developers) to quickly add, remove, activate and deactivate features across a SharePoint site farm.
These are awesome features and something that basic ASP.NET does not have, but it does add additional development overhead to build the solution packaging.
You need to create such a package via VSeWSS (or a similar tool such as WSP Builder)
Add entries for all the files you want to include in the package
Update and get the latest version of the files from development SharePoint or TFS
Compile the package into a WSP file (which is a cab file)
Test the package on a staging server
Deploy it on a production server
In ASP.NET deployment is a simple xcopy. Or you can right click the website project and "Publish website" in Visual Studio.
In ASP.NET - Typically, the team will store the code on a source control system such as TFS (Team Foundation Server), check it out to their own local system, develop and test locally then check it back into source control for sharing.
In SharePoint - SharePoint comes with its own document control and version history out of the box. This is great for collaborating between developers and designers, but isn’t available for everything.
Differences - Unlike TFS, SharePoint does not support multiple check-out so each file can only be checked out to one person at a time. The modification must be checked back into SharePoint.
We think the following are best tracked on a development SharePoint server:
Master page
Page Layouts
XSL
CSS
And these should not (or cannot) be version controlled on SharePoint server:
Low level customizations such as custom web parts should still be developed in VS.NET and stored in TFS
Package files to build solution packages should be stored in TFS
In ASP.NET - Typically, the team will store the code on a source control system such as TFS (Team Foundation Server), check it out to their own local system, develop and test locally then check it back into source control for sharing.
In SharePoint - SharePoint comes with its own document control and version history out of the box. This is great for collaborating between developers and designers, but isn’t available for everything.
Differences - Unlike TFS, SharePoint does not support multiple check-out so each file can only be checked out to one person at a time. The modification must be checked back into SharePoint.
This is the number one, and most important rule in working with InfoPath.
Always go for the lowest common denominator. It sure beats realizing half way later that your form can't be hosted on SharePoint InfoPath Forms Services!
This is the number one, and most important rule in working with InfoPath.
Always go for the lowest common denominator. It sure beats realizing half way later that your form can't be hosted on SharePoint InfoPath Forms Services!
SharePoint allows you to create a Data Connection Library to hold all the connection information that Forms and Excel services can utilize.
You should always use a Data Connection Library.
Data Connection Library provides a central location for defining all the connections to various data sources within your company.
It allows you to change the data source definition in one place, without having to worry about changing the same definition in 50 forms and excel spreadsheets.
A centralized data connection library also helps your users to locate data easily.
Your users don't want to know the intricate details on how to get a particular data - they just want the data and have the form working! So if you as the administrator provides it for them, they will love you, they will use it, and you will have an easier time managing your SharePoint site!
Everyone wins!
SharePoint allows you to create a Data Connection Library to hold all the connection information that Forms and Excel services can utilize.
ASP.NET 3.5/4.0 library references – this is necessary for all the ASP.NET AJAX calls
Add system.web/pages/controls – to add additional tag prefix from System.W eb.Extensions
Add HttpModule (for example – to clean up extra JavaScript from SharePoint)
SafeControl tags for all custom dlls – in general these can be added via your solution package as well
You should always use a SPConfigModification class to modify your web.config – never tell your user or administrator to make changes manually! This also allows them to switch off a feature from SharePoint knowing that the changes had been reverted.For developers – you must test your SPConfigModification carefully, mismatched XPath will cause problems in your web.config and create duplicate entries!
In SharePoint, web configuration includes:
ASP.NET 3.5/4.0 library references – this is necessary for all the ASP.NET AJAX calls
Add system.web/pages/controls – to add additional tag prefix from System.W eb.Extensions
Add HttpModule (for example – to clean up extra JavaScript from SharePoint)
SafeControl tags for all custom dlls – in general these can be added via your solution package as well
ASP.NET is file system driven, whilst SharePoint is database driven. All SharePoint content and meta data comes from a database, including images, HTML, Master Page, etc. SharePoint provides a framework where components can be plugged in, and as a result these areas are improved out-of-the-box:
Security model, membership, permissions.
The UI framework becomes relatively consistent.
Menus, navigation, and site maps.
Administration of access i.e., site owners can change permissions for that site – without the need for administrators.
Deployment model is very different:
ASP.NET has MSI file or XCopy deployment – individual server.
SharePoint deployment is via Solution Package – but goes cross-site farms.
Deployment is both declarative in (XML format), as well as in code with Feature and Event receivers.
Tools:
ASP.NET is mostly done in Visual Studio .NET.
SharePoint development is split among:
Internet Explorer – SharePoint configurations (note: non-IE browsers remain 2nd level and isn’t as good as IE with SharePoint)
Microsoft SharePoint Designer – SharePoint HTML page design and customization
Visual Studio .NET – custom web parts, custom workflows, solution packages
SharePoint designer can silently reformat your code and introduce errors.
If you modify any master page or page layout file with SharePoint designer, it becomes customized. This means that SharePoint is now looking at a customized version stored in the database rather than the version on the file system. You then can't deploy future changes, because SharePoint will now always serve the customized version instead of the ghosted version in the solution package.
This is to prevent their work affecting other developers. During development, you can expect many of these things to happen:
IIS resets may need to be done frequently, which stops the SharePoint website working.
Custom web parts can easily introduce memory leaks which can stop SharePoint working.
You may be running development SharePoint in debugging mode which would hold the server thread.
You may be reading event or error logs that are being polluted by other developers simultaneously.
Thus, all SharePoint customization and development must be done on a Virtual Machine. No ifs, no buts.
It's very important to correctly setup a SharePoint environment for development. Correctly configured, this will save you a lot of trouble later on.
From time to time, you can seriously screw/damage a SharePoint installation during development and it is best not to install SharePoint on your day-to-day machine.
Additionally, when you start a new SharePoint project you don't want to carry all the baggage from previous customizations that could potentially affect your new project.
There are many other benefits of using a virtual machine for development
Virtual machines can be fired up and shut down easily
Virtual machines can run faster, via being located on a different server and thus it doesn't waste developers' own computer resources
Virtual machines can be copied and brought to a client for demonstration or testing
They are the best way to quickly test or experiment with something new
Virtual machines can frees up resources on the host, so it doesn’t waste resource when developers are not working on SharePoint
Virtual machines can be easily cloned to scale up the development team
Virtual machines enable developers to work in Windows Server 2003 / 2008 environment so they will be aware of the configuration issue when deploying to staging and production
There are few considerations when using Virtual Machines:
Need to activate additional servers
Need at least 2 GB of RAM for SharePoint 2007
Need at least 4 GB of RAM for SharePoint 2010
Virtual PC does not support 64 bit Operating Systems
If you’re using Windows 7 or Vista, we recommend using ‘boot to VHD’ or VMWare
If you are after a clean, pre-configured SharePoint server image to test SharePoint, the easiest way is to download a trial VM from MicrosoftTip:More info on setting up SharePoint VM
This is to prevent their work affecting other developers. During development, you can expect many of these things to happen:
IIS resets may need to be done frequently, which stops the SharePoint website working.
Custom web parts can easily introduce memory leaks which can stop SharePoint working.
You may be running development SharePoint in debugging mode which would hold the server thread.
You may be reading event or error logs that are being polluted by other developers simultaneously.
Thus, all SharePoint customization and development must be done on a Virtual Machine. No ifs, no buts.
It's very important to correctly setup a SharePoint environment for development. Correctly configured, this will save you a lot of trouble later on.
From time to time, you can seriously screw/damage a SharePoint installation during development and it is best not to install SharePoint on your day-to-day machine.
Additionally, when you start a new SharePoint project you don't want to carry all the baggage from previous customizations that could potentially affect your new project.
Microsoft SharePoint Technologies is built on top of ASP.NET technologies. In particular, MOSS 2007 is based on ASP.NET 2.0, SharePoint 2010 is based on ASP.NET 3.5, SharePoint 2013 is based on ASP.NET 4.
This means that there are many skills that an ASP.NET developer already has that can be translated to SharePoint directly.
Master Pages – SharePoint uses master pages
Site Map – SharePoint uses the ASP.NET site map provider model and comes with many additional customized site map providers out of the box
Menu – SharePoint uses ASP.NET menu controls, powered by site maps
Page Control Lifecycle – the same key fundamental knowledge for ASP.NET is also necessary when making custom SharePoint development
Web.Config – like ASP.NET – many SharePoint configuration is done in the Web.Config – though SharePoint provides web UI to modify many of these options from Central Administration
.NET – Your .NET skills are definitely not going to go away
IIS – Each SharePoint web application is a “Site” in IIS, the site bindings are also identical
Microsoft SharePoint Technologies is built on top of ASP.NET technologies. In particular, MOSS 2007 is based on ASP.NET 2.0, SharePoint 2010 is based on ASP.NET 3.5, SharePoint 2013 is based on ASP.NET 4.
Development for a SharePoint solution is always risky and may involve bringing down the server from time to time. So we always customize and develop SharePoint solutions on a separate development server. But when your development is done, do you know how to deploy your changes to the staging and eventually the production server?
The Bad method
The naïve and bad method would be to just back up the entire content database, then copy the database backup to the destination server, and restore it there.
Any additional content at the destination server is wiped out – no content editing can continue while the development work is happening…
Backup file can be extremely large as it includes version history and a lot of extra fat, the file can easily be over a few hundred megabytes!
Deployment via backup and restore is not a Microsoft supported operation
The Good method
The better method is to build a feature or solution deployment package
Build a VSeWSS project for package and deployment
When built, this will produce a wsp file (this is a cab file) that can be deployed as features on the destination server
A few considerations for this approach:
Site definitions, list definitions, layouts and masterpages, static content and webparts can all be deployed this way
User content cannot be deployed this way. Any content will need to be exported and re-imported to move between development, staging and/or production servers.
Development for a SharePoint solution is always risky and may involve bringing down the server from time to time. So we always customize and develop SharePoint solutions on a separate development server. But when your development is done, do you know how to deploy your changes to the staging and eventually the production server?
When working on packaging SharePoint artefacts into Features & Solutions, you should always make small incremental changes to your VSeWSS projects. Each time you should build & deploy to check you haven't broken anything.
You should regularly make labels in TFS so you can quickly compare your changes against previous working versions to identify problems.
CAML is the XML definition for all things in SharePoint, in deployment, and in creating templates, CAML is the only format.In SharePoint development, you will also need to know CAML, in particular, how to write a query in CAML.
SharePoint is not good at telling you if you made a mistake with your CAML query.
Figure: Debug error message
Hard to debug.
Tip: Use 3rd Party tools - U2U CAML Query Builder
Figure: U2U CAML Query Builder
Note: U2U CAML Builder is the best tool that we have. There are some occasional UI and interface issues, but for creating CAML and testing it against live SharePoint lists it gets the job done. And it’s free!
CAML is the XML definition for all things in SharePoint, in deployment, and in creating templates, CAML is the only format.
In SharePoint development, you will also need to know CAML, in particular, how to write a query in CAML.
Each time you deploy a new package to your SharePoint site, you should add a new entry in the version list.
This will enable you to quickly find out which version of the package your SharePoint site is using, and let users know what version they are running.
A custom list for Version should be created at the root level of a SharePoint site collection, and each time a package is deployed - a new record should be added to this version list.
A simple blank page with a Content Query Web Part can display this versions list in a friendly manner.
We do not change the version numbers in the .NET Assembly because the assemblies have to be strong-name signed and deployed to the GAC. So having a versions list is crucial in working out what version of your package is deployed on which server.
Each time you deploy a new package to your SharePoint site, you should add a new entry in the version list.
This will enable you to quickly find out which version of the package your SharePoint site is using, and let users know what version they are running.
SharePoint comes with some very basic workflows out of the box. A particular example is the content approval workflow.
When a content approval workflow is used, it modifies the process of publishing content to be:
User clicks publish (click 1)
Workflow starts, and asks the user to request for approval, there’s an option to add additional messages (click 2)
The workflow sends an email to the user to tell him an approval workflow has started. (email 1)
The workflow also sends an email to the approver(s) (email 2)
The approver receives an email, then returns to the page – they can Approve or Reject the workflow. (click 3)
Either way, a new workflow screen appears, with an option to add additional messages, the approver clicks accept (click 4)
The approval workflow completes and publishes the page.
It then sends an email telling the user that an approval workflow has been completed (email 3).
What is the problem?
The out of the box workflow is extremely generic. It has no customizations or shortcuts. Even if you are an approver, you cannot skip any of the steps. The end result is that you will have to click 4 times and receive 3 emails, for approving your own finalized content.
These kind of workflows are designed generic to fit any business’ needs – and in fact, businesses using these out of the box workflows have to adjust their staff’s workflow to match SharePoint’s ones. Which can be counter intuitive.
We think these SharePoint workflows need to be far more customizable.
SharePoint does not provide support for complex reusable workflows easily - most companies go for a 3rd party solution:
Figure: 3rd party tool - Blackpearl Figure: 3rd party tool - Nintex
SharePoint comes with some very basic workflows out of the box. A particular example is the content approval workflow.
When a content approval workflow is used, it modifies the process of publishing content to be:
User clicks publish (click 1)
Workflow starts, and asks the user to request for approval, there’s an option to add additional messages (click 2)
The workflow sends an email to the user to tell him an approval workflow has started. (email 1)
The workflow also sends an email to the approver(s) (email 2)
The approver receives an email, then returns to the page – they can Approve or Reject the workflow. (click 3)
Either way, a new workflow screen appears, with an option to add additional messages, the approver clicks accept (click 4)
The approval workflow completes and publishes the page.
It then sends an email telling the user that an approval workflow has been completed (email 3).
What is the problem?
The out of the box workflow is extremely generic. It has no customizations or shortcuts. Even if you are an approver, you cannot skip any of the steps. The end result is that you will have to click 4 times and receive 3 emails, for approving your own finalized content.
These kind of workflows are designed generic to fit any business’ needs – and in fact, businesses using these out of the box workflows have to adjust their staff’s workflow to match SharePoint’s ones. Which can be counter intuitive.
But there are things that it doesn't do naturally, or it does really badly. Here are some tips on using SharePoint designer well.
Don't use inline CSS - this goes for any website.
Always put <div class="..."> wrappers around SharePoint controls. This allows us to define styles for SharePoint controls. It is possible to use CssClass like ASP.NET, but then we lose control to SharePoint regarding how that control will be rendered. Also, some SharePoint controls will eat up your CssClass and not render anything.
Naming convention for control id! Don't get lazy.
Turn off Auto indent. Otherwise SharePoint designer will keep modifying your file whenever it saves the HTML - this will make you very upset.
Uncheck Auto indent
We love SharePoint designer and use it everyday.
But there are things that it doesn't do naturally, or it does really badly. Here are some tips on using SharePoint designer well.
Don't use inline CSS - this goes for any website.
Always put <div class="..."> wrappers around SharePoint controls. This allows us to define styles for SharePoint controls. It is possible to use CssClass like ASP.NET, but then we lose control to SharePoint regarding how that control will be rendered. Also, some SharePoint controls will eat up your CssClass and not render anything.
Naming convention for control id! Don't get lazy.
Turn off Auto indent. Otherwise SharePoint designer will keep modifying your file whenever it saves the HTML - this will make you very upset.
When a designer (or a developer) adds style (CSS) files to SharePoint - care must be taken regarding where the files are placed:
Some places are are not suitable because they are not good for deployment
Other places may have permission issues - designers can't access them
Some files are part of the site definition and should not be customized
So the rules are:
Never modify out of the box SharePoint files in /Style Library/ - those files are part of the site definition, if you customize them they are hard to deploy
Start with a clean, minimal masterpage
Create and reference your own CSS files and put them under /Style Library/CSS/<client>/
You may want to further divide your CSS paths according to the areas of the site that your CSS is designed for:
E.g. /Style Library/CSS/SSW/Clients/layout.css
Designers can modify the XSL file as well!
Put them under /Style Library/XSL Style Sheets/<client>/
When a designer (or a developer) adds style (CSS) files to SharePoint - care must be taken regarding where the files are placed:
Some places are are not suitable because they are not good for deployment
Other places may have permission issues - designers can't access them
Some files are part of the site definition and should not be customized
A site column is created on a site level and visible to all lists and content types within that site (and subsites).
You should always try to use Site Columns instead of List Columns
New in WSS v3 (SharePoint 2007)
The same column can be added to different Content Types, lists, list templates
Allows you to make modifications at one place and SharePoint can apply the changes for you across the different lists and content types (doesn't try to fix the content for you though)
More visibility of the customization we are applying to the SharePoint website
Make sure the site column is added to our own group description such as "SSW Columns" - this is important for filtering and exporting site column customizations for deployment. Also great because they are now grouped in the UI.
Figure: Create column - Bad Example
Figure: Add from existing site columns - Good Example
Figure: Site Columns - Good Example
Sometimes you still may want to use a List Column.
You are Mary and want to create a simple list to track supplies, but you do not have site permissions to create site columns
A site column is created on a site level and visible to all lists and content types within that site (and subsites).
You should always try to use Site Columns instead of List Columns
SharePoint utilizes CAML to do a lot of things - one of these is using CAML to define a query language to select elements from lists within SharePoint.
The development experience with CAML is not good. CAML is unforgiving when it comes to errors, but it doesn't tell you what's wrong. Thus earning it a bad name with SharePoint developers. People don't like CAML.
The SharePoint object model is very comprehensive and lets you select items from lists, select lists from sites, in site-collections within web-applications.
Naturally, using the object model is great for traversing all elements in a list. Once you have a handle to the item, you can also easily modify that item.
On the other hand, one of the SharePoint class SPSiteDataQuery allows a developer to use CAML to specify a query condition that SharePoint can understand to search and return matching elements from across the entire site collection.
This is the underlying class that the Content Query Web Part relies on.
So, you need to use object model when you want to:
Iterate all elements in a list
Modify elements in a list
And you use CAML, whether in CQWP or in code with SPSiteDataQuery to:
Select, filter elements from SharePoint lists
Select elements from multiple lists
SharePoint utilizes CAML to do a lot of things - one of these is using CAML to define a query language to select elements from lists within SharePoint.
The development experience with CAML is not good. CAML is unforgiving when it comes to errors, but it doesn't tell you what's wrong. Thus earning it a bad name with SharePoint developers. People don't like CAML.
SmartPart is basically a simple but genius idea - it is a simple web part that can host a user control (ascx) inside it via the Page.LoadControl method. That way, all you have to do as a SharePoint developer is to write the ascx control, and you can do it with the Visual Studio designer to arrange the user control via drag and drop, and then when you want the web part on a SharePoint page, you load the generic SmartPart, and tell it to load the ascx that you want.
However, there are some PRO's and CON's when you use a SmartPart:
Pros
Being able to rapidly create the control's layout and then focus on the code behind - in familiar ASP.NET user control style.
Cons
Many users switch to full trust for their User Controls and disregard SharePoint security this is very easy to set up, but very bad practice. The user control dll should be deployed to the GAC.
Performance is not as good as a web part because a SmartPart is "host" by a page.
Hard to deploy - this is a major problem for SSW because we use solution package to deploy web parts. The ascx can be deployed manually to wss\VirtualDirectories\, or it can be deployed to the 12 hive via \_controlTemplates/ - and then the user control referenced via ~/\_layouts/controlTemplates/ but this is not an intended feature of SharePoint deployment.
Hard to debug - if the ascx is written with src codebehind, then that file is compiled on demand by ASP.NET you can't debug it easily.
Our recommendation:
Understand the difference between SmartParts and Web Parts - don't use SmartParts just because it's "easy" - there are many issues that will come back and hurt the developer.
If your control does not work with SharePoint directly, or has a lot of layout elements it is OK to use SmartParts
Otherwise, write your own Web Part.
SmartPart is basically a simple but genius idea - it is a simple web part that can host a user control (ascx) inside it via the Page.LoadControl method. That way, all you have to do as a SharePoint developer is to write the ascx control, and you can do it with the Visual Studio designer to arrange the user control via drag and drop, and then when you want the web part on a SharePoint page, you load the generic SmartPart, and tell it to load the ascx that you want.
However, there are some PRO's and CON's when you use a SmartPart:
A Favicon is a small image file included on nearly all professional developed sites. When a browser hits your website and a user bookmarks that site then the favicon.ico graphic will be displayed in the browser’s URL/address line upon subsequent visits to that site.
A Favicon is a small image file included on nearly all professional developed sites. When a browser hits your website and a user bookmarks that site then the favicon.ico graphic will be displayed in the browser’s URL/address line upon subsequent visits to that site.
As a server product, SharePoint supports lots of configuration, but the support for packaging and deploying changes between servers remains very week.
The experts agree that the best and preferred way to package a set of changes is to build a solution package. A SharePoint solution package includes all the components and dependent files packed in a cab file.
There are many reasons why you need to use solution package:
All dependent files and components are in the package - allowing developers to quickly deploy development, testing, staging and production servers.
Manual steps are very long, and error prone
Solution packages are easy to retract
Minimize downtime in the SharePoint production server during an upgrade operation
No content data loss during upgrades - SharePoint backup/restore deployment methods will block users from making changes to the production the site during the upgrade period
As a server product, SharePoint supports lots of configuration, but the support for packaging and deploying changes between servers remains very week.
The experts agree that the best and preferred way to package a set of changes is to build a solution package. A SharePoint solution package includes all the components and dependent files packed in a cab file.
There are many reasons why you need to use solution package:
In SQL Server you have tables to store data. Then you have Views, Relations and Stored Procedures.
SharePoint gives us Lists where we can store rows and columns of data, but it is not the same as a full database.
There are no joints out of SharePoint – you can do limited operations with lookup fields but they are not the same as joints in SQL Server
Views in SharePoint are filters, grouping and sort on a single list only.
Formula fields in SharePoint are only updated when the row is changed. If you change the lookup value in the lookup list, it will not change any of the items using formula fields that are currently referencing that lookup.
No stored procedures in SharePoint
Database remains the best at doing database work. SharePoint is OK at creating quick lists and working with simple lists, but it is not a database server.
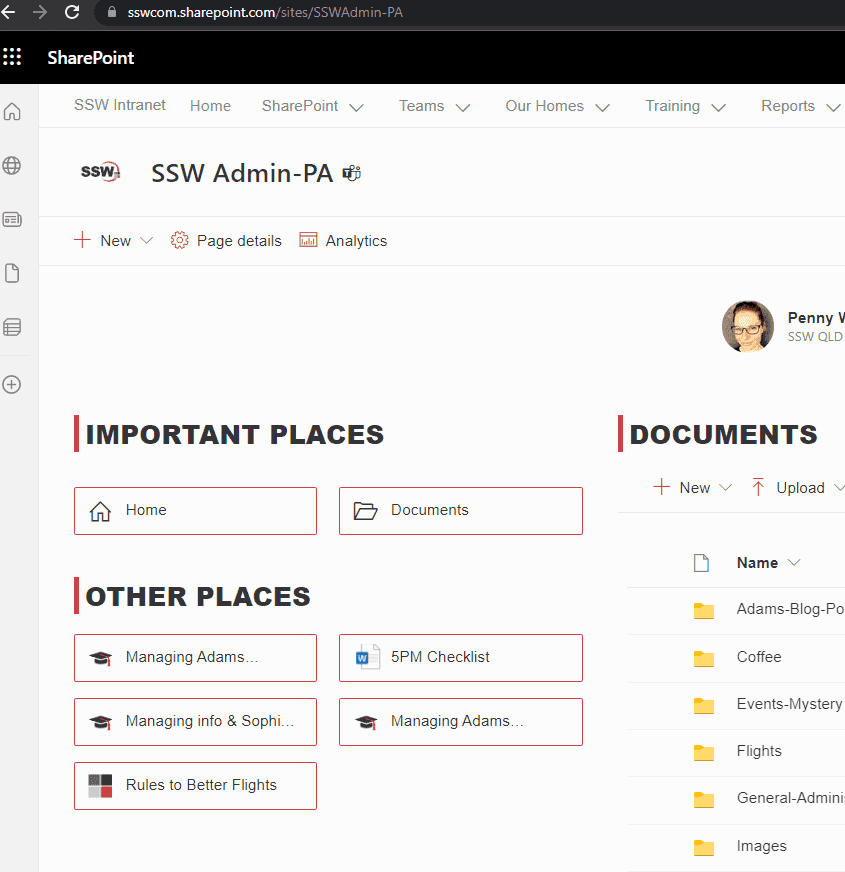
Do you let your designers loose on your development SharePoint?
This is how we work:
A designer would imagine and mockup the design using a graphics tool – such as Photoshop
After the mockups are signed off, we let the designers work on the actual page
Give them designer permissions to your development site and let them loose with SharePoint designer!
There are many reasons why we believe that designers should work directly in SharePoint, with SharePoint designer:
In all areas of .NET development, whether it be ASP.NET, WCF or SilverLight, designers are more and more involved with the actual project beyond mockups
It helps them understand the limitations of SharePoint, which helps their future design to play to its strengths
They are also better at CSS and DOM than a typical developer, as well as more cross-browser aware
They are able to make a call on how close a designer can be bent when the implementation is hard or impossible - with developers who can't make that call, they may end up spending a lot of time failing to get the last 2 pixel perfect
SharePoint designer is sufficiently powerful and offers the only experience currently available for building with SharePoint sites
SharePoint has built-in check-in and check-out, as well as version controls, publishing and approval controls - all of which are excellent for team development
The major drawback for a designer is the complexity of a SharePoint masterpage:
<insert picture>
Figure: Bad - Nasty looking masterpage
Luckily, we always start with a clean-minimal masterpage, which gives our designers full freedom to implement their vision:
<insert picture>
Figure: Good - clean-minimal masterpage
Do you let your designers loose on your development SharePoint?
This is how we work:
A designer would imagine and mockup the design using a graphics tool – such as Photoshop
After the mockups are signed off, we let the designers work on the actual page
Give them designer permissions to your development site and let them loose with SharePoint designer!
The Content Editor Web Part is very easy to use in any web part zone, and gives your content editors ability to add additional text and flair to a page. **Figure: Content Editor Web Part – available in any web part zone
**
However, there is a scary hidden trap!
Figure: Content Editor Web Part looking mostly harmless...
So what’s bad with the Content Editor Web Part?
The content in a content editor web part is not version controlled.
If an editor accidentally overwrites a previous copy – there’s no way to go back.
If an editor accidentally deletes a Content Editor Web Part – the content in it is lost.
Data loss is always bad – and Content Editor Web Part gives you many different ways you can easily lose data... you need tread carefully and know the risks!
The best practice is:
Do your content editing in the Content Editor Web Part, or in SharePoint Designer.
Click the Source Editor button afterwards to get the raw html view.
Copy and save this to a plain HTML file, and save the file in the page library (which is version controlled).
In the Content Editor Web Part – link to the HTML page’s URL.
a.If the text is very tiny – may be just a big heading, you may not want to do this.
b.Using Content Link is also another way you can re-use the same text in different web pages and update them in one place – very good for big banners.
Figure: Using Content Link to a file - safely stored in the document library. This gives us the best of both worlds
The Content Editor Web Part is very easy to use in any web part zone, and gives your content editors ability to add additional text and flair to a page.
**Figure: Content Editor Web Part – available in any web part zone
**
However, there is a scary hidden trap!
It is extremely important to make your site standards compliant:
It makes styling a lot easier.
It also means your site is likely to work for all browsers, even if you don’t specifically target/support them.
It requires accessibility for big public sites can be met easier.
When you first run your SharePoint site – you’ll discover that it looks nice on the surface but needs a significant amount of work to fix all the bad HTML.
Implement CSS Friendly – these are the control adapters released by Microsoft to make ASP.NET render better, non-table based controls. You can implement them for SharePoint sites as well:
<TABLEid=zz1_TopNavigationMenuclass="..."border=0cellSpacing=0cellPadding=0><TBODY><TR><TDid=zz1_TopNavigationMenun0><TABLEclass="..."border=0cellSpacing=0cellPadding=0width="100%"><TBODY><TR><TDstyle="WHITE-SPACE: nowrap"><Astyle="..."class="..."href="...">Home</A></TD></TR></TBODY></TABLE></TD> ... <TDid=zz1_TopNavigationMenun1><TABLEclass="..."border=0cellSpacing=0cellPadding=0width="100%"><TBODY><TR><TDstyle="WHITE-SPACE: nowrap"><Astyle="..."class="..."href="...">Operations</A></TD></TR></TBODY></TABLE></TD> ... <TDid=zz1_TopNavigationMenun2><TABLEclass="..."border=0cellSpacing=0cellPadding=0width="100%"><TBODY><TR><TDstyle="WHITE-SPACE: nowrap"><Astyle="..."class="..."href="...">Application Management</A></TD></TR></TBODY></TABLE></TD> ...</TR></TBODY></TABLE> Bad example - without using CSS Friendly <divclass="CssFriendly-Menu-Horizontal"id="zz1\_TopNavigationMenu"><ulclass="CssFriendly-Menu"><liclass="CssFriendly-Menu-WithChildren"><ahref="..."class="CssFriendly-Menu-Link TopLevelNavItem">About Us</a><divclass="cbb CssFriendly-Menu-Dropdown"><divclass="CssFriendly-Menu-Dropdown-ItemHost"><ulclass="first"><liclass="CssFriendly-Menu-Leaf"><ahref="..."class="CssFriendly-Menu-Link">Employees</a></li></ul></div></div></li> ...</ul></div>
Good example - using CSS Friendly in SharePoint
It is extremely important to make your site standards compliant:
It makes styling a lot easier.
It also means your site is likely to work for all browsers, even if you don’t specifically target/support them.
It requires accessibility for big public sites can be met easier.
You should always try to configure existing out-of-the-box SharePoint webparts before you roll your own.
The Content Query web part in particular is very flexible – allowing contents from different lists to be presented in different ways.
These are some of the fields in the CQWP that are often configured:
MainXslLink, ItemXslLink
These two controls the main and item XSL file paths. Set these to your new XSL file under /Style Library/XSL Style Sheets/SSW/SSWMainContent.xsl and SSWItem.xsl files
ItemLimit
The default number of items that are displayed on a Content Query web part is 15. With unlimited pages. Sometimes you want this number to be a lot higher (or -1 for no limit).
Note: If you do make this unlimited - make sure your page is designed to grow infinitely or the layout may look strange.
CommonViewFields
The Content Query web part automatically selects a few of the common fields for any query. But sometimes you want a particular field that isn't selected by default. This is when you should use CommonViewFields.
The syntax is fieldname,fieldtype;
E.g. PublishingContent,PublishingHTML;
Query and QueryOverride
The Content Query web part gives the user a lot of flexibility to design the query in the UI toolpart. However if your needs are perculiar you can use the QueryOverride to skip over defining the query and use your supplied CAML directly.
The long answer - Deploying changes between development, staging and production servers can be a very interesting exercise:
It is painstakingly awkward when you realize that you have forgotten a file
Or forgotten to take the latest version of a particular file
Each iteration is manual and can be error prone
The result is that your developers are working late into the evening and your SharePoint servers are down for a prolonged period of time – something that may be very difficult to accept in a corporate environment
At SSW, we saw all this was unacceptable and work to improve this process.
Our answer to the deployment problem is a combination of tools and processes – we call it the SSWpackage.exe.
Multiple development virtual machine environments
Test repeated deployment to staging before you actually deploy to the production server
SSW SharePoint Deployment Auditor – compares development, staging and production servers to identify missing files that needs to be deployed
Specify ignore lists
Spits out XML code that would be easy to add to your package xml
SSW Package Updater – updates the solution package based on the XML definitions
Ensure you always have the latest version of the files from development SharePoint included in your package.
Microsoft Visual Studio extensions for Windows SharePoint Services
Using the latest VSeWSS 1.3 CTP
Generates the package and batch files
SharePoint STSADM tool for deployment
Into the future of SSWPackage.exe:
Fully continuous integration with SharePoint
More SharePoint validation functions
Improved versioning control
A great GUI to bring it all together
We use SSWPackage.exe
The long answer - Deploying changes between development, staging and production servers can be a very interesting exercise:
It is painstakingly awkward when you realize that you have forgotten a file
Or forgotten to take the latest version of a particular file
Each iteration is manual and can be error prone
The result is that your developers are working late into the evening and your SharePoint servers are down for a prolonged period of time – something that may be very difficult to accept in a corporate environment
At SSW, we saw all this was unacceptable and work to improve this process.
Add an extra column to the “Version History” page to show how big a change was made in each version (in number of lines modified or MB changed or something).
In this case the editor (Ulysses) clicked on edit just to see what it looked like from an Editor’s viewpoint, but there is no indication that there was no significant change.
The edits that were not significant should show their records as dimmed.
classCreateShoppingListHandler : SPItemEventReceiver{publicoverridevoidItemAdding(SPItemEventPropertiesproperties) {floatprice = 0;floatcost = 0;if(float.TryParse(properties.ListItem.Fields["Price"].ToString(), outprice) && float.TryParse(properties.ListItem.Fields["Cost"].ToString(), outcost)) {if(price < cost) {properties.ErrorMessage = "The cost must not be less than the price";properties.Cancel = true; } } }}
Bad example: using custom code – creating a custom event receiver on the item (the item adding event or item updating event)
Good example: using no code – just using the field validation on a list. A demo of this from Andrew Connell on http://channel9.msdn.com/learn/courses/SharePoint2010Developer/ListsAndSchemas/FieldandListItemValidation/
This is how you should work with document versions:
Make sure your document library is configured to use versioning. Tip: You can configure this in Settings | Versioning Settings
Make sure you are showing the version column in your document view. Figure: You can add the column by selecting Modify View
Whenever you edit the document and check it in, SharePoint will automatically increase the version number. If you need to send this document to a client then it is important to: 1. Save the file locally by selecting Send To | Download a Copy 2. Add the version to the end of the filename e.g. Specifications_v2.0.docx 3. Then email it to the client. 4. We do this so that we can track what version of the document was sent to the client.
Tip: If you are not working with SharePoint then we recommend you include version numbers in your file names.
This is how you should work with document versions:
Developing in ASP.NET is easy, you just press F5, Visual Studio spins up instance of the Cassini web server, and you can see your work execute. Developing in SharePoint is much harder as you need access to a local SharePoint server to see your work run.
In SharePoint 2007 there are three options, in SharePoint 2010 they have added one more.Figure: Setting up the development environment in SharePoint can give you a headache
Your development choices in SharePoint 2007 are:
Remote to a shared SharePoint development server
Tip: This is best for people who do *not* need to have their own SharePoint server, such as designers, testers or content editors.
Problem #1: By default you only get 2 concurrent accounts
Problem #2: IISRESET clobbers other users.
Run your own local virtual machine (VM)
Tip #1: Use an external drive to make it faster
Tip #2: Use SSD to go even faster :)
Use ‘Boot’ to VHD (Recommended - most trouble but best performance)
One of the biggest problem is that SharePoint 2007 can only be installed on Windows Server and most developer machines do not run Windows Server as the host OS. Tweaks to install SharePoint to Vista were available, but considered risky – since your development environment does not fully reflect the production server.In SharePoint 2010 – the scenery has changed a little. These are all your options now:
Remote to a shared SharePoint development server
Tip: This is best for people who do *not* need to have their own SharePoint server, such as designers, testers or content editors.
Problem #1: By default you only get 2 concurrent accounts
Problem #2: IISRESET clobbers other users.
Run your own local virtual machine (Not recommended – because SharePoint 2010 is 64-bit only)
Tip #1: Use an external drive to make it faster
Tip #2: Use SSD to go even faster :)
Tip #3: The 64-bit requirement means, you can’t use Virtual PC, and so you have to use either Hyper-V (which requires a Windows Server host), or VMWare
Tip #4: The 64-bit requirement means, your host must be x64 to run the virtual machines in x64
Install SharePoint 2010 on your Windows 7 PC (Not Recommended)
You are not fully representing the production server
Are there any shortcuts for Silverlight developers (for SharePoint consumption)?
Yes, you can easily deploy a xap file to a document library. However, if you need to debug it you will need the SharePoint 2010 object model.
Tip: You could minimise your exposure to the object model by using a Repository pattern, which would allow you to debug and test your application without SharePoint, but ultimately you will need to debug and test in SharePoint.
Figure: The Ultimate solution for SharePoint development environments is to have another machine under your desk. The Ultimate Solution
Get yourself a second machine (same as remote)
But don’t share it with anyone else!
Developing in ASP.NET is easy, you just press F5, Visual Studio spins up instance of the Cassini web server, and you can see your work execute. Developing in SharePoint is much harder as you need access to a local SharePoint server to see your work run.
In SharePoint 2007 there are three options, in SharePoint 2010 they have added one more.
Figure: Setting up the development environment in SharePoint can give you a headache
In SharePoint 2007, we have Business Data Catalog to connect SharePoint to other line of business applications.
When you connect your other systems to SharePoint you can then have one central place to see your data:
Microsoft CRM connected to SharePoint allows you to search for CRM contacts from SharePoint
TFS connected to SharePoint lets you see the project documents and reports via SharePoint
Your roster system connected to SharePoint allows you to see those calendars in SharePoint
In SharePoint 2010 – the Business Data Catalog is upgraded to the new Business Data Connectivity Service (BCS).
It is a lot easier to plug-in
Supports not just READ operations, but delete, update and create operations as well.
In SharePoint 2007, we have Business Data Catalog to connect SharePoint to other line of business applications.
When you connect your other systems to SharePoint you can then have one central place to see your data:
Microsoft CRM connected to SharePoint allows you to search for CRM contacts from SharePoint
TFS connected to SharePoint lets you see the project documents and reports via SharePoint
Your roster system connected to SharePoint allows you to see those calendars in SharePoint
Any configuration settings, that you rely upon, must have a check so you get an email as soon as the problem arises. Eg.An anonymous access check - A web publishing site needs a check to make sure anonymous access is configured correctly.
Figure: Enable anonymous access for publishing site
Figure: monitors for anonymous access - If the monitor is down, there will be an email sending out to our network admins
Any configuration settings, that you rely upon, must have a check so you get an email as soon as the problem arises. Eg.
An anonymous access check - A web publishing site needs a check to make sure anonymous access is configured correctly.
Figure: Enable anonymous access for publishing site
Figure: monitors for anonymous access - If the monitor is down, there will be an email sending out to our network admins
We are always disappointed when adding version information to a Word document. When you use the Word version you get a number that indicates the number of times the document has been saved and not a proper version number.
It is possible to get the number into Word for the version of the document on the SharePoint document library.
Note: This also works in SharePoint 2010 and Office 2010.
Figure: Good example, you see the formatted SharePoint version number
Bad Example
Good Example
We are always disappointed when adding version information to a Word document. When you use the Word version you get a number that indicates the number of times the document has been saved and not a proper version number.
It is possible to get the number into Word for the version of the document on the SharePoint document library.
Each SharePoint packages contains features that can be targetted at various scopes. You need to pay special attention when you are targetting the Web Application scope.
The problem with this web application feature is that it will activate by default on all new Web Applications created on that farm, regardless of what the web application or root site template is.
The best practice is to make sure you use the additional attribute ActivateOnDefault and set it to False. Then SharePoint administrators can choose to activate the feature after a new web application is created.
Each SharePoint packages contains features that can be targetted at various scopes. You need to pay special attention when you are targetting the Web Application scope.
If you want an easy way to access data in remote or legacy systems, provide one or more of the CRUD operations to the end users and search the data within the SharePoint search framework, then you should consider BCS. You can also use MS Office applications to access the data from SharePoint.
However, BCS doesn't do everything. It does not provide support for WorkFlow or EventReceivers on the list in SharePoint.
BCS is good for synchronising the data at SharePoint with one other system. It is not suitable for publishing the data to multiple systems (i.e. syndication). If you need to implement syndication, use a standard SharePoint List and attach either a Workflow or an EventReceiver to handle sending updates to the end systems instead.
Use BCS with multiple systems(not working)
Use BCS with one system at time
If you want an easy way to access data in remote or legacy systems, provide one or more of the CRUD operations to the end users and search the data within the SharePoint search framework, then you should consider BCS. You can also use MS Office applications to access the data from SharePoint.
However, BCS doesn't do everything. It does not provide support for WorkFlow or EventReceivers on the list in SharePoint.
BCS is good for synchronising the data at SharePoint with one other system. It is not suitable for publishing the data to multiple systems (i.e. syndication). If you need to implement syndication, use a standard SharePoint List and attach either a Workflow or an EventReceiver to handle sending updates to the end systems instead.
If you are planning to use Workflow, use Workflow with SharePoint List instead of BCS. Because Workflow cannot be associated directly with external lists. The reason is data is not stored in SharePoint, so the Workflow cannot be notified when items change.
BCS doesn't have WorkFlow support
Use WorkFlow with SharePoint List
If you are planning to use Workflow, use Workflow with SharePoint List instead of BCS. Because Workflow cannot be associated directly with external lists. The reason is data is not stored in SharePoint, so the Workflow cannot be notified when items change.
Figure: Bad example - using the default Date Format
Figure: Good example - using the Date Format with 'ddd'
How do you do this ?
By default, the date type column only have two format options:
Figure: Date Format #1**Figure: Date Format #2
** To add the week day(eg.Wed) you need to:
Select List Settings | Columns |Create column | Calculated (calculation based on other columns)
See the columns of this list in the "Insert Column", add the column you want to change format, and custom the code in "Formula" like below: Figure: Calculated column with Formula code
Change the views of the list to use the new Calculated column (WeekDate) instead of the original date column (Date): Figure: Replace the old Date column (Date) with new Calculated column (WeekDate It should not be this hard - see suggestion to the SharePoint team to make date formatting easier.
Figure: Bad example - using the default Date Format
Figure: Good example - using the Date Format with 'ddd'
Among other things, it means never sending attachments in an email. Once an attachment is included in an email there are multiple copies of that attachment. If people change the contents of the attachment there is confusion about who holds the "master version" of that file.
SharePoint changes this by allowing you to easily email a link to a SharePoint file. This means all recipients review and edit the single "master version" of the file.
Figure: Good example: Email a link, not a file
Among other things, it means never sending attachments in an email. Once an attachment is included in an email there are multiple copies of that attachment. If people change the contents of the attachment there is confusion about who holds the "master version" of that file.
When you want to update the Rule Title, please DO NOT update them in the list directly.Click the URL near it, navigate to the Rule Summary page, and edit the Rule Summary Page Title, it will automatically update:
Rule Summary Page Title
Site Title
Item Title in RuleCategoryLookupData List
Like this (thanks for Adam's snapshot) :
When you want to update the Rule Title, please DO NOT update them in the list directly.
Click the URL near it, navigate to the Rule Summary page, and edit the Rule Summary Page Title, it will automatically update:
SharePoint 2010 and Office 2010 ships with a fantastic document management feature "Managed Metadata Service". This new service provides first class support for enterprise taxonomy within a standard SharePoint 2010 environment.
Unfortunately, Office 2007 and Office 2003 can't work with managed metadata fields out of the box.
Office 2010:1. Works fine
Office 2007:1. Document information can't display managed metadata 2. You can still save documents to SharePoint 3. But you can't check-in (if metadata fields are required) 4. User needs to perform a web check-in
Office 2003:1. Can't create new or Open documents with managed metadata 2. Install Office 2007 document support upgrade, this bring the experience a bit better similar to Office 2007.
Best Solution:
Use a 3rd party solution - the best one being OnePlaceMail which provides a UI for managed metadata via the "Save to SharePoint". Works with all three versions of Office so users get a consistent UI.
Figure: The optional save dialog that pops up when saving document to SharePoint - allowing use of Managed Metadata from Office 2003, 2007 and File Explorer
SharePoint 2010 and Office 2010 ships with a fantastic document management feature "Managed Metadata Service". This new service provides first class support for enterprise taxonomy within a standard SharePoint 2010 environment.
Unfortunately, Office 2007 and Office 2003 can't work with managed metadata fields out of the box.
My Site and My Profile< are great but if you are not using them, it makes sense to remove them:
Figure: Links need to be hidden
You can follow below steps to hide “My Site” and “My Profile”. There are a few options, based on what you need to do:
Delete the association (not recommended)
Going to Central Admin | Application Management | Service Applications | Configure service application associations, and choose “default” link:
Figure: Bad example - Choose “default” link
Uncheck the “User Profile Service Application” in the opened page, then click “OK”:
Figure: Bad example - Uncheck the association for "User Profile Service"
Customize permissions for only some people to have access to create personal site
You can remove it for most people - but leave it for only some users.
Go to Central Admin | Application Management | Service Applications | Manage service applications, and click the link of “User Profile Service Application”, navigate to its manage page:
Figure: OK example - “User Profile Service Application” manage page
Click People | Manage User Permissions, you can customize the user profile permission for specific users:
Figure: OK example - Customize "User Profile Permissions"
Delete the service (recommended if you don't need the service at all in your farm)
Note: You can always create it later if you need it in the future.
Go to Central Admin | Application Management | Service Applications | Manage service applications, and select “User Profile Service Application”, then click the “Delete” button on the ribbon:
Figure: Good example - Delete "User Profile Service"
::: greyboxNote: Later on if you want to get My Site working read these 2 links... unless Microsoft creates a services that fixes User Profile Synchronization service. Thanks to Mark Rhodes for these tips:
When SharePoint encounters a new person, it takes people's display name and account name from Active Directory, but sometimes
Figure: Mixed up names - some are good Display Name, some are essentially just the Account Name (More here)
The easiest way to fix this requires someone with central administration access:1. Go to: SharePoint Central Administration | Application Management | Service Applications | Manage Service applications 2. Go to User Profile Service Application
3. Go to Manage User Profiles
4. Find the user profile that you want to update
5. Fix the Name field (Display name)
6. Save
Better wayThe better way is to set up User Profile Synchronization and have SharePoint communicate with Active Directory on a schedule and keep user's profile information up to date. Unfortunately, it can be tricky to set this up in SharePoint 2010.
TechnicalWhen a user is entered (or using) a SharePoint site, the site will first check with Central Admin (the farm) to enquire about this user's profile details. The farm grabs the account name and display name from Active Directory, but does not keep this synchronized.
Unless configured otherwise, end users in SharePoint do not have the ability to modify their own display name. And the best place to update this is to either:
Modify the farm user information list cache (via steps above), or
Set up User Profile Synchronization
When SharePoint encounters a new person, it takes people's display name and account name from Active Directory, but sometimes
Follow the step to fix SharePoint JavaScript errors:
Your content editor is trying to change page layout via the Ribbon in SharePoint 2010
Figure: Click Page Layout in the Ribbon
But they get a JavaScript error
Webpage error details
User Agent: Mozilla/4.0 (compatible; MSIE 8.0; Windows NT 6.1; WOW64; Trident/4.0; SLCC2; .NET CLR 2.0.50727; .NET CLR 3.5.30729; .NET CLR 3.0.30729; Media Center PC 6.0; .NET4.0C; .NET4.0E; InfoPath.3)
Timestamp: Wed, 22 Dec 2010 01:33:17 UTC
Message: Object required
Line: 2
Char: 6422
Code: 0
URI:http://intranet.ssw.com.au/_layouts/cui.js?rev=wvoVpqlQb30nGo4DjDk8Kg%3D%3D
This error is likely caused by SharePoint trying to render available page layouts for the page to switch to, but there is an error.A very quick fix that can be applied by a site owner is:
Site Settings | Look and Feel | Page layouts and site templates
Restrict the valid number of page layouts that can be used, instead of allowing "Pages in this site can use any layout"Figure: Restrict valid page layouts
This fixes the Ribbon menu
Figure: Ribbon menu fixed!
Tell your sys admin that there are broken packages in SharePoint and must be fixed ASAP
Follow the step to fix SharePoint JavaScript errors:
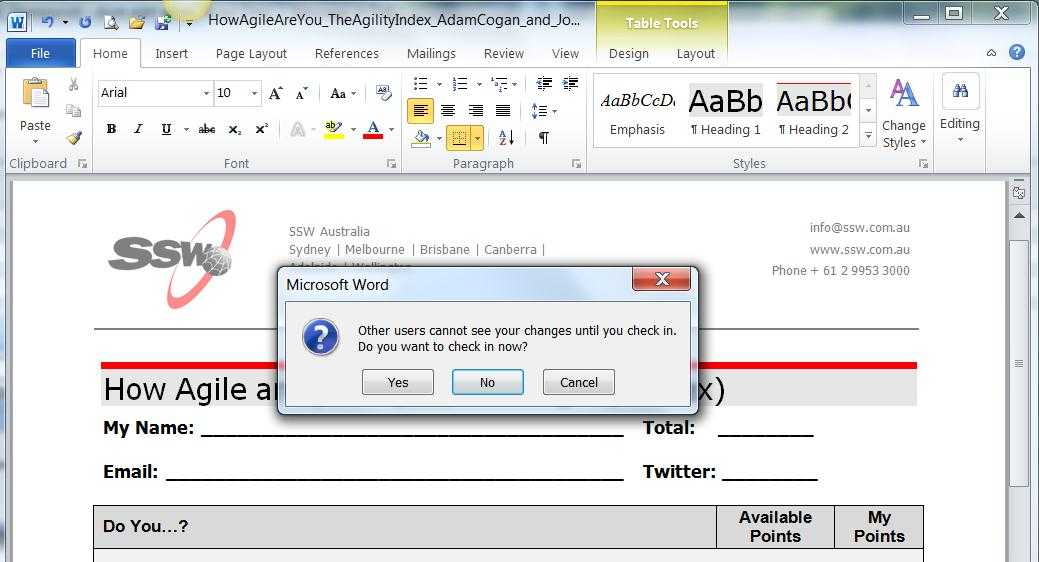
When editing a .doc file in a SharePoint document library, you need to always “check Out” when you see “Read Only”. You need to “Check In” the document after editing to TFS.
Figure: Warning - If you see “Read-Only” in the title bar, then you need to “Check Out”Figure: Click “Check Out” to edit the document in TFSFigure: When you click “yes”, expect a 2nd dialog - for SharePoint controlled docsFigure: Good example – The dialog you should always get on saving
When editing a .doc file in a SharePoint document library, you need to always “check Out” when you see “Read Only”. You need to “Check In” the document after editing to TFS.
Figure: Warning - If you see “Read-Only” in the title bar, then you need to “Check Out”
SharePoint as a platform on top of ASP.NET gives you many components that you don’t get from ASP.NET out of the box:
WYSIWYG editing (IE only, no FireFox)
SharePoint’s rich text editor works really well with IE out of the box, works with SharePoint image libraries, and supports many features and even allows site style configurations to define and restrict styles that can be applied in the site. Unfortunately, it is not a cross browser compliant WYSIWYG editor.
In ASP.NET there are many 3rd party options here – but you won’t get the integrated support that SharePoint’s editor has, without doing further customization.
Content Version Control (with Publish and Approval workflow)
SharePoint gives your end users content version control – they can update their pages and check-in to share it with the team, or publish it for everyone to see. Workflows can be attached to notify the necessary internal reviews.
SharePoint also tracks changes across versions (except in web part zones), and allows users to compare between different versions.
In ASP.NET this is not available – you will need to do significant work to achieve this behaviour, or build on top of another ASP.NET platform.
Permission Control (just assign to Groups)
SharePoint allows items to be assigned to permission groups and works very well with Active Directory (or other membership providers) directly.
In ASP.NET site permissions can be specified via web.config but the UI to configure parts of the site is limited.
Creating a subsite (simple and then appear in menus, breadcrumbs…)
End users can create subsites in SharePoint that automatically appears in menu navigation and has all the correct breadcrumbs wired up. Subsites forms the necessary site navigation within SharePoint.
In ASP.NET end users cannot create subsites – developers has to do this.
Spell check
SharePoint editor web parts come with spell check abilities.
ASP.NET does not have equivalent – though many browsers now support a client-side spellchecking facility, and some 3rd party rich text editors also have spell check.
Search (filtered by your permissions) – google only works for anonymous
SharePoint comes with a highly configurable enterprise search facility. The search result is filtered based on the current user so SharePoint will never show results that you aren’t supposed to see.
SharePoint search can index Office documents as well as other popular document formats like PDF.
Search engines like Google performs well for public content, but there is no way for the search crawler to index inside your organization. SharePoint uses its own internal crawler to keep your site’s content up to date in the search results.
In ASP.NET - this is often overlooked – most ASP.NET search facilities are limited to only specific kind of data: e.g. search clients with the ID of SSW
SharePoint as a platform on top of ASP.NET gives you many components that you don’t get from ASP.NET out of the box:
By default, the group header of a list shows bigger font size only on modern UI, this is fine for one level group. However, if you have two level groups, it could be better to show different header styles between level one and level two group headers.
To implement this, you will need to inject a custom style to first level group header. e.g.
If you want to make this style available in a "site collection" scope (aka apply to all lists and libraries in a site collection), use a "SharePoint Extension" is not a bad option. Read more details at Deploy your extension to SharePoint (Hello World part 3).
Once deployed, you should be able to see a header style like the below:
Figure: Level one group header is bold
By default, the group header of a list shows bigger font size only on modern UI, this is fine for one level group. However, if you have two level groups, it could be better to show different header styles between level one and level two group headers.
You should do anything that helps a project succeed. The best thing is to enable great collaboration, by giving your customer an awesome 'Customer Portal'. Then they can see new mockups, comment on features, get new releases and participate in team discussions on their particular project.
So the first thing you should do is to create a 'Customer Portal' in your SharePoint extranet. Then give your customer a login, send them an email and they are now going to really get involved!
There are many means by which you could provide this functionality to your client.
If you are using SharePoint then....
It is advised that you create a customized SharePoint Team Collaboration site template. That way you can very quickly initialize a new site, for each new customer.
Once you have the template, follow these steps to create a customer portal with SharePoint 2007:
Go to the root where you want to create a site. E.g. sharepoint.ssw.com.au
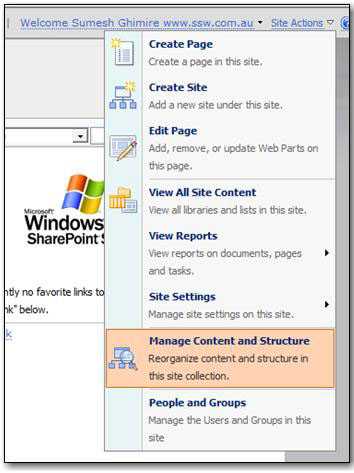
Click "Site Actions" on right-hand top, select "Manage Content and Structure
Figure: The first step to creating a 'Customer Portal' is to select 'Manage Content and Structure' to view site collection
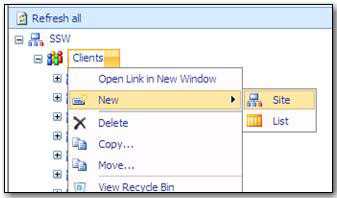
Once the new window opens, on the left-hand side, click on the 'Clients' dropdown select New -> Site.
Note: If you don’t see this option, that means you don’t have permission to create the site.
Figure: Create new site
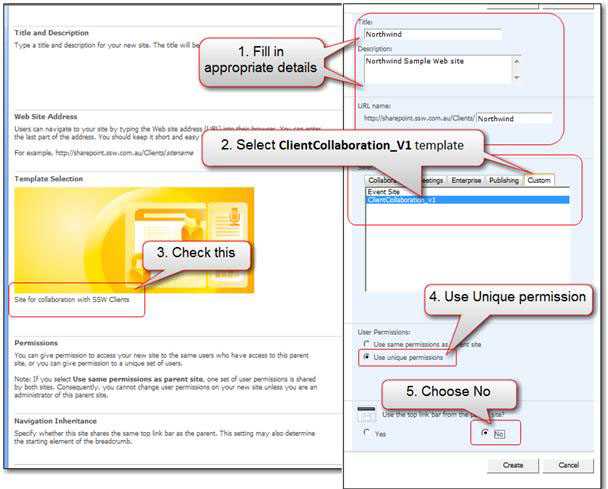
Now follow these steps when the new window opens fill in the fields below.
Figure: Fill in the appropriate info then click "Create"
More Information:
Fill in the fields for the new client site
eg. Title, Description, and URL
Select the template
e.g “ClientCollaboration_V1” in the Custom tab. Note: Your selection is confirmed in the picture. In this example, the template’s description looks like “Site for Collaboration with SSW Clients”.
Select “Use Unique permissions” as you need to give the client an account to visit.
In the “Navigation Inheritance” choose “No” as you don’t need to let client visit the other client sites via the navigation.
Click “Create”
Next step is to setup the groups and permissions.
Figure: Create a 'new group' or select an 'existing group' for the newly created site
More Information:
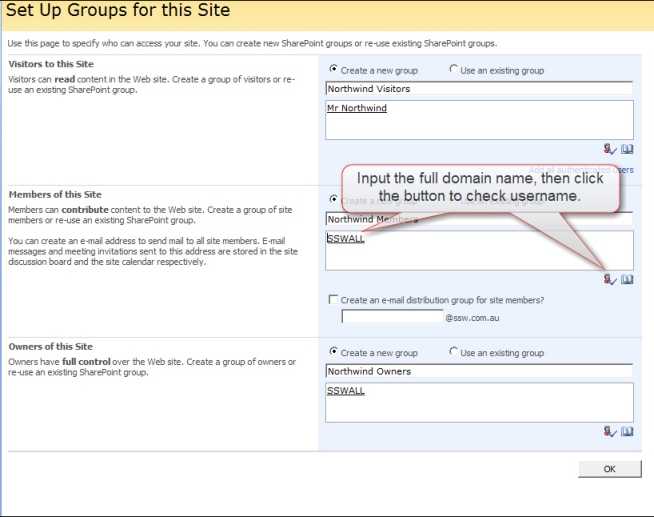
Permissions: After you created the website for the client project, you need to configure the permission to make sure the developers and the clients can visit the site with the current authority. By default:
Visitors to the site - Read:
Visitors need to read most of the site.
They can't read team discussions (not used)
They can download from 'release files' document library.
They can synchronize their calendar to the team calendar in SharePoint (not used - one day it should read from CRM)
Members of this Site - Contribute:
Can view, add, update and delete.
Owners of this Site - Full Control:
Has a full control.
In this case, we are using 'create a new group' option because we want this group to be able to access only for this particular site - It is a good practice to create a new group for every site you create, because it will be easier to add or delete users in the group for that specific site.
Note: you can also access this through the "People and Group" option on "Site Action" link on right-hand top of the page if you need to manage permission in future.
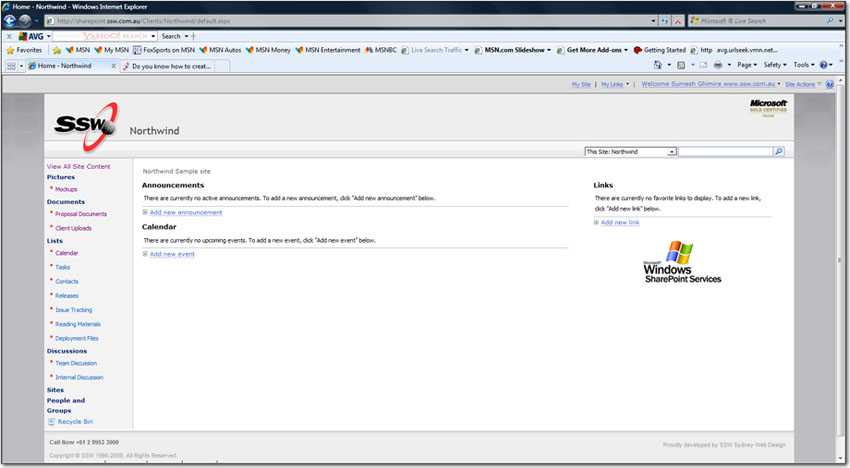
Click "OK", and the portal is created.
Figure: Northwind portal
Note: SharePoint will send "welcome email" to all the members of the groups you created for the site with basic information, but you still need to send an email to your customer with the login details like URL, username, and password.
You should do anything that helps a project succeed. The best thing is to enable great collaboration, by giving your customer an awesome 'Customer Portal'. Then they can see new mockups, comment on features, get new releases and participate in team discussions on their particular project.
So the first thing you should do is to create a 'Customer Portal' in your SharePoint extranet. Then give your customer a login, send them an email and they are now going to really get involved!
There are many means by which you could provide this functionality to your client.
If you are using SharePoint then....
It is advised that you create a customized SharePoint Team Collaboration site template. That way you can very quickly initialize a new site, for each new customer.
Once you have the template, follow these steps to create a customer portal with SharePoint 2007:
With a web application you are developing you have full control of web.config and have access to it in your Visual Studio project, and can follow "How to set up Application Insights" to set up Application Insights. This way Visual Studio will do all the modifications for you automatically.
But when you develop on SharePoint, you do not have a full copy of web.config in your Visual Studio project, the web.config will be initialized on the SharePoint server when a new SharePoint site is created. This means Visual Studio cannot be used to update the web.config for you. Although you can modify SharePoint web.config via coding, that involves lots of development and testing work against your SharePoint server.
The best process to implement Applications Insights in SharePoint can be split into two parts:
Implement App Insight JavaScript in master page (via Visual Studio) or web pages individually via embedded code, there are two good articles include the detail steps:
Use Application Insights Status Monitor configuration tool to add DLLs reference and update web.config (no coding work involved), there are two articles include the detail steps:
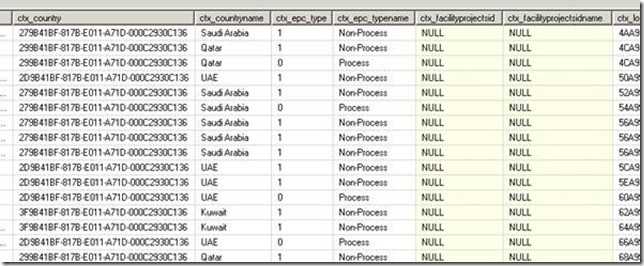
You have data in CRM 2011, so how do you see it in SharePoint? The data that is stored in CRM entities should be available in SharePoint so users can find and use the data in areas such as:
SharePoint search
SharePoint reporting (if you are using SQL Reporting Services in integrated mode)
There are many ways to get to this data, let's go through them:
Option 1: SharePoint BCS Adapter (provided by the CRM Team) RECOMMENDED
This BCS Adapter for CRM 2011 is from the CRM team (It does all of the BCS work for you by interrogating the CRM metadata service).
clip_image002[8]Read/Write
clip_image002[9]Minimal coding
clip_image002[10]Easiest to implement
clip_image002[11]The likely way forward (Best Practice as Microsoft) | clip_image004[13]Needs to be deployed and published to the web server.
clip_image004[14]Less performance than SQL filter views directly
clip_image004[15]Only recently released. |
More information:
Download from Microsoft
Read "Connecting to CRM Online 2011 with SharePoint 2010 Business Connectivity Services"
Run tool to generate the XML mapping (.BDCM)
This solution uses a BCS Connector – a .NET Assembly responsible for mapping external data into a form usable by SharePoint. This component is loaded and hosted within SharePoint 2010 and communicates with CRM via the CRM Proxy Service.
Option 2: SQL Server Filtered Views
CRM recommends that you *don't* read from the Tables, so they provide SQL Views for this purpose.
Summary: SharePoint BCS > CRM database
Pros
Cons
|
clip_image002[2]Best performance
clip_image002[2]Codeless | clip_image004Read-only
clip_image004[1]Not available for hosted CRM
clip_image004[2] Security issues as you are exposing the view. |
Filtered Views in Microsoft CRM provide access to the data available that supports providing picklist name and id values (lookup tables).
More information:
If you only want read-only for CRM on-premises data for SharePoint users, this solution is fine. You create the External Content Type directly against the Filtered Views in the CRM database as per Use SQL and Filtered Views to Retrieve Data for Reports
.
Figure: The result of "SELECT * FROM FilteredCtx_Project". Use Office SharePoint Designer to hook this up
clip_image004[4]Needs to be deployed and published to the web server.
clip_image004[5]Less performance than SQL filter views directly #1 |
Note: Performance could be improved by making the reads from the views and the writes through the web service
More information:
Use BCS in VS 2010
Write code that calls the CRM web services (that access the CRM data)
Test
Deploy
Option 4: Expose OData from CRM as RSS
The CRM 2011 OData Query Designer can be used to build queries to expose the data from CRM as RSS
Pros
Cons
clip_image002[4]Easy configuration
clip_image004[6]50 records limit. Need to page through the results.
clip_image004[7]Possible issues with firewalls and proxies because it uses Integrated Security for authentication.
clip_image004[8]Read-Only
clip_image004[9]No easy way to consume |
Note: You can really only call the OData endpoint from an application that already has an authentication cookie with the CRM server.
i.e. you can't impersonate and call it like you can the standard WCF endpoints
So it is really only suited to calling from Silverlight and JavaScript web resources that are delivered inside CRM (because they have the cookie)
More information:
The first step is to expose the data:
See the data
Figure: See the data - RSS source for xtc_countrySet
The second step (and the problem) is consuming the data
Figure: BCS has no option to consume RSS data. Please Microsoft SharePoint Team, we need a new 'Data Source Type' = OData
In summary, CRM 2011 can expose OData, but SharePoint 2010 BCS doesn't consume OData.
The 3 options to consume the OData/RSS data:
Consume the OData by SQL Server, via TSQL ??? Then use BCS to call SQL Server.
Summary: SharePoint BCS > DataSourceType: SQL Server > OData > CRM database
Consume the OData by a BCS adapter + code calling web services (same story as above).
Summary: SharePoint BCS > code calling OData > CRM database
Consume the RSS by "SharePoint RSS view web part" directly.
Summary: SharePoint RSS view web part > OData > CRM database
(not recommended as it could not be used in "SharePoint Search")
So OData is all things horrible because it is hard to eat :-(
Option 5: BizTalk
Biztalk is built for mapping systems together, unfortunately, this solution is only considered for large enterprises.
clip_image002[5]Read/Write
clip_image002[6]The BizTalk data centre can also provide data for any system.
clip_image002[7]Requires little code if users already have BizTalk | clip_image004[10]BizTalk :-)
clip_image004[11]Deployment - Needs external work to deploy BizTalk server.
clip_image004[12] Licence Cost |
Option 6: OData 3rd Party solutions (doesn't exist)
Today SharePoint 2010 exposes lists and document libraries as OData, but does not natively consume OData.
What does this mean?
CRM 2011 exposes it data as OData, but cannot consume OData
SharePoint 2010 exposes it data as OData, but cannot consume OData
...and there are no 3rd party solutions to solve this...
You have data in CRM 2011, so how do you see it in SharePoint? The data that is stored in CRM entities should be available in SharePoint so users can find and use the data in areas such as:
SharePoint search
SharePoint reporting (if you are using SQL Reporting Services in integrated mode)
There are many ways to get to this data, let's go through them:
By default, SharePoint diagnostic logging level was set to “Information” and “Medium”, which will log quite a big info, and it increased a log after configuring “hybrid search”:
Figure: default logging levelsFigure: lots of "Medium" level search logs
This made us had 60GB logs for only 14 days.
So the solution is to change to "diagnostic logging level" as below to reduce the log size:
By default, SharePoint diagnostic logging level was set to “Information” and “Medium”, which will log quite a big info, and it increased a log after configuring “hybrid search”:
It is not a good idea to have Windows Update automatically updating your servers. There are a few reasons.
The hotfix could bring down a production environment. (This issue previously happened)
In fact, even in a development environment, this could be hours of lost work as the development team struggles to understand why only
some of the developers' servers magically and mysteriously broke overnight.
Windows Update could restart your server, or put your server in a state where it requires restarting - preventing any urgent MSI installs without bringing down the server.
Windows Update remains the best thing for end-users to protect their systems. But in a server, especially a production server environment - Windows Update patches are just like any new versions of the software that's built internally. It should be tested and then deployed in a controlled manner.
So recommendations for managing updates are as follows:
Use WSUS to approve/deny updates for your servers.
Update Staging/Development servers first to see if any issues arise from the updates.
Roll these updates out to Production once confident there are no issues.
Windows Updates may be critical and should be kept relatively up to date.
Do all of this on a schedule - have an email sent to your SysAdmins to remind them to review and reboot needed machines:
Good Example: Scheduled email showing clear action points and WSUS stats
Most people have now moved to SharePoint Online, either from scratch or by migrating content from previous versions of SharePoint. In SharePoint Online, a lot of legacy features have been deprecated and replaced by more modern counterparts. Unfortunately, chances are you have ported a whole lot of useless things as part of your migration.
[TODO: Screenshot of Useless stuff]
Before removing seemingly useless or old stuff, you should always make sure that site owners are OK with the deletion and that the data is actually not useful. In most cases however, the libraries detailed below have been added to your site by default and contain only demo and/or defautl data.
Process
The process to remove legacy items is always the same regardless of the library/list you're trying to remove:
Find the product or feature that replaces it in SharePoint Online
Deactivate the site feature associated with the list or library:
Either manually via:
Site Settings | Site Features | Feature XYZ | Deactivate
Or programmatically using:
# Connect and get contextConnect-PnPOnline -Url https://contoso.sharepoint.com# Get Feature Object$Feature = Get-PnPFeature -Scope Web -Identity $FeatureId#Feature IDs below# Get the Feature statusIf($Feature.DefinitionId -ne $null){# De-activate the FeatureDisable-PnPFeature -Scope Web -Identity $FeatureId -Force}Else{Write-host -f Yellow "Feature is not active!"}
If feature is already disabled or if SharePoint throws an error on deactivation (can happen for very old features), perform a forced delete of the library using powershell.
# Connect and get contextConnect-PnPOnline -Url https://contoso.sharepoint.com$ctx = Get-PnPContext# Get list object$list = $ctx.Web.Lists.GetByTitle("Library_To_delete")# Force delete (send to recycle bin)$list.AllowDeletion = $True$list.Update()$ctx.ExecuteQuery()$list.Recycle() | Out-Null$ctx.ExecuteQuery()
MicroFeed
Microfeed has been replaced in SharePoint by Yammer webparts and is no longer supported.
Associated Site feature to disable: "Site Feed"GUID: 15a572c6-e545-4d32-897a-bab6f5846e18
Announcements
Annoucements are now replaced by the news webparts [TODO: Link to news webpart doc]
Associated Site feature to disable: "Announcement Tiles"GUID: 00bfea71-d1ce-42de-9c63-a44004ce0104
Workflow Tasks
SharePoint Worklow are deprecated and replaced by Power Automate [TODO:link to rule to PowerAutomate]
Associated Site feature to disable: "Workflow Task"GUID: 57311b7a-9afd-4ff0-866e-9393ad6647b1
Drop-Off Library
Drop-Off Library is not deprecated in SharePoint Online explicitely, however it is considered best practice to user Power Automate to achieve the same results with much greater flexibility and maintainability.
Associated Site feature to disable: "Content Organizer"GUID: 7ad5272a-2694-4349-953e-ea5ef290e97c
Most people have now moved to SharePoint Online, either from scratch or by migrating content from previous versions of SharePoint. In SharePoint Online, a lot of legacy features have been deprecated and replaced by more modern counterparts. Unfortunately, chances are you have ported a whole lot of useless things as part of your migration.
[TODO: Screenshot of Useless stuff]
Before removing seemingly useless or old stuff, you should always make sure that site owners are OK with the deletion and that the data is actually not useful. In most cases however, the libraries detailed below have been added to your site by default and contain only demo and/or defautl data.
In SharePoint 2010, you can use SharePoint service /_vti_bin/listdata.svc to access data in SharePoint list, but in SharePoint 2013, /_vti_bin/listdata.svc has been officially deprecated.
The new service in SharePoint 2013 is /server/site/_api/web/lists/getbytitle('listname')
In SharePoint 2010, you can use SharePoint service /_vti_bin/listdata.svc to access data in SharePoint list, but in SharePoint 2013, /_vti_bin/listdata.svc has been officially deprecated.
Disposing objects in SharePoint is important, but never do it with objects from SPContext.Current. SharePoint will manage disposing these objects itself.
using (SPWebweb = SPContext.Current.Site.RootWeb){//do something here}
Figure: Using statement is trying to dispose current site object - it will cause exception
Just simply use "Current" object directly.
SPWebweb = SPContext.Current.Site.RootWeb;//do something here
Figure: Use Current objects directly - don't need to dispose them
It's important for all your SharePoint Sites to be as consistent as possible. This helps users' navigation through new pages as they know exactly where to look.
Following these simple rules makes this really easy:
Put your preferred navigation in the same place (usually on the left-hand side)
Keep the headings consistent
Use icons for each type of link, so users easily know what to expect when clicking on a link (E.g. A Microsoft Word document is going to open a Word document) Aldo, a link to "Home" looks the same on every page.
Navigation consistency between pages
Figure: Bad example - The page on the left has totally different navigation to the page on the right
Figure: Good example - Both pages looking consistent - common navigation elements in the same spot
Headings and icons consistency within a page
Figure: Bad example - There are no icons to help users on the left navigation + the headings are the different
Figure: Good example - Icons help users to know what files each link open on the left navigation + the headings are the same
It's important for all your SharePoint Sites to be as consistent as possible. This helps users' navigation through new pages as they know exactly where to look.

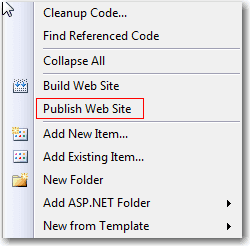

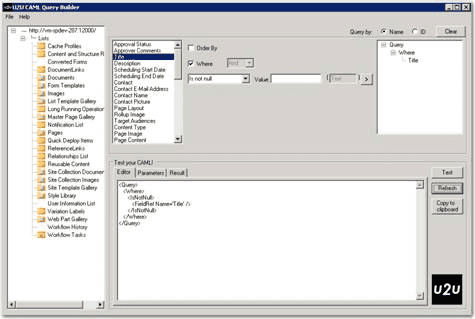
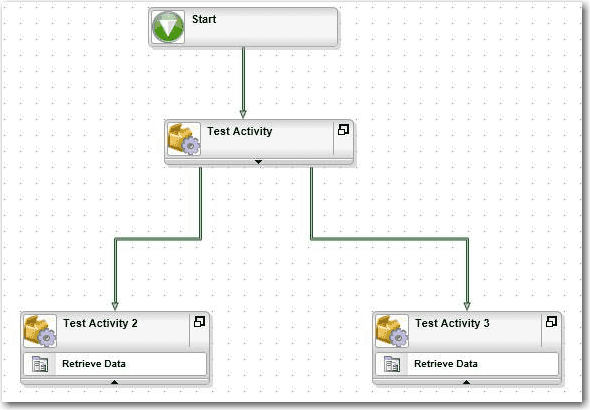
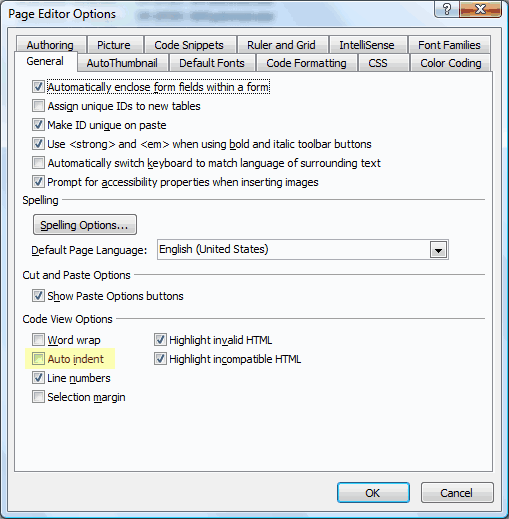
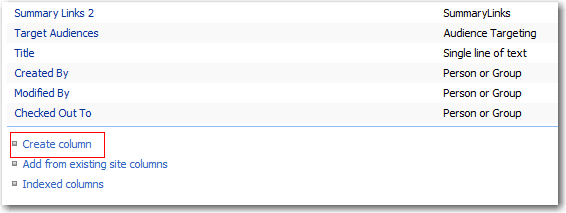
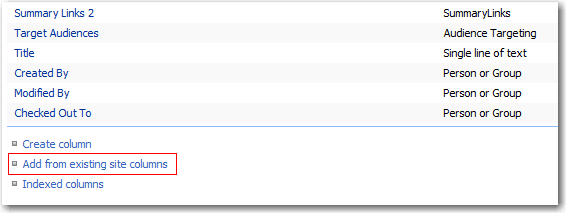

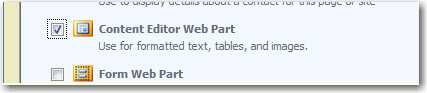 **Figure: Content Editor Web Part – available in any web part zone
**
However, there is a scary hidden trap!
**Figure: Content Editor Web Part – available in any web part zone
**
However, there is a scary hidden trap! 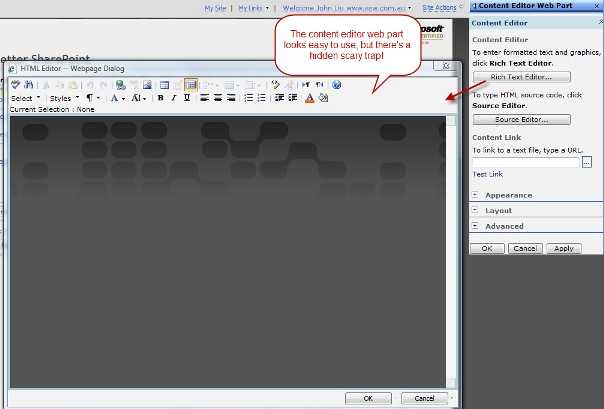 Figure: Content Editor Web Part looking mostly harmless...
So what’s bad with the Content Editor Web Part?
Figure: Content Editor Web Part looking mostly harmless...
So what’s bad with the Content Editor Web Part?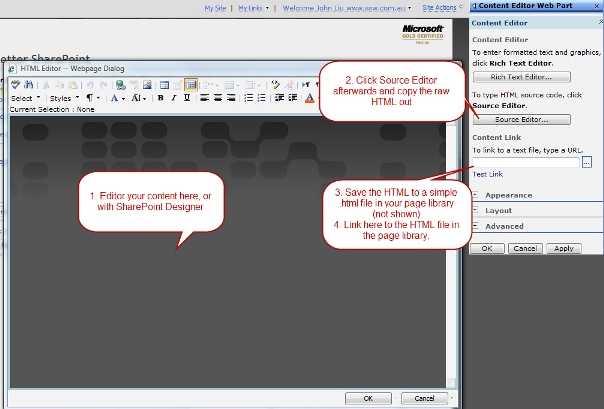 Figure: Using Content Link to a file - safely stored in the document library. This gives us the best of both worlds
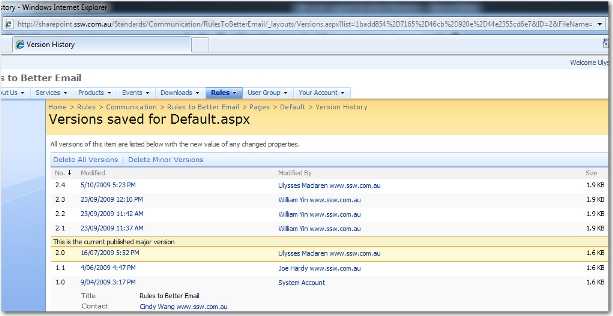 Figure: Version History
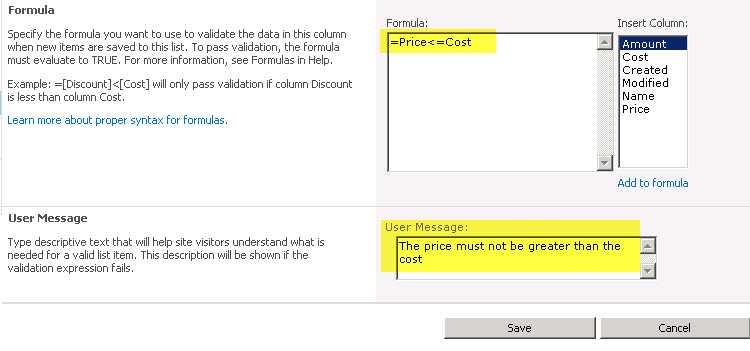

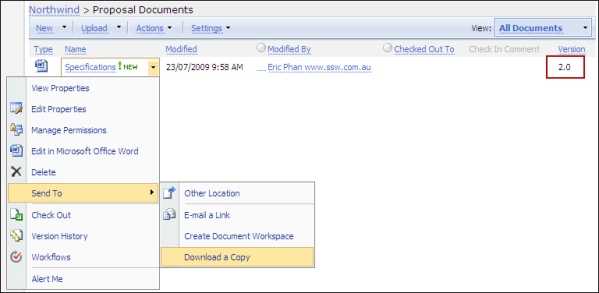 2. Add the version to the end of the filename e.g. Specifications_v2.0.docx 3. Then email it to the client. 4. We do this so that we can track what version of the document was sent to the client.
Tip: If you are not working with SharePoint then we recommend you include version numbers in your file names.
2. Add the version to the end of the filename e.g. Specifications_v2.0.docx 3. Then email it to the client. 4. We do this so that we can track what version of the document was sent to the client.
Tip: If you are not working with SharePoint then we recommend you include version numbers in your file names. Figure: Setting up the development environment in SharePoint can give you a headache
 Figure: The Ultimate solution for SharePoint development environments is to have another machine under your desk. The Ultimate Solution
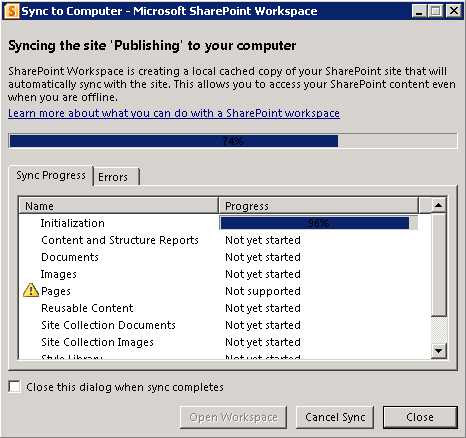 Figure: SharePoint Workspace synchronizing an entire site
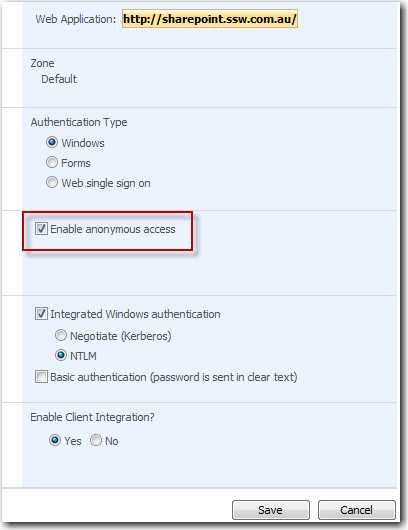 Figure: Enable anonymous access for publishing site
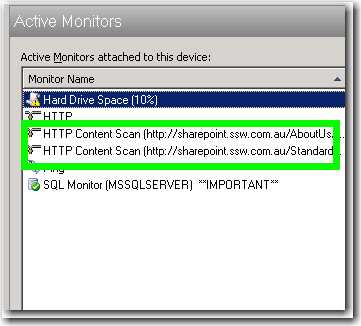 Figure: monitors for anonymous access - If the monitor is down, there will be an email sending out to our network admins
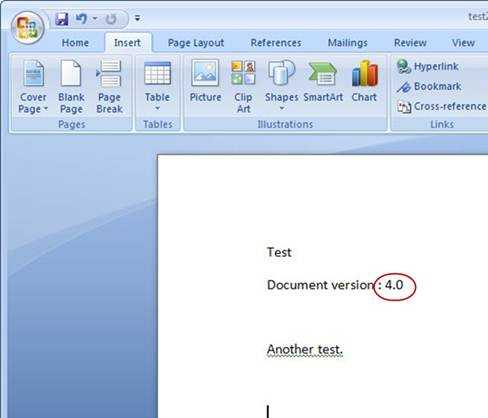

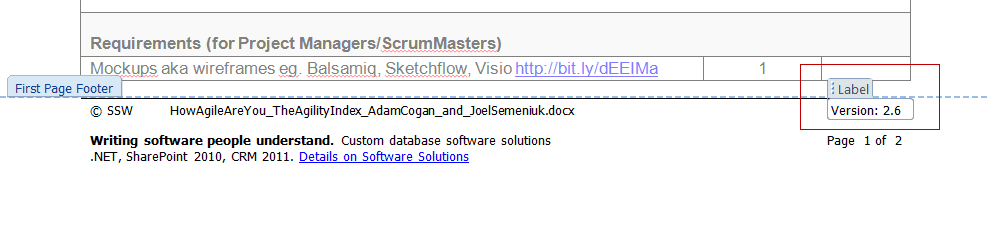
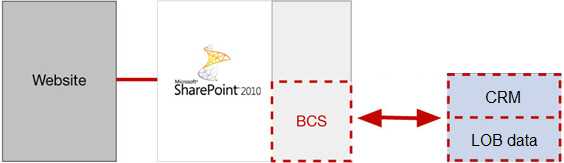
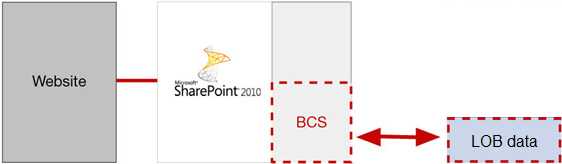
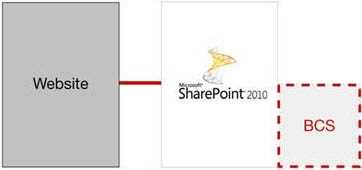
 Figure: Bad example - using the default Date Format
 Figure: Good example - using the Date Format with 'ddd'
 Figure: Date Format #1
  **Figure: Date Format #2
** To add the week day(eg.Wed) you need to:
**Figure: Date Format #2
** To add the week day(eg.Wed) you need to: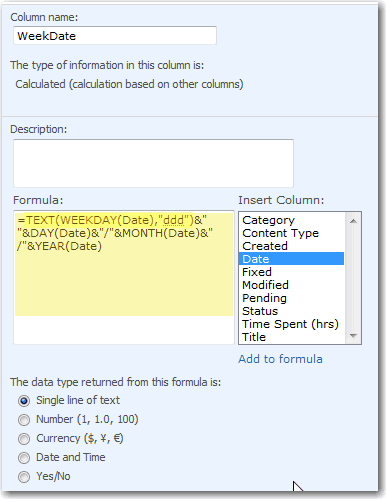 Figure: Calculated column with Formula code
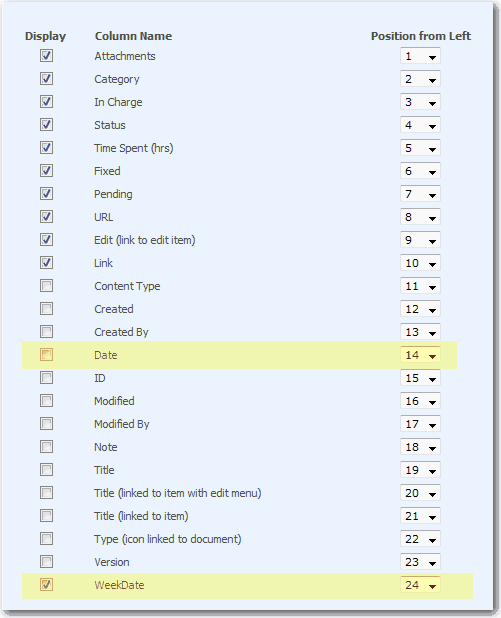 Figure: Replace the old Date column (Date) with new Calculated column (WeekDate It should not be this hard - see suggestion to the SharePoint team to make date formatting easier.
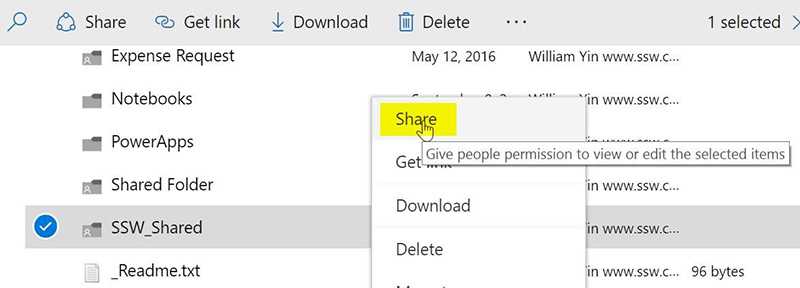
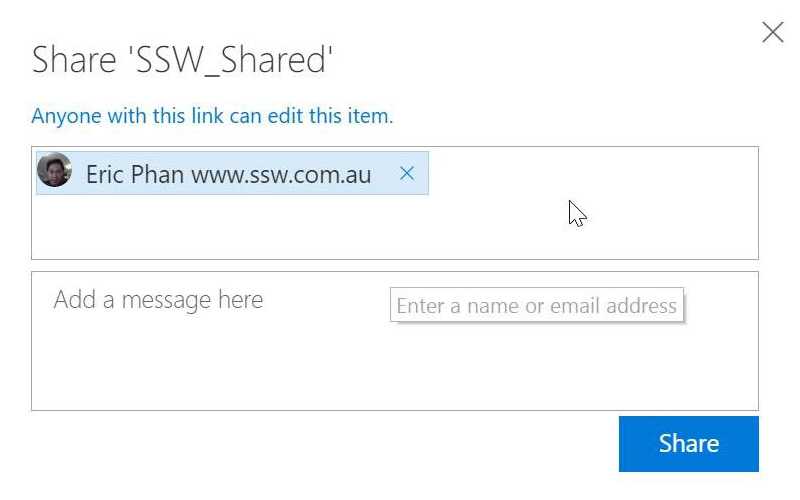
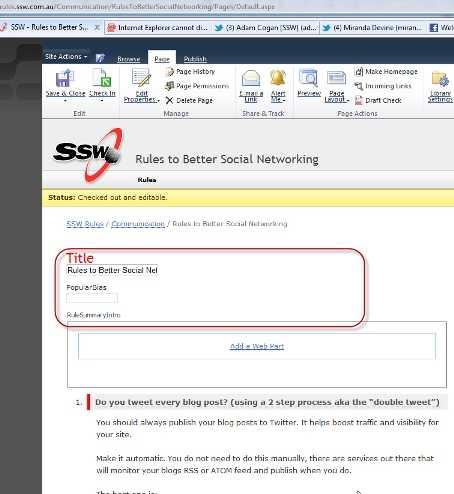
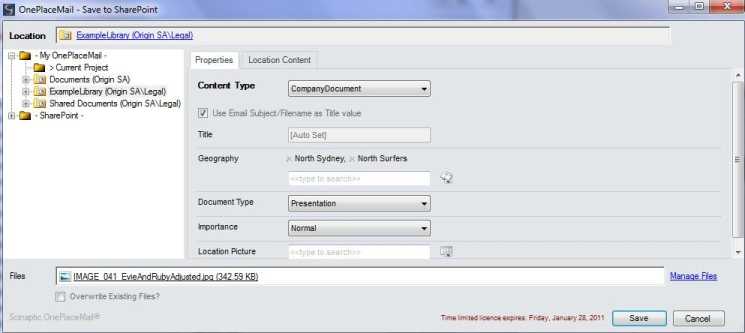 Figure: The optional save dialog that pops up when saving document to SharePoint - allowing use of Managed Metadata from Office 2003, 2007 and File Explorer
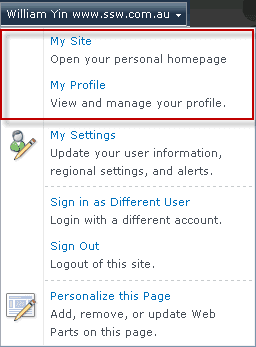
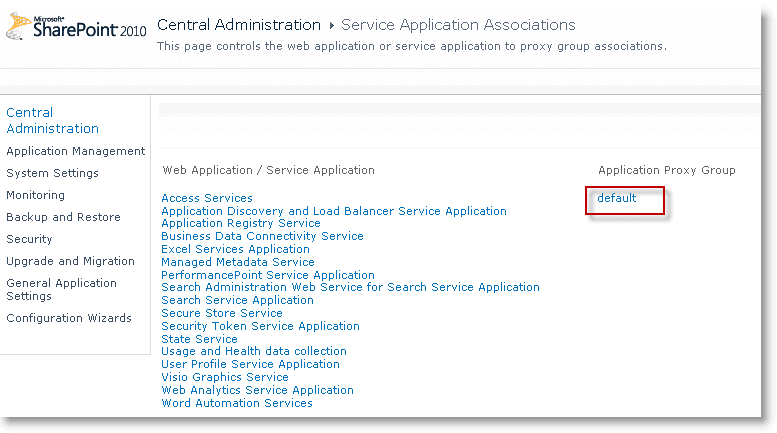
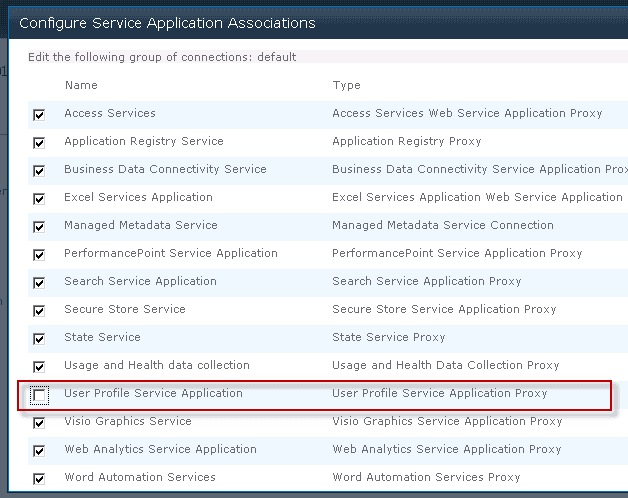
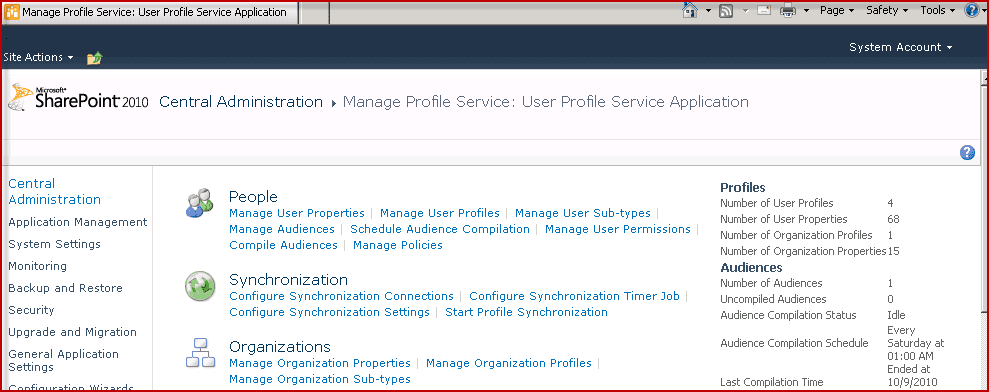
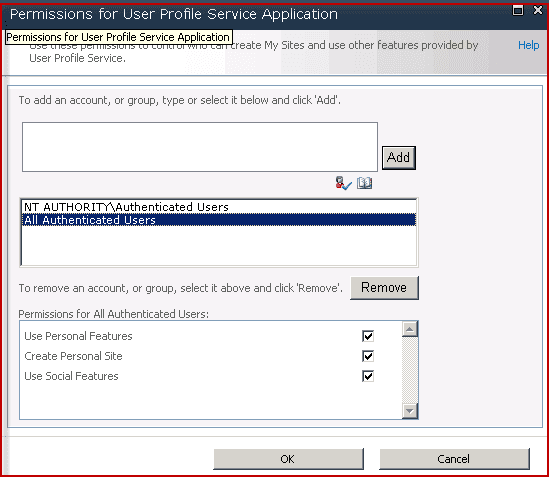

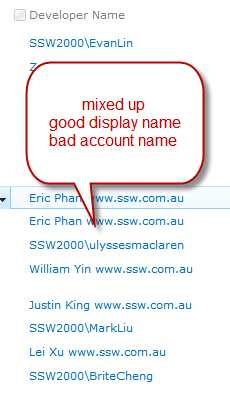 Figure: Mixed up names - some are good Display Name, some are essentially just the Account Name (More here)
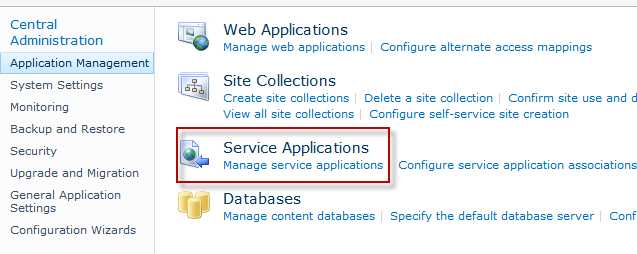 2. Go to User Profile Service Application
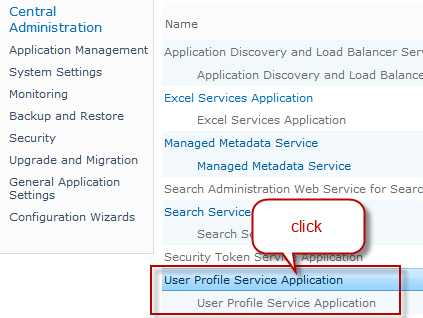 3. Go to Manage User Profiles
 4. Find the user profile that you want to update
 5. Fix the Name field (Display name)
 6. Save
 Figure: Click Page Layout in the Ribbon
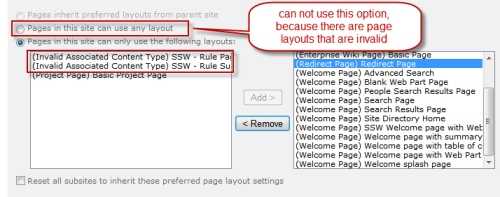 Figure: Restrict valid page layouts
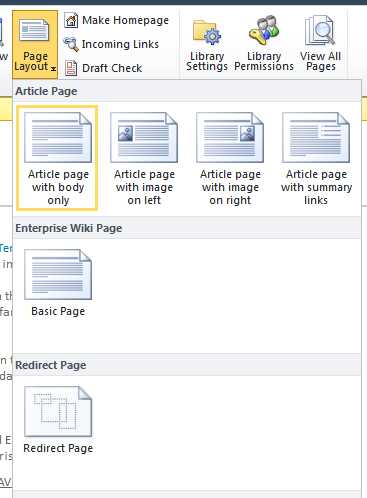 Figure: Ribbon menu fixed!
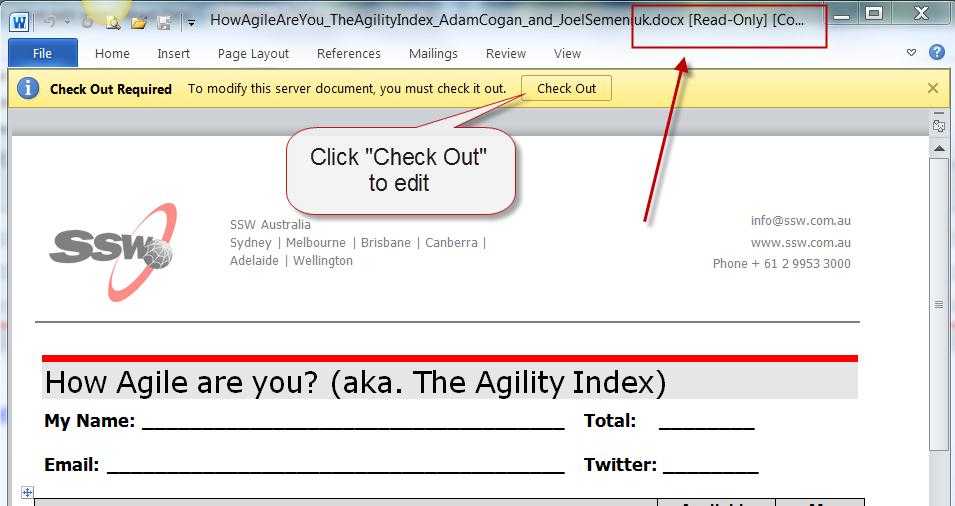
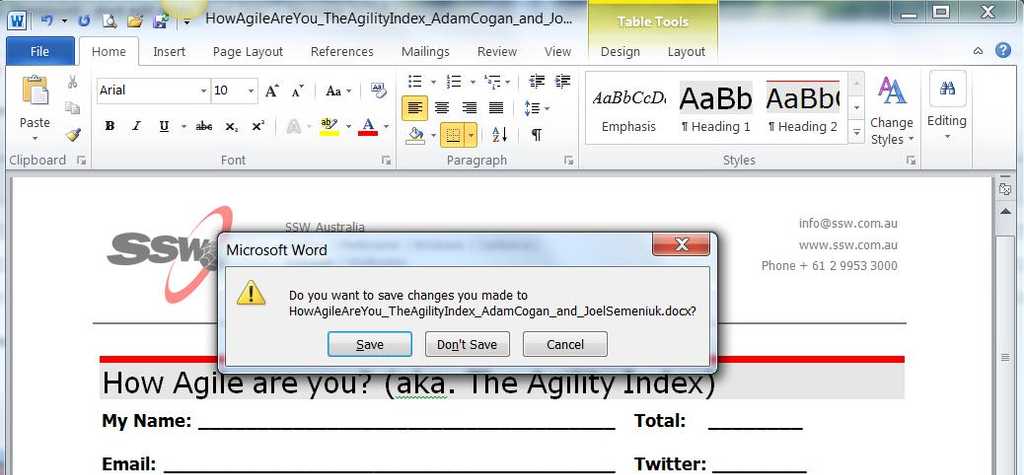
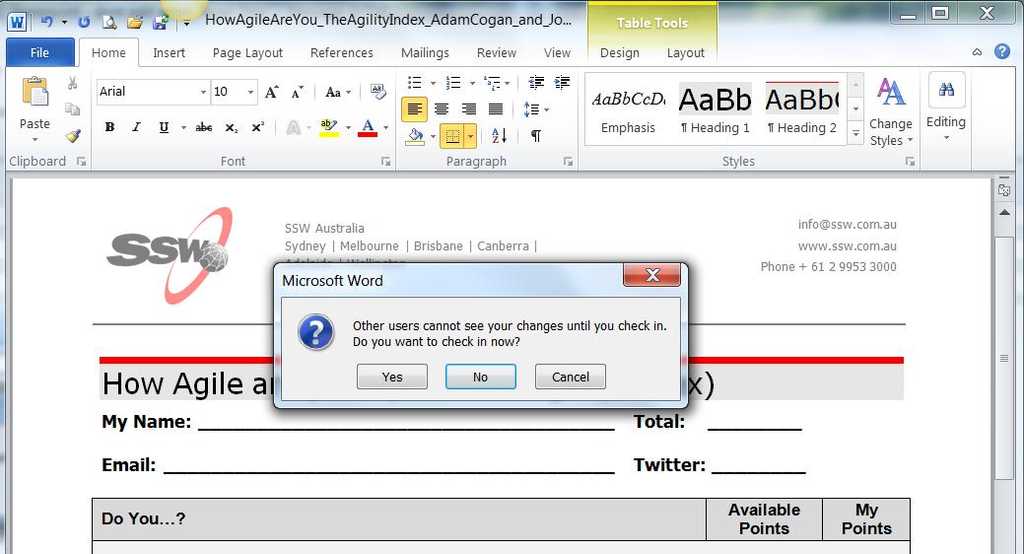
 Bad example: Obvious 'login' link for administrators 2. Use little dot for a hidden link:
 Bad example: little dot for a hidden link
 Good example: Use /admin/ URL for administrators