Rules to Better GitHub - 49 Rules
GitHub is a code hosting platform for version control and collaboration. It lets you and others work together on projects from anywhere.
Here is a series of rules on how to get the most out of GitHub.
Learn more about Scrum with GitHub.
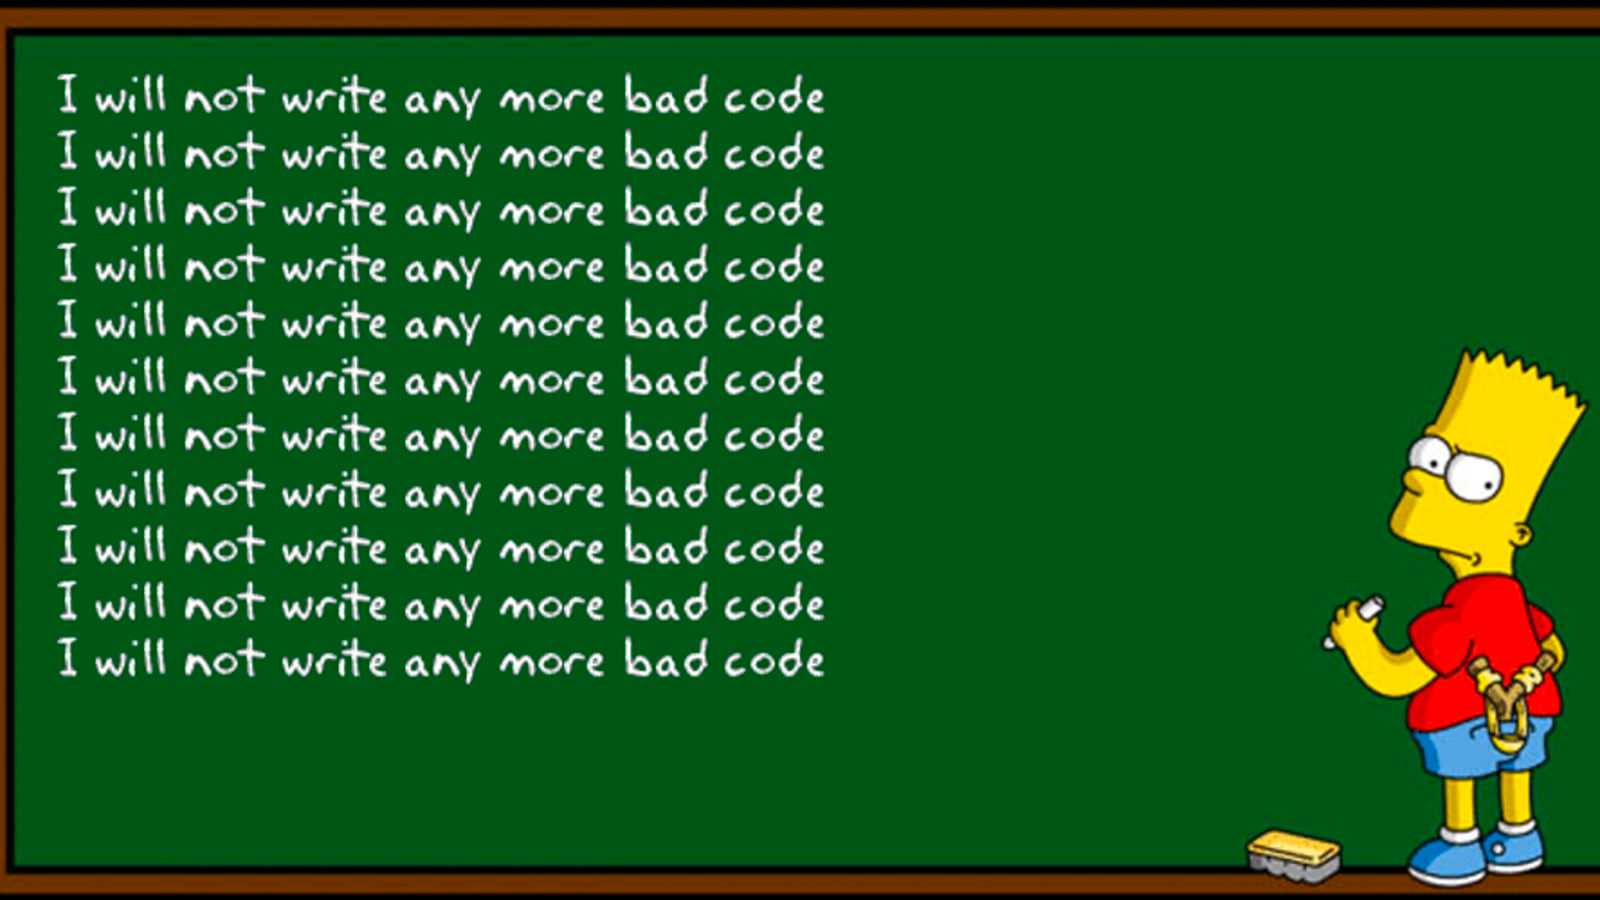
Everybody strives to be perfect, but mistakes are normal, and it is easy for a developer to skim over errors when they've read their own code code hundreds of times!
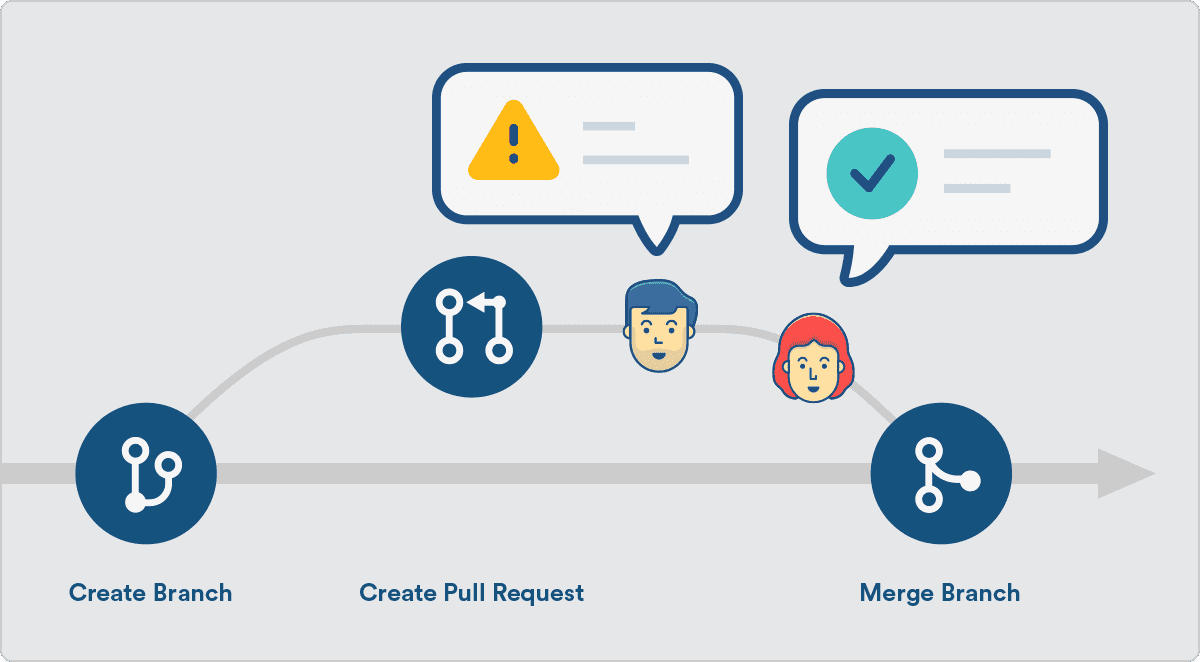
Pull requests are the best way to ensure that two sets of eyes see every change - so the responsibility is never solely on the person writing the code.
When Pull Requests are enabled, developers must create a branch and make their changes on that branch. Then they submit a Pull Request to merge their changes back into main. Each pull request must be approved by another reviewer.

Figure: Bad example - Leaving the responsibility to each person to write perfect code 
Figure: Good example - Make Pull Requests required 
Figure: Pull requests also give version history for rejected code! Useful resources - learn about Pull Requests
Video: What is a Pull Request? (3 min)Consistent naming is important so that users of your GitHub account can easily find what they are looking for and so that you appear professional.
Figure: Bad example – Repository names are not consistently formatted 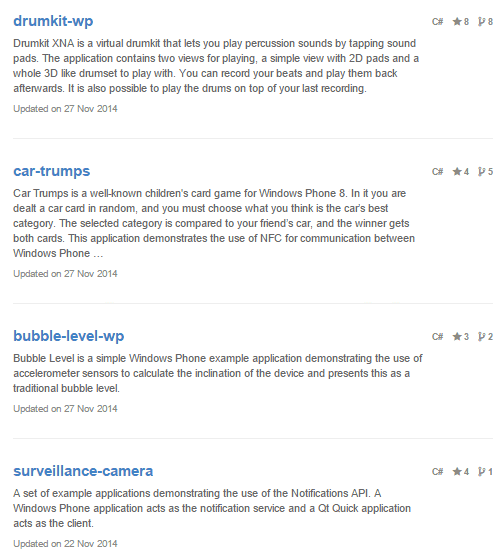
Figure: OK example – Repositories are following the lower-cased hyphenated format that is common for open source projects 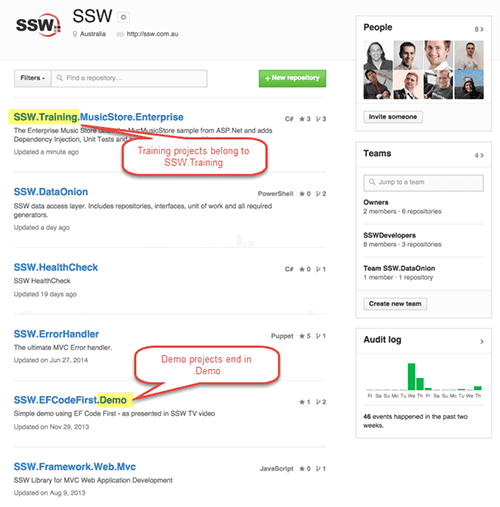
Figure: Good example – Repository names are name-spaced in the format [CompanyName].[ProjectName] Adding a description to your repositories is essential, so they do not appear blank in the preview on your GitHub profile.
Figure: Repositories with no description look bad 
Figure: Repositories with a description look good It is important when working in multiple projects to ensure consistent practices.
Structuring your repositories consistently makes your project feel professional, and makes it easier to work with as it is predictable.
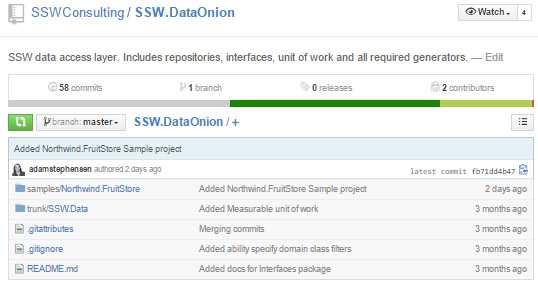
Figure: Bad example – The folder containing the source code is called ‘trunk’ rather than ‘src’ + there is no 'docs' folder containing the important documents 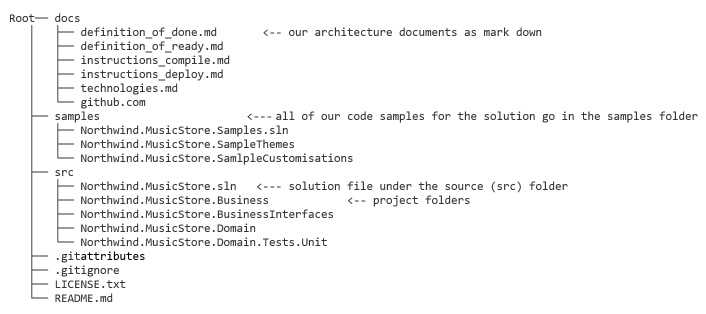
Figure: Good example - All documentation is in the ‘docs’ folder, samples are in the ‘samples’ folder, and all the source code is under ‘src’ It is important that you, especially a developer, knows how to use labels for GitHub issues when using an open source project on GitHub, as it would help compact issues and make the issue management workflow more efficient. Essentially, having such a predictable workflow will let the community feel professional.
Every new repository comes in with some default labels out of the box that you could use to label your issues to help create a standard workflow in a repository. A list of the default labels and their general uses can be found here: GitHub - Managing Labels
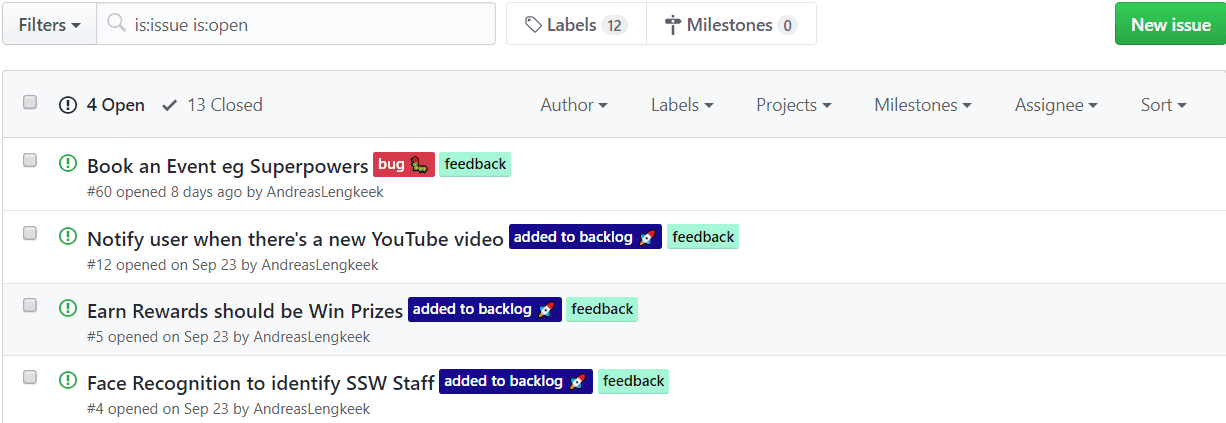
Depending on the project, there is often a need to create labels on top of the default labels. For instance, when you are using an internal project management solution (such as Azure DevOps) for an open source project, a new label "added to backlog" is created and applied to applicable issues specifically for demonstrating that an issue has been added to the Azure DevOps backlog and is being worked on for the community. This way you can give the community an understanding of the current goals of the project and a higher feeling of interactivity with your development team.

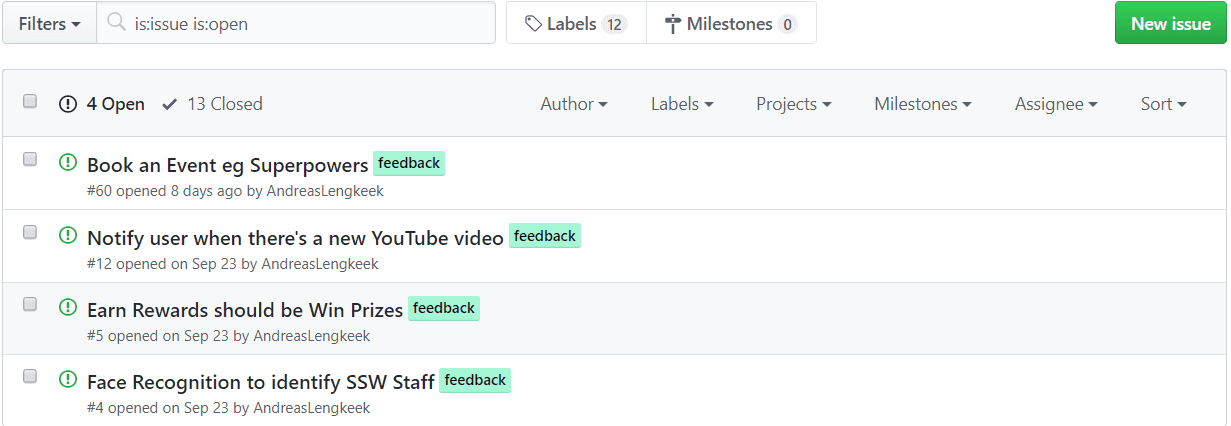
Figure: Bad example - It is hard to understand what issues are being worked on 
Figure: Good example - It is very simple to understand if an issue has received attention Review and clean up labels
You should review the labels regularly and clean up outdated or irrelevant labels to keep the backlog clean and organized. A good use of labels can improve project clarity, enhance communication among team members, and streamline issue prioritization. In contrast, poor management of labels can lead to confusion, misaligned priorities in workflow.
When using YakShaver to create work items, they will be tagged with
Needs Refinement, this reminds developers to review the issue to ensure that the details are correct. Once the review has been test passed, ensure that this label is removed, so that other team members know that it ready to be worked on.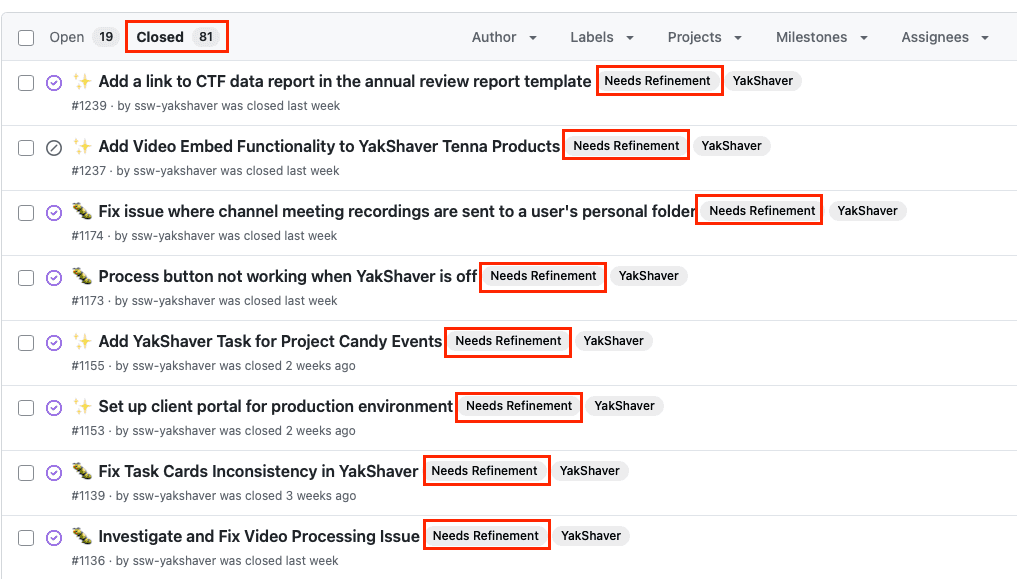
Figure: Bad example - The `Needs Refinement` labels are still on closed issues 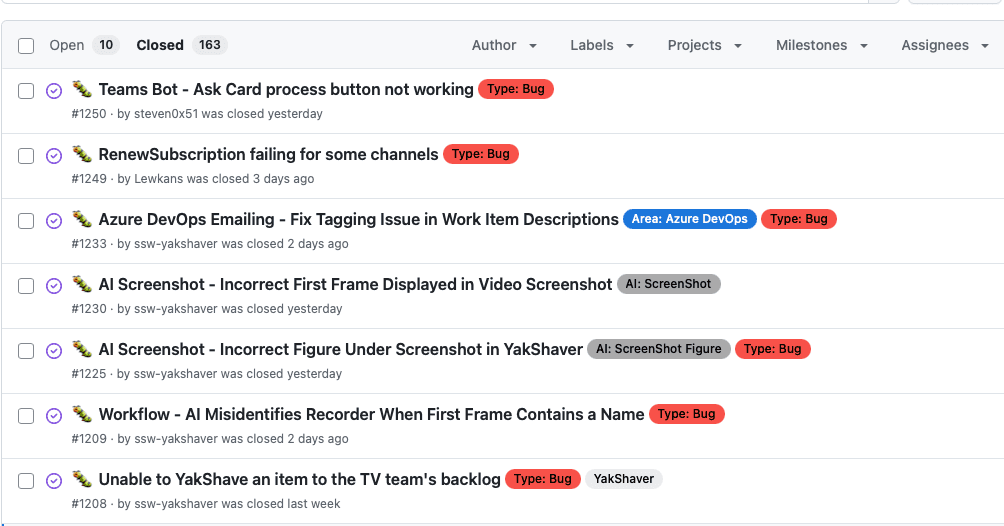
Figure: Good example - Labels are relevant When to review a label
- When the label is no longer relevant - For example, removing a "blocked" label after resolving dependencies or unblocking an issue
- If it misrepresents the current state - For instance, removing "need refinement" after the details has been added
- When the issue is closed - Ensure the labels are consistent before closing the issue to maintain an accurate project history
- If the label is unused or duplicated - Remove labels that are not actively used or merge duplicates (e.g. having both label "bug-fix" and "bug")
- When team conventions change - If the team revises its workflow or labeling strategy, update labels to align with the new conventions
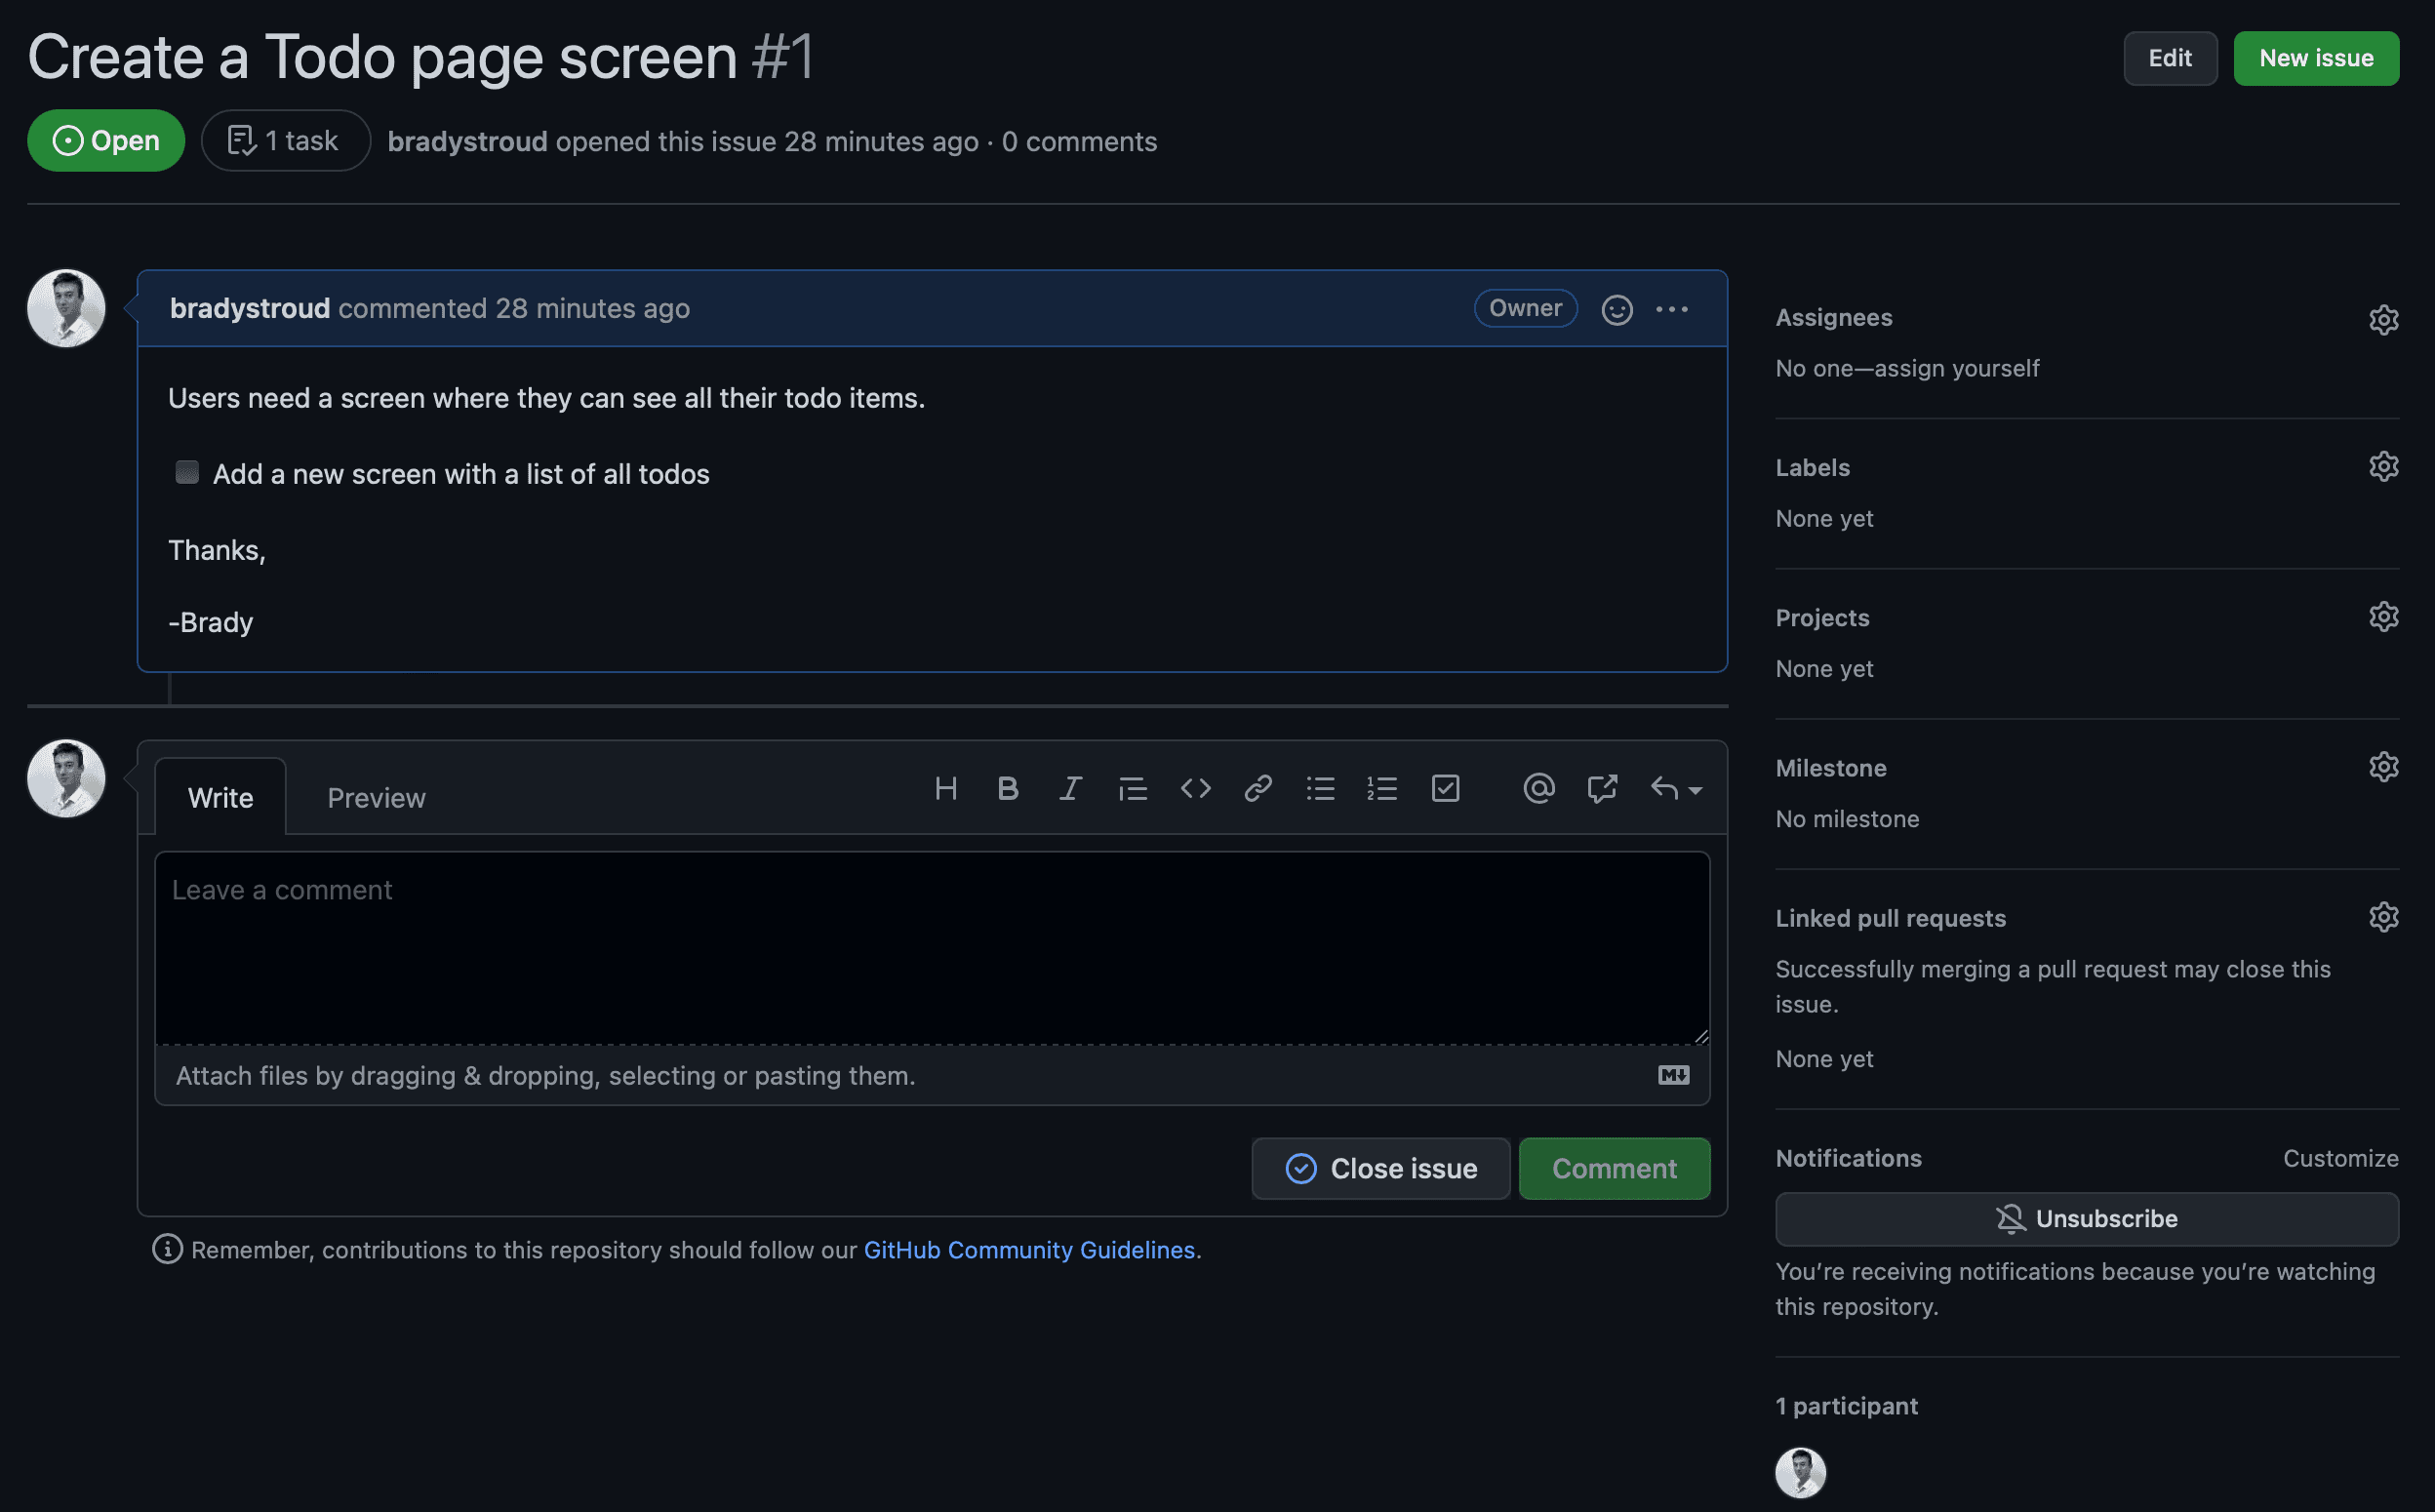
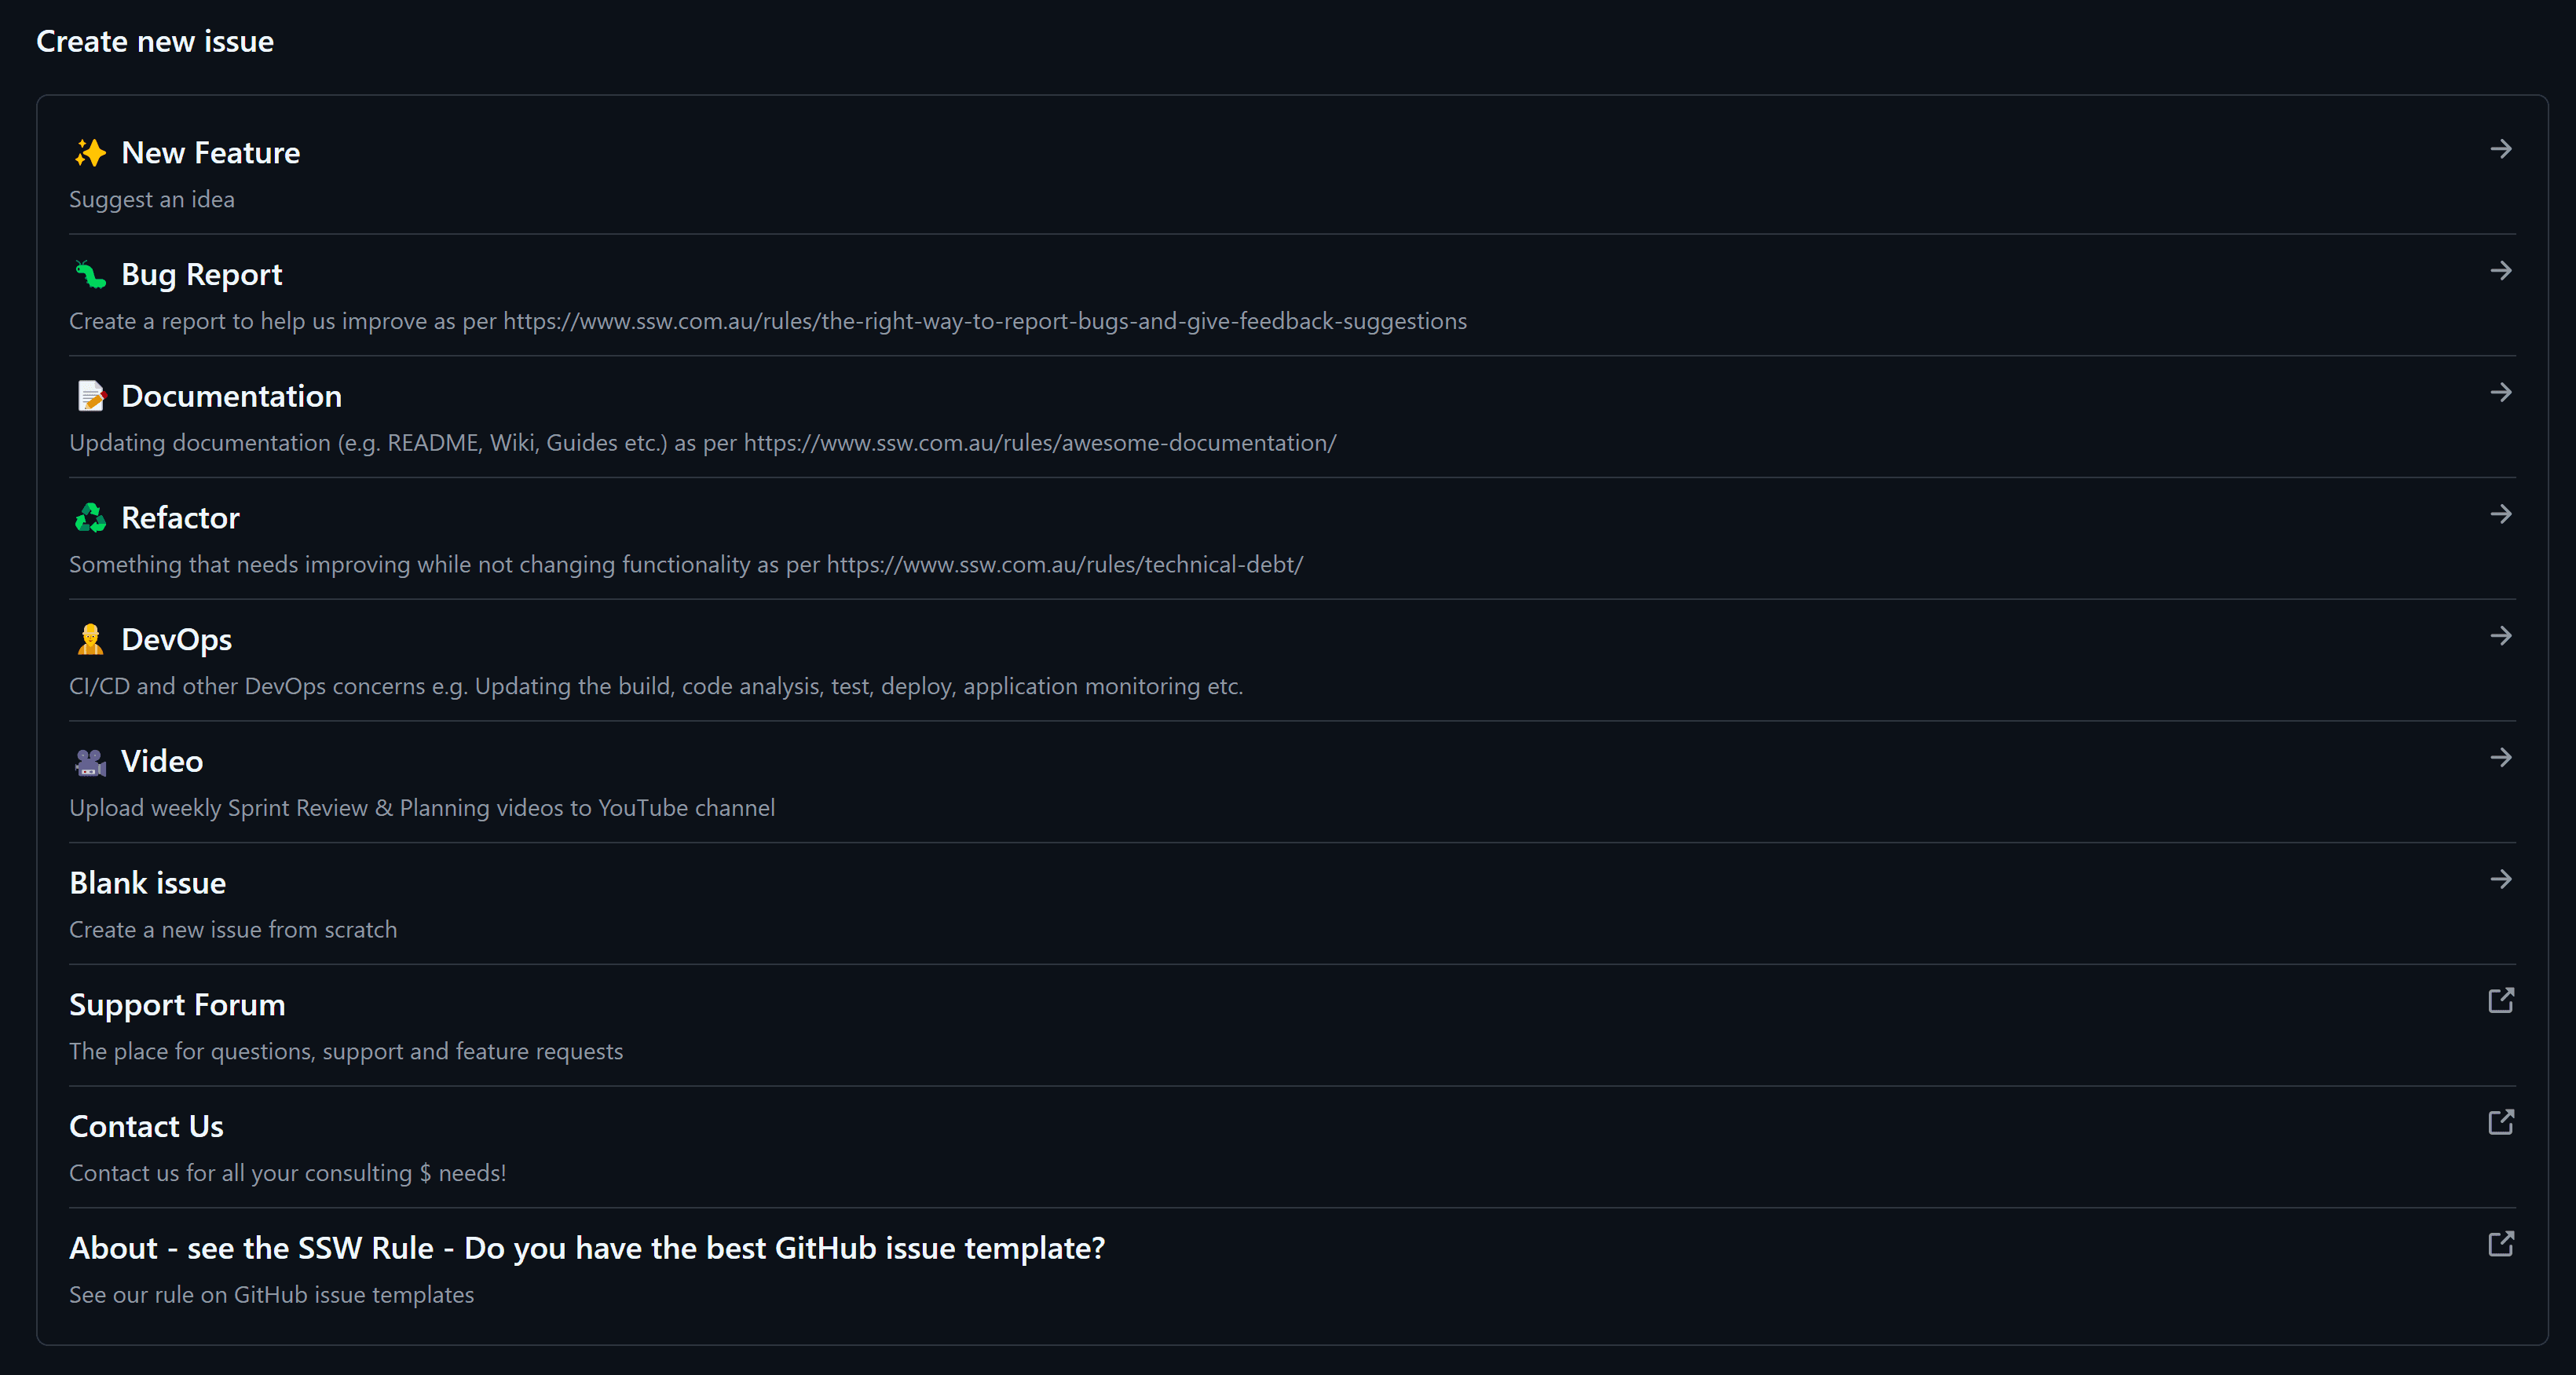
GitHub Issues offer a great way of raising Issues within projects. However, it can be difficult to distinguish whether the Issue is a bug, feature request or just a question. GitHub Issue Templates should be used to help standardize Issues and ensure they have enough information for a developer to start work.
The templates also make it easy for people to write good quality issues, increasing the chance of getting good feedback and suggestions from users.
Let's take a look at how implementing Issue Templates can improve repository backlogs...

Figure: Bad example - Issue created without a Template 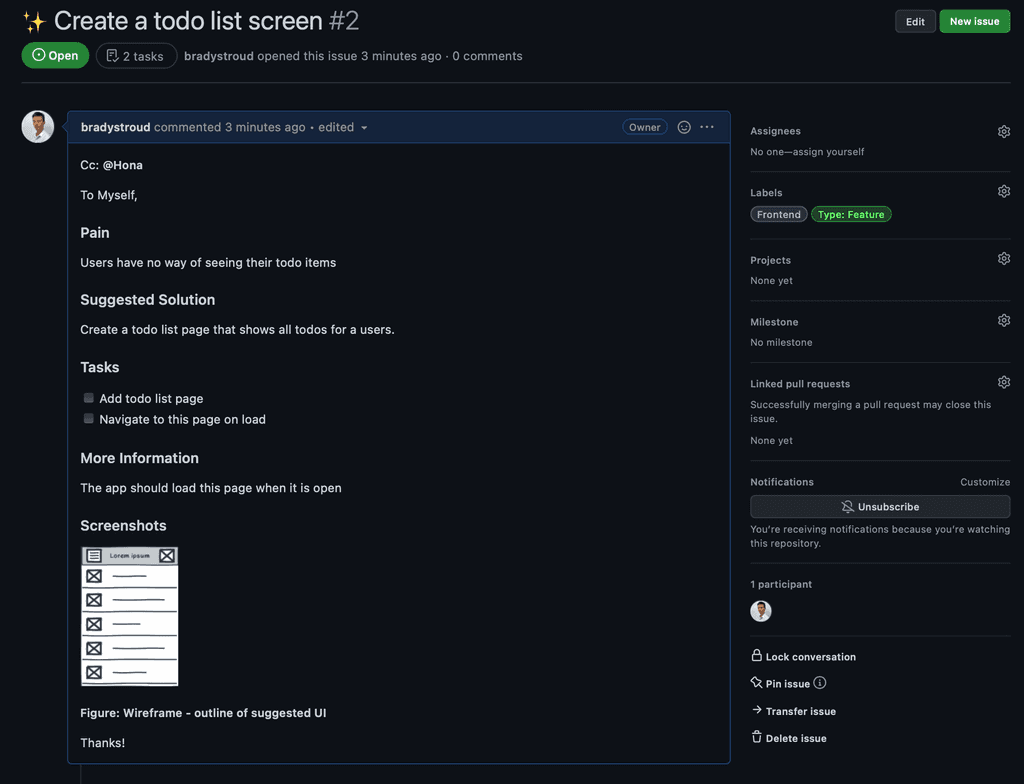
Figure: Good example - Issue created from a Template 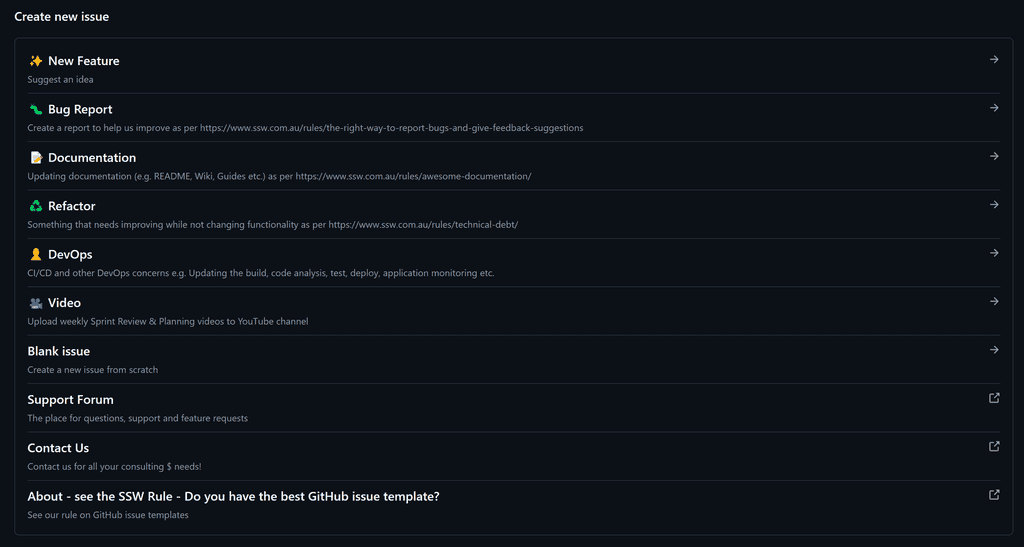
Figure: Good example - All the available Issue Template For instructions on setting this up, check out:
GitHub Issue Forms
You can take this a step further by creating Issue Forms - these are awesome for non-technical people who aren't comfortable with Markdown.
Check it out on GitHub Issue Forms docs
Figure: Issue Forms make reporting bugs easy Some websites use GitHub to manage their content (e.g. SSW Rules). GitHub makes reviewing changes easy through "Pull Requests".
A Pull Request is a request to make changes to 1 or more files. GitHub provides out of the box functionality for reviewing changes in a pull request. This process is as follows:
- Open the Pull Request
-
Examine the changes using the tabs:
- Conversations: Comments people have made about the change
- Commits: Summary of the changes the requester has made
- Checks: You can ignore this if you are not a developer
- Important - Files changed: See the difference between the old and new files being changed. Red highlighting indicates deleted parts and green highlighting indicates added parts.
This visual preview of the changes to a markdown file is accessed via Files changed | Display the rich diff

Figure: Reviewing tabs in a GitHub Pull Request 
Figure: The view via "Display the rich diff" button -
Approve OR ask for changes
a. Go to Files changed | Review changes
b. Select an option:- Choose "Approve" to mark it as ready to go live
Add a comment with feedback (if necessary) - Choose "Comment" for general feedback when PR it's not ready for approval
- Choose "Request changes" for mandatory changes to the PR
c. Press "Submit review" so that the requester can see it
- Choose "Approve" to mark it as ready to go live

Figure: Steps for submitting a Pull Request review - Done - your review has been submitted ⭐
As a software developer, you are going to create Pull Requests (PRs) that you want to be easy for others to review and approve. The quality of a Pull Request can vary - from cryptic to well-written.
Including a little bit of context helps your reviewer understand changes quickly so they can review your PR faster and give better suggestions.
There are 2 essential things you should have when writing a Pull Request:
1. Concise and self-explanatory title
Good PR titles provide a clear, concise summary of the change, helping reviewers quickly understand its purpose and priority.
- What the PR will do
- How the PR achieves it
- Emojis! Follow the GitMoji.dev standard
The key to writing a concise Pull Request is to base the PR itself on a PBI / Issue (assuming they are well written).
PBI title: Product Backlog Item 100359: "Desktop App | Exporting occasionally failed"
Pull Request title: Fix exporting
Bad example - Pull Request title does not tell what issues have been fixed and how
PBI title: Product Backlog Item 100359: "Desktop App | Exporting occasionally failed"
Pull Request title: 🐛 BUG - Fix desktop app exporting - prevent database concurrent access while exporting
Good example - Pull Request title briefly describes the fix that it has
Having the "What" information allows the reviewers to quickly understand what this is about while having the "How" can help the reviewer to quickly understand how your PR solved the problem. Sometimes we might want to put the "How" in the PR descriptions (see below) if it is too long or hard to explain in one sentence.
2. Clear and informative description
The Pull Request description is a medium for the developer to tell the reviewers what the changes are about.
Good PR descriptions provide context to help others quickly understand the problem, solution, and rationale. This minimizes confusion, accelerates reviews, and improves overall code quality.
Tip: For rare straight-forward changes, the self-explanatory title might be enough. You should still make sure there is enough details so the reviewer knows what initiated the changes. E.g. "PR Title: Fixed broken LinkedIn link caught by CodeAuditor on footer"
Examples of sentences to have in a good PR description:
- "Relates to #{{ ISSUE NUMBER or URL }}" (⚠️ see avoid linking to Issues you do not want to close)
- "From email subject: {{ EMAIL SUBJECT }}" (similar to the rule on warn then call)
- "As per my conversation with {{ NAME(S) }}" (similar to "as per our conversation" rule)
- "Worked with {{ @MENTION(S) }}" (as per pair or mob programming rule)
- "This PR is to {{ ACHIEVE THE FEATURE / FIX THE BUG / OTHER GOAL(S) }}" (anything that was not possible to explain in the title)
- "See {{ SCREENSHOT / DONE VIDEO }} for more details" (to help the reviewer to understand the changes. E.g. styling changes)
If you noticed that a change needed to be made and had no specific task/issue, use:
- "I/We noticed a problem: {{ DETAILS }}"
If there is an area you are uncertain about, add:
- "I'm looking for feedback on this code"
If the PR is closing an email task after merged, remember to refer back to it:
- "Done - see email: {{ EMAIL SUBJECT }}"
Linking the source to a PR serves as documentation on which development work that was done. It helps in the future to debug when and which changes were introduced and the original specification of that piece of work.
PR title: Update Rule “meaningful-pbi-titles/rule”
PR description:
Figure: Bad example - Cannot tell what was done here
PR title: Update Rule “meaningful-pbi-titles/rule”
PR description: Added missing video caption + removed unnecessary brackets
Figure: OK example - Clear and concise description, however it's not clear what task triggered the change
PR title: Update Rule “meaningful-pbi-titles/rule”
PR description: From email subject by @bob: SSW.Rules - Video caption missing. Done - Added missing video caption + removed unnecessary brackets
Figure: Good example - It's clear what changes are being made and where the task came from
There is also well-known Pull Request semantics like Conventional Commits on how to write a PR body, but we can still have a great PR without using such preciseness.
How to approach making a Pull Request
Video: 5 Tips For Better Pull Requests (11 min)
FAQs
Q: Are you making many small changes? A: You should summarize by saying: “Improved readability” OR “Fixed typos and grammar”.
Q: Are the changes big and complex? A: You should include a demonstration of the change.
E.g. A screenshot to show text/UI changes, or a Done video to demo functionality changes.Q: Are you using a CMS editor (i.e. Netlify or Tina) A: CMS editors may automatically add a placeholder description. If you're using a CMS to make your changes, you may need to go to the PR afterward and update the description to include the context.
Tip: Ensure devs follow these tips by using a template. Learn more and check out a template example.
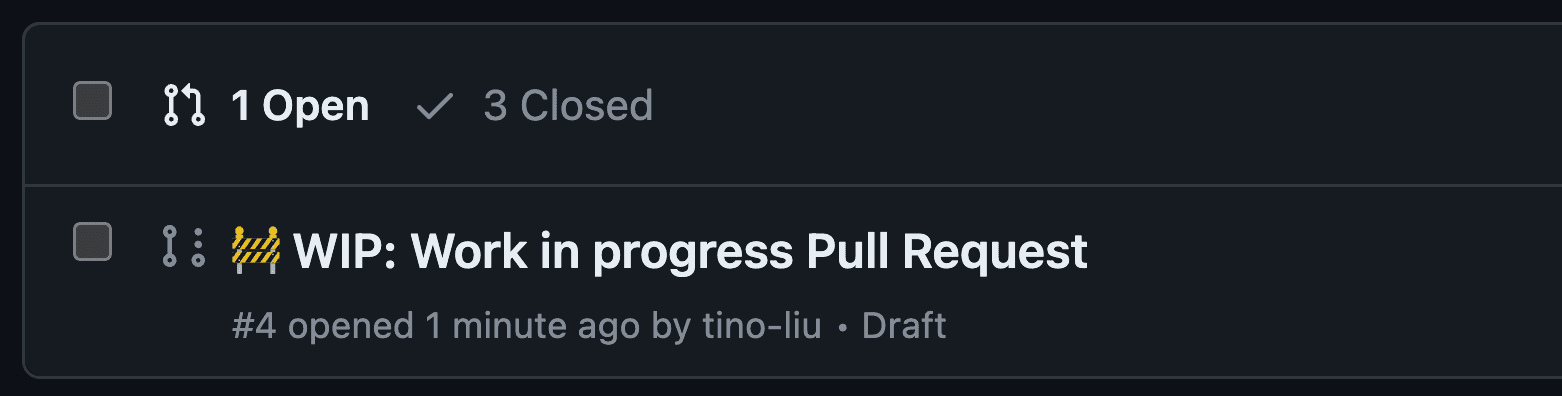
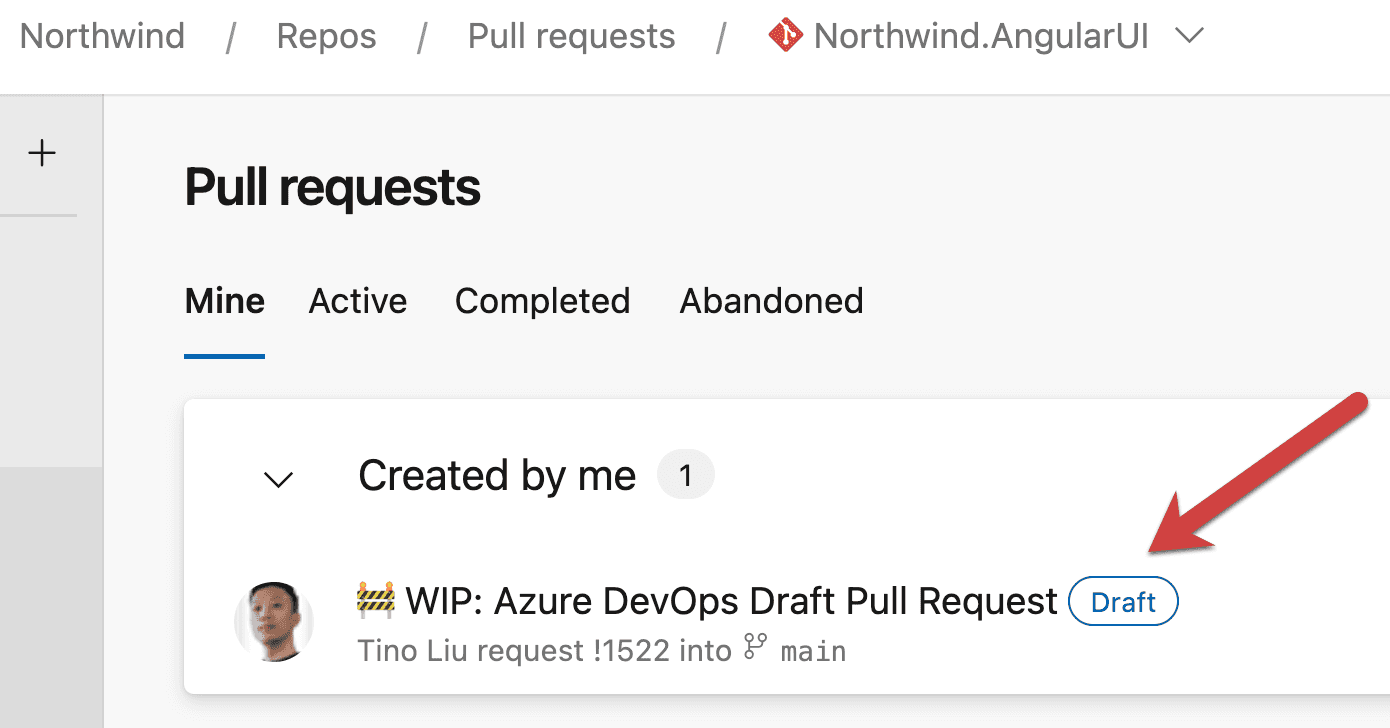
The use of Draft Pull Requests is a handy practice to indicate work in progress promoting early collaboration and continuous feedback.This approach enhances code quality, reduces duplication, and helps to maintain a transparent and efficient development pipeline. Creating Draft Pull Requests will also trigger GitHub Workflows so developers get early feedback on the quality of their changes.
Draft Pull Requests are less effective if they are not clearly marked as Draft, as is the case on GitHub. To make them clearer, use a naming convention like
🚧 WIP: {{PR Title}}to clearly show that it is a Draft Pull Request.GitHub
Figure: Bad example - The default experience lacks clear indication that this is Draft Pull Request 
Figure: Good example - Add prefix with 🚧 emoji to clearly indicate it is a Draft Pull Request If you want to go one step further, you can add the WIP App to your repo. The WIP App prevents the merging of Pull Requests with "WIP" in their title. When you are ready to go, you just remove the WIP prefix.

Figure: Good example - WIP app catching Draft Pull Request Azure DevOps
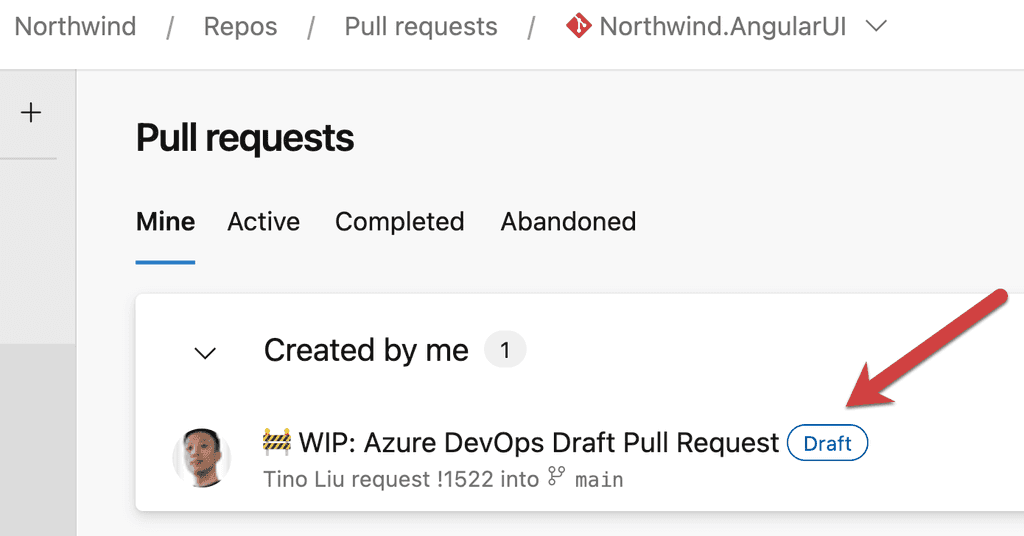
Figure: Good example - Clear naming and indication of a draft pull request The best way to handle continuous development and deployment is following GitHub Flow. The basic idea is to always deploy from main , and to create a feature branch for every feature. When the feature is complete, it is merged back to main via a pull request, which provides a trigger for other developers to build.
Using this strategy, main is always production-ready and deployable.

Finishing a Feature with World Class Flow Note: This rule applies to git. For branching advice in TFVC, see when to branch.
Figure: Bad example - Committing to main 
Figure: Good example - Committing to a new branch 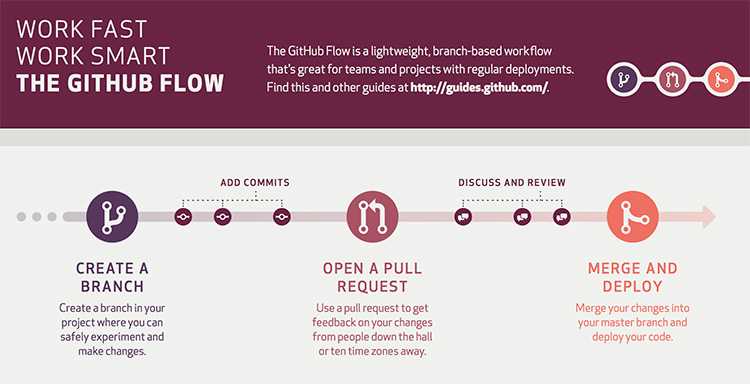
Figure: Great diagram from GitHub The process
Assumption
Set up build system to deploy from the main branch
Your build systems should always deploy from main, and should automatically deploy on every commit to main.
Since main is always being deployed, it must always be in a deployable state.Step 1 - Create a branch
a) Create a "feature branch" for every PBI
When starting a PBI from the task board, create a branch from main with a descriptive name for that feature.
git branch start-stuffFigure: Bad example - Branch name is not descriptive
git branch feature/1234-create-basic-web-applicationFigure: Good example - Branch name describes the intent of the change and follows a branch naming convention
It is critical that this branch always comes off main, not another feature branch. Main is the only branch that is mandated to be in a deployable state, so any other option is unsafe.
Obviously, we're creating a lot of branches and merging a lot under this strategy - and that's ok. Be sure to keep your PBIs small (as per breaking large tasks into smaller tasks), and you will not have much merge pain.
The benefit of creating feature branches is to reduce the number of conflicts and churn of unfinished code during development of a feature. It allows features to be developed independently of each other and reduces the amount of expensive "pull latest from the server, and rebuild everything" operations, as well as greatly limiting the impact of commits with unfinished code.
b) Code away and complete the PBI
c) Create a commit - it will contain your changed files on your local PC
While working, commit frequently to this branch with nice, descriptive messages. For example: "Added a field to hold the product category to our timesheet read model" or "added a column to the timesheet summary UI for the product category".
git commit -m "Started report change"Figure: Bad example - Commit message does not describe what was changed
git commit -m "Added a product category filter to the timesheet summary report UI"Figure: Good example - Commit message describes exactly what was changed
d) Push your changes to your remote Feature Branch
Step 2 - Open a pull request (to merge from your current branch to the main)
When the change is complete, or when you want feedback on anything, open a pull request to merge the branch back to main. The pull request is more than just a request to merge, it is a request to have someone review the code and architecture, or image and to discuss any issues. Resolve these issues with more commits in the branch before continuing.
Tip: A best practice is to have another developer review your work and then approve.
It is easy to chalk this step up as busy-work, but it is one of the most valuable parts of the strategy.
Assumption
Deploy the changes to a staging environment. This allows the features to be tested before being merged to main.
Some prefer to move this step to after the merge, especially when using a release management tool like VSTS Release or Octopus Deploy (see Do you use the best deployment tool). If you decide to go this route, remember that main should remain deployable and production ready at all times and that all branches come from main. If skipping this step, ensure that you have CI on your feature branch to ensure that your branch compiles and passes all tests before merging.
Step 3 - Merge and Deploy (to main)
Once everyone is happy and everything is tested, complete the pull request, which will merge back to main. Ensure you are not using the "Fast Forward" merge option (git), or details about the branch will be lost - it will appear as though all work was done in main. Being able to see the feature branches in the git log is very useful.
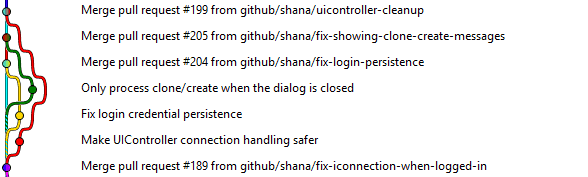
Figure: Good example - Each change is well described, small and in its own feature branch After you completed the pull request, make sure you also delete the branch that you made the pull request of. Deleting your completed branch will not just help yourself in the long run, but also everyone else. Having too many branches especially a stale one will confuse developers on what "may" be in progress, moreover it would cause so much pain to the future developer when they have to do a clean-up and the branch author has left.
Figure: Bad example - Lots of stale branches that could cause confusion or potentially take a long time to resolve conflicts when merging Otherwise, you can do it before you complete the pull request by ticking delete branch option.
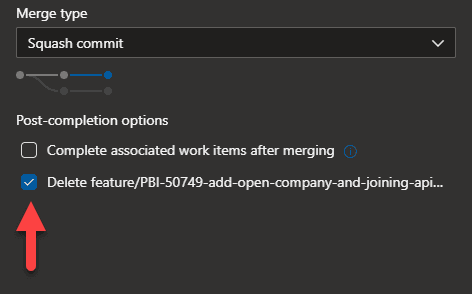
Figure: Good example - Automatically delete the branch after the pull request completion in Azure Devops 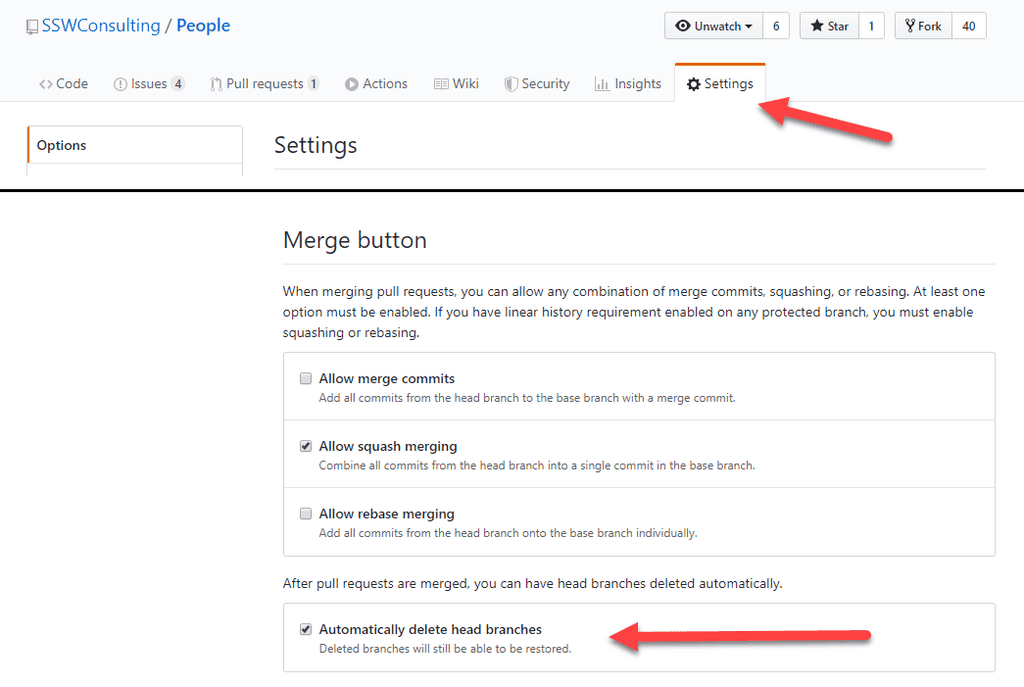
Figure: Good example - Set the whole project to auto-delete branch after merging in GitHub Once merged, main should immediately and automatically be deployed (in a perfect world, to production).
Have you ever looked at the list of branches in your repository and not know what they were for?
Consistent naming conventions in source control systems help improve collaboration, clarity, and organization across teams. Using meaningful branch names with PBI numbers enhances traceability and reduces merge debt.
Always remember to:
- Include a PBI number - This makes it easy to track the purpose of the branch, reduces confusion, and provides context
- Use lowercase kebab style naming - Keeps the name easy to read and compatible with a wide range of systems
- Be descriptive - Clearly indicate the purpose or content of the branch
- Keep it short - Use concise yet meaningful names
- Extra: Use categories for improved organization - If your repository has many branches or you want to keep them organized, adding a prefix such as "feature", "bugfix", or "hotfix" is beneficial
Note: Release branches should always include a prefix (e.g., release/) to distinguish them from other branch types and keep them organized.
- SomeUser-patch-3
- fix-styling-issue
- redirects
- update-package-version
- fix-stuff
Figure: Bad example - Poorly named branches missing PBI numbers
- 1463-collection-categories
- 1506-fix-storage-variable-yaml
- 1299-update-third-party-dependencies
Figure: OK example - Branches with PBI numbers and meaningful names
- feature/3421-add-search-functionality
- bugfix/4578-fix-date-formatting-issue
- hotfix/9845-patch-payment-api-timeout
- release/2.3.1
Figure: Good example - Branches with category prefixes
{{ CATEGORY }}/{{ PBI NUMBER }}-{{ DESCRIPTION }}
Figure: Good example - Recommended naming format
❌ Avoid using
SomeUser-patch-1GitHub's automatically generated branch names like patch-1, patch-2, etc., are convenient for quick edits but lack context, making it difficult to identify the changes introduced. These branches are often used for typo fixes or minor documentation updates that are immediately raised as pull requests.
To improve clarity, use a descriptive name instead, such as
fix-readme-typoinstead ofpatch-1.Reviews are a crucial step in the PR process, as they ensure that the code/content is of high quality and adheres to the standards of the project. However, sometimes, developers encounter minor changes that do not require extensive reviews. In such cases, using a rubber stamp label can help expedite the PR approval process.
The rubber stamp label signifies that the change can be approved without extensive scrutiny. It is typically used for minor changes such as typos, formatting issues, or small documentation updates. By using a rubber stamp label, we can save time on reviews.
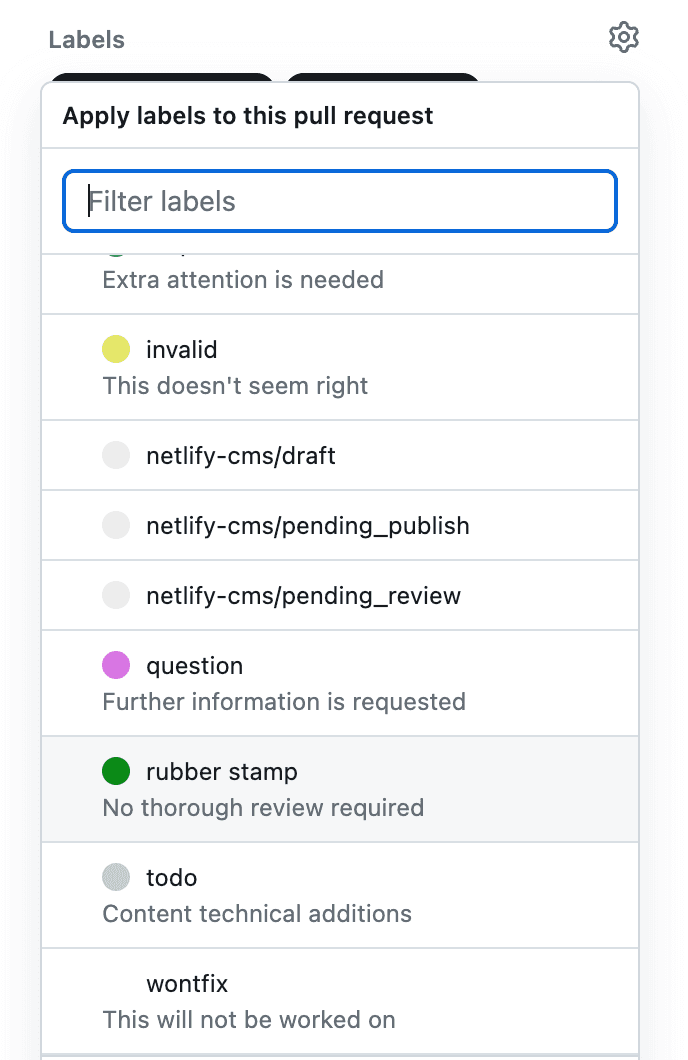
Figure: "Rubber stamp" label for GitHub Pull Requests To use a rubber stamp label effectively, you must follow some best practices:
- Only use the rubber stamp label for minor changes - As mentioned earlier, the rubber stamp label is meant for minor changes only. Developers must ensure that the changes they make are truly minor and do not require in-depth reviews.
- Ensure that the change adheres to other standards - Even though the change is minor, it must still follow the project standards. Developers must ensure that their changes do not introduce any new issues or errors.
By following these best practices, developers can use the rubber stamp label to get their PRs approved quickly without compromising the quality of the project.
Here are the steps to use the rubber stamp label effectively:
- Make the change and submit a PR
- Clearly describe the changes
- Add the rubber stamp label to the PR. This means that the change can be approved without detailed review
- Wait for the PR to be approved, hopefully in less time than other PRs... it will clearly show the label to reviewers
- Once the PR is approved, the changes will be merged into the codebase
Pull requests are a fundamental feature of collaborative software development, allowing contributors to propose changes to a project and receive feedback from other developers. When reviewing a pull request, it can be tempting to make additional changes beyond those requested by the PR creator.
Certain projects (E.g. SSW.Rules) allow these additional edits, without the need for extra reviews by someone else. Knowing that, it's crucial to make sure the changes are correct, necessary and beneficial to the project before adding them.
Most common scenarios where editing an existing PR is encouraged:
- Fixing typos
- Grammar improvements
- Formatting (Markdown) fixes/improvements
For the cases where your wanted change can serve as a learning opportunity to others, it is always best if you ask them to action by requesting a change. This way the extra change can be avoided in the future.
Warning: Only experts should include their own changes to an existing PR.
Never add extra changes to a PR if you are less experienced or unfamiliar with the project. The additional changes may be unnecessary or even harmful!Ultimately, the decision to add additional changes to a pull request should be made based on the needs of the project and the expertise of the contributors involved. It's important to carefully consider the impact of any additional changes and ensure that they are aligned with the project standards.
Written communication can easily cause misunderstandings. Help the reader understand your message better by:
- Using “>” and indentation when quoting the text from others, like the original email you are replying to.
Note: “>” is not needed when quoting from a web page - Make the question/task followed by the respective answer in a logical order
- Add numbers to tasks if the sender forgot.
Mention you changed the history. E.g. “(added numbers to tasks in the history, so we can clearly refer to them)” - Your text should be always kept to the left
This way you won't forget any questions in the original email.
Note: You do not need to use ">" and indentation, when you are replying to the task that is very clear, because in this case extra text reduces clarity.
To: Adam Subject: RE: Change on Northwind app Figure: Bad example - There's too much information with no reasonable order
To: Adam Subject: RE: Change on Northwind app Figure: Bad example - Order is OK, but it's using quotes to reference others' text + no indentation + missing numbers on questions/tasks
To: Adam Subject: RE: Change on Northwind app Figure: OK example - Even with ">", indentation and numbers, without spacing the text becomes cramped and hard to read
To: Adam Subject: RE: Change on Northwind app Figure: Good example - You can clearly see the context of each part of the reply
Tip #1: When using Outlook, the raw “>” character may be automatically formatted to a “>” bullet point. This change is a problem because it may change to a normal bullet point after being sent. To prevent this issue, press Control+Z to turn it back into the raw “>” character.
Tip #2: For those using mobile devices the indentation function is not available, try instead using 3 spaces to indent manually
Tip #3: Note the extra line break after each reply... this helps group each question with it's answer
Tip #4: If you're quoting someone who already used >, you can use >>
Tip #5: Some people also use a different text color in their reply, but this is generally overkill
Markdown
When using Markdown (usually on GitHub), use a ">" symbol to achieve a similar result.

Figure: Indenting tasks in Markdown 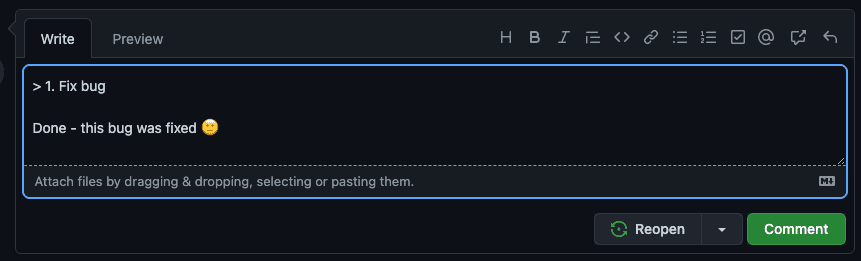
Figure: How it looks You can find more info about GitHub Markdown syntax at Basic writing and formatting syntax.
Video: Top 10+ Rules to Better Email Communication with Ulysses Maclaren
- Using “>” and indentation when quoting the text from others, like the original email you are replying to.
It is important when creating a new repository, to set it up correctly. Repositories without Descriptions, ReadMe files or licenses do not appear professionally built.
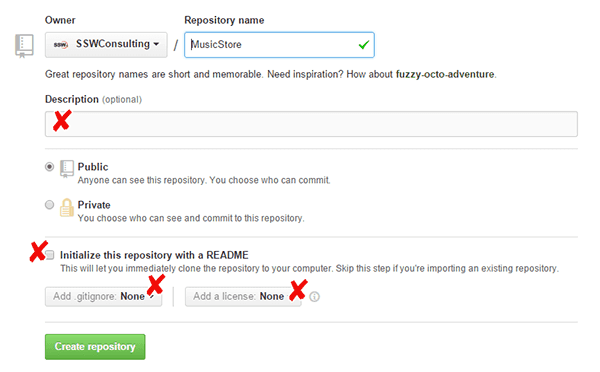
Figure: Bad Example – Without the correct .gitIgnore, files that should not be included in the repository will be added. Without the correct license, your project will either be under-protected or over-protected 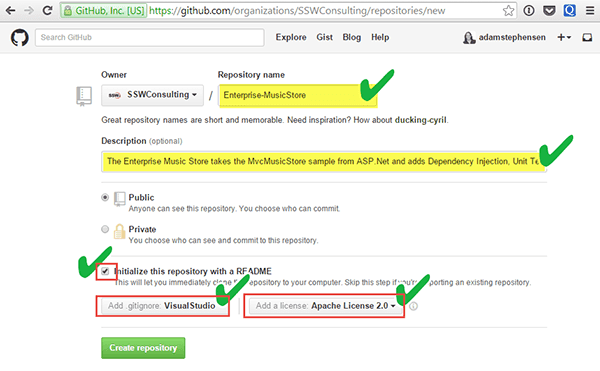
Figure: Good Example – As well as a good repository name and description, a ReadMe, .gitignore and license will be included in the repository. Reading ugly commits is not very pleasant and makes it very confusing when you have to check the commit history.
Bad Example: The commits have no meaning. Here are a few ways to improve your commit log.
Tip #1: Have a nice, concise comment
Examples:
- Fixed bug with emoji engine
- Added new emoji filter
- Updated Architecture Diagram to have emojis
Tip #2: Using prefixes
Even better is to add a helpful prefix to categorize your commits.
Examples:
- Fix: Fixed bug with emoji engine
- Feature: Added new emoji filter
- Doc: Updated Architecture Diagram to have emojis
Tip #3: Using emojis 💄
In a text message, emojis helps to add emotion and context to plain text. Why not use them in commit messages too 😃?
Examples:
- 🐛 BUG - Fixed emoji engine in language component
- 🚀 Feature - Added emoji filter on Snapchat
- 📄 Doc - Added emoji’s to changelog
There are a bunch more options to choose from - carloscuesta/gitmoji: An emoji guide for your commit messages. 😜 (github.com)
Tip #4: Using gitmoji VSCode extension
Gitmoji - Visual Studio Marketplace (visualstudio.com).
You can even go 🤘 hardcore and use the gitmoji cli - carloscuesta/gitmoji-cli: A gitmoji interactive command line tool for using emojis on commits. 💻 (github.com)

Good Example: Great use of emoji and concise message. See what emojis work best with each topic here: https://gitmoji.dev/

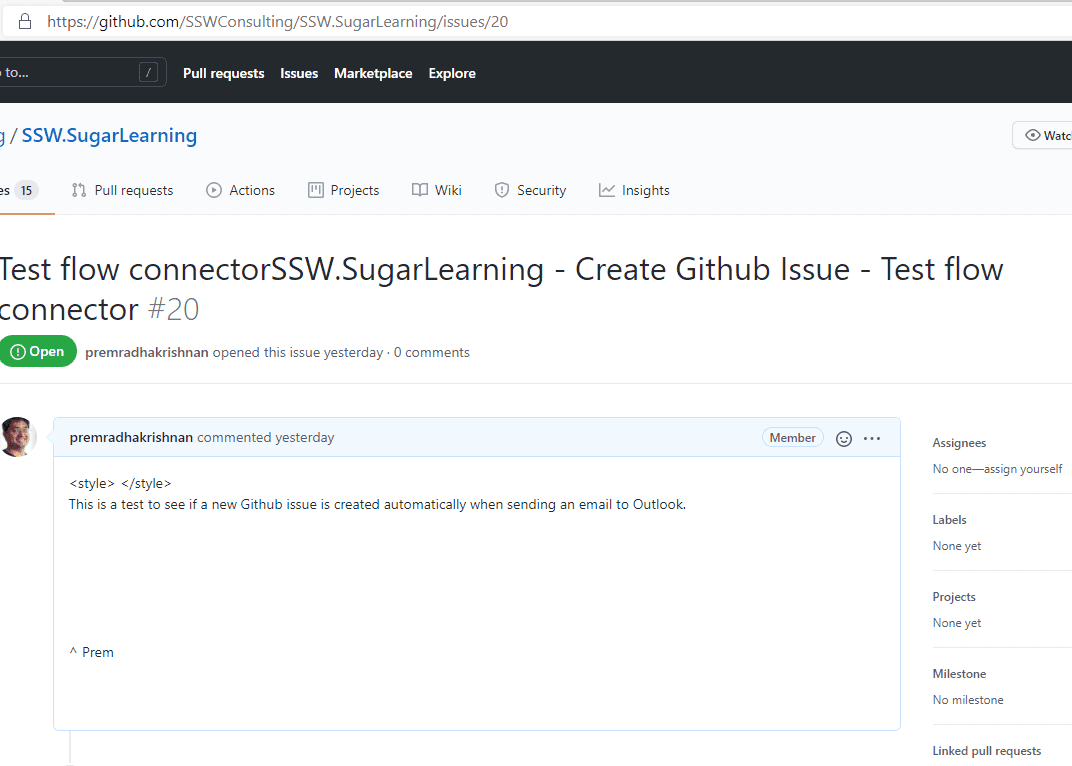
Figure: Emojis list. If a Product Owner sends an email to the development team with a request, that email should be turned into a Github Issue before any work is started or the work is prioritized on the backlog.
Power Automate has a connector to do this automatically when an email arrives in Outlook. It can create a new Github Issue by parsing the From, To, Subject and body of the email.
However, at the moment there is a limitation that it doesn't read inline attachments in emails and therefore you have to create your issues manually in Github.
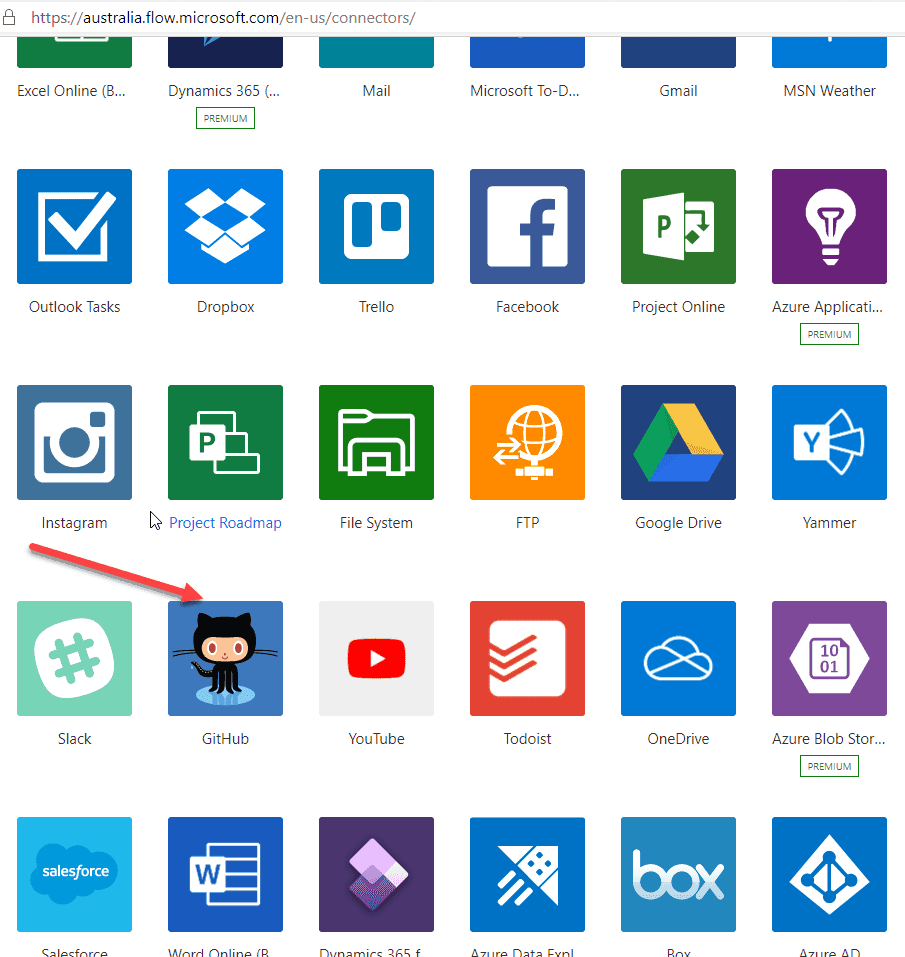
Figure: Power Automate | Connectors | Github 
Figure: Configure Flow connectors to create a new Github Issue from Outlook ⚠️ Warning: This Flow connector does not support inline images.
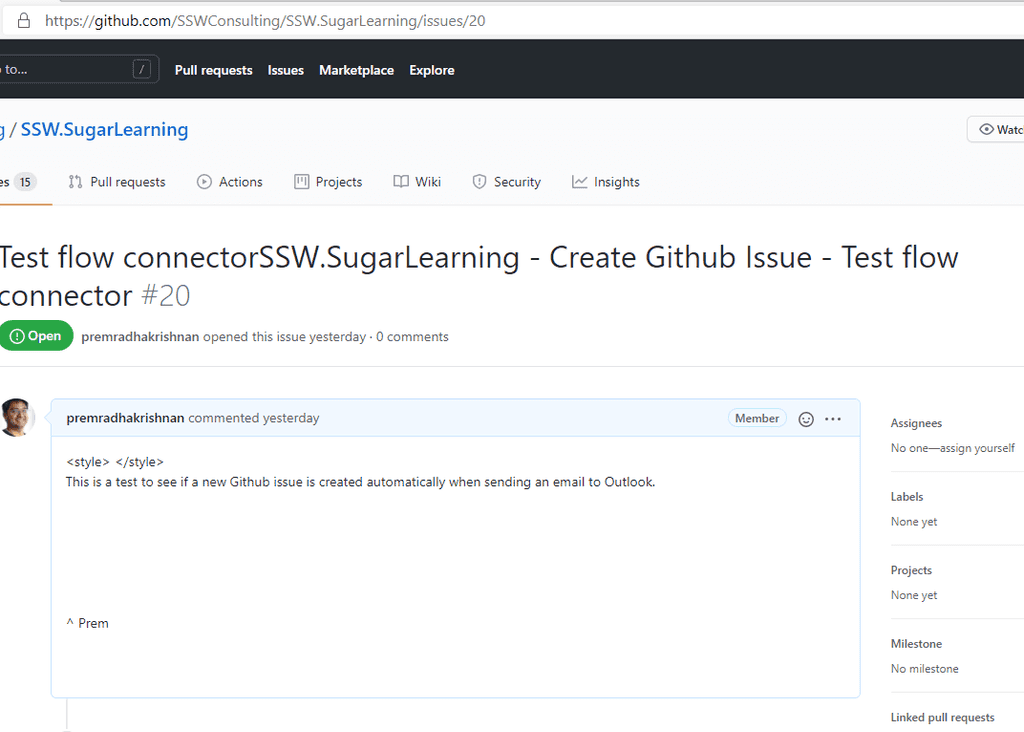
Figure: Good Example - Github issue created from Outlook using Flow connectors 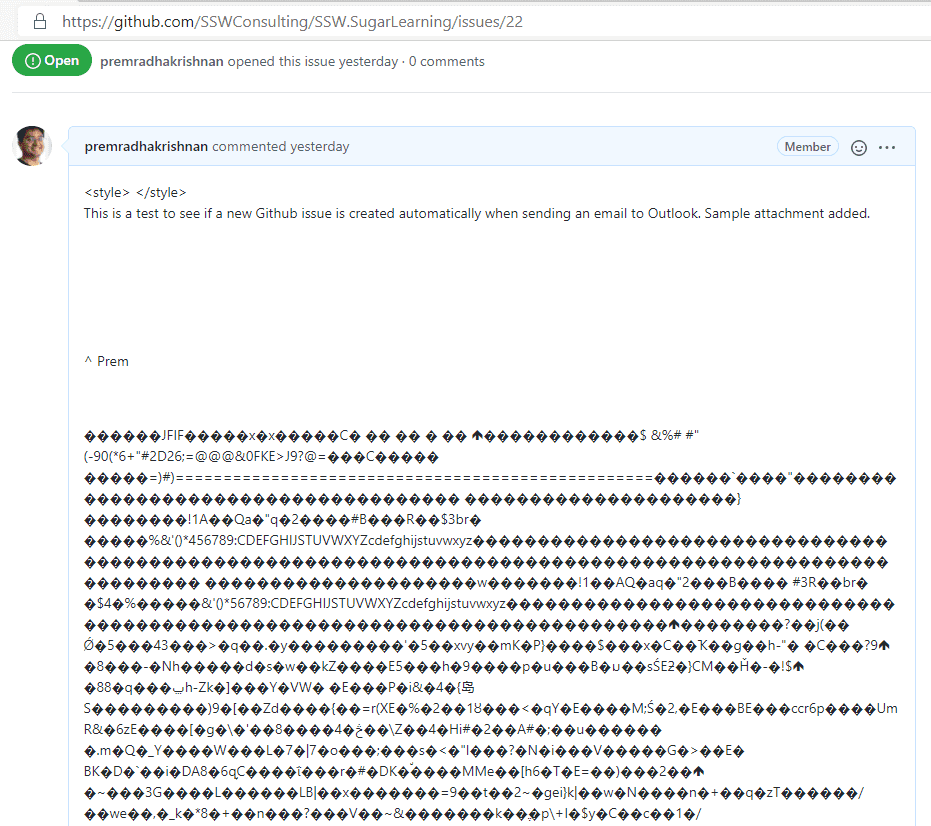
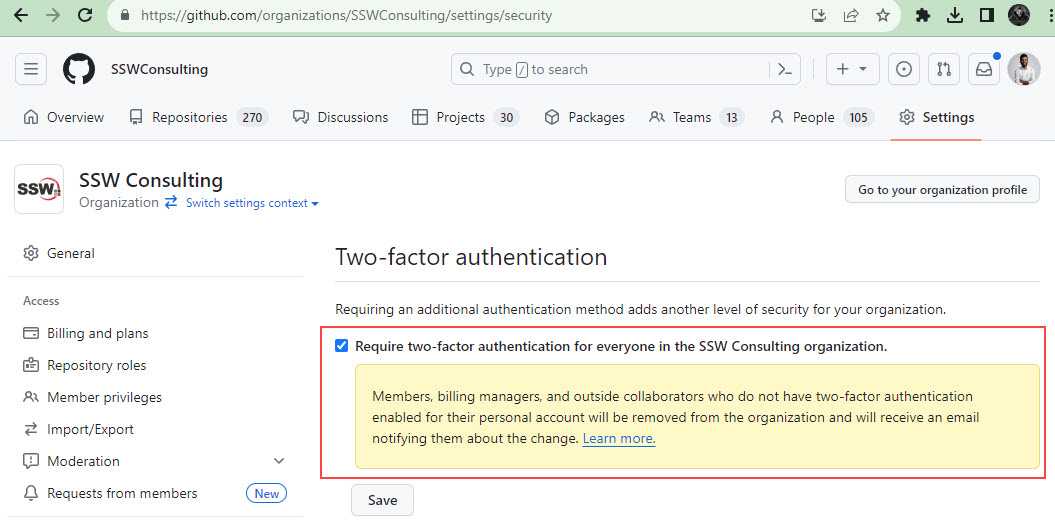
Figure: Bad Example - Github issue created using Flow - inline attachment shows up as junk characters If all members use 2FA in your organisation, the risk of unauthorised access to your repositories is lower. GitHub organisations can be configured to require all members to use 2FA to join.
- Go to your organisation | Settings | Organization security
- Under 'Two-factor authentication', select 'Require two-factor authentication for everyone in your organization'
- Save
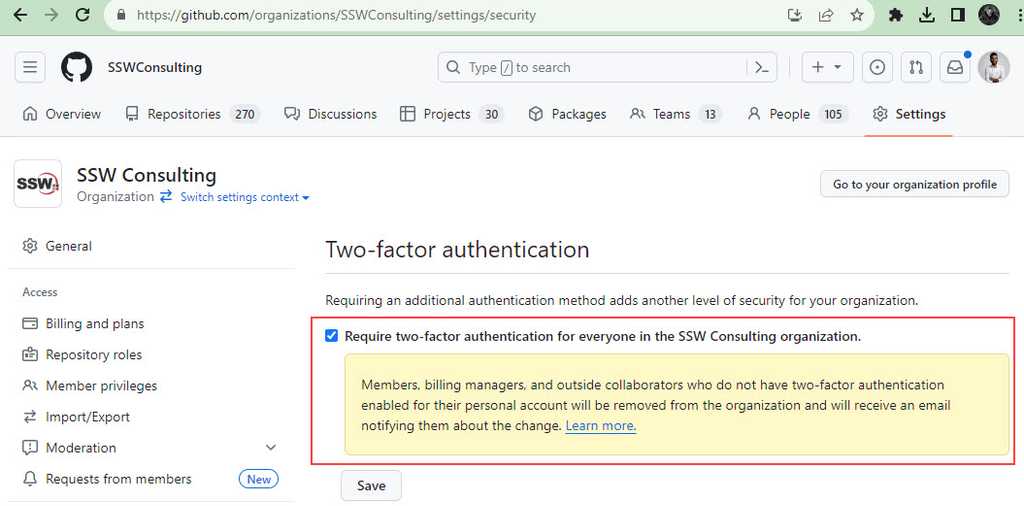
Figure: Require 2FA in your organisation Enforcing 2FA in an existing organisation will remove members that are not using 2FA.
See the GitHub docs Requiring two-factor authentication in your organization
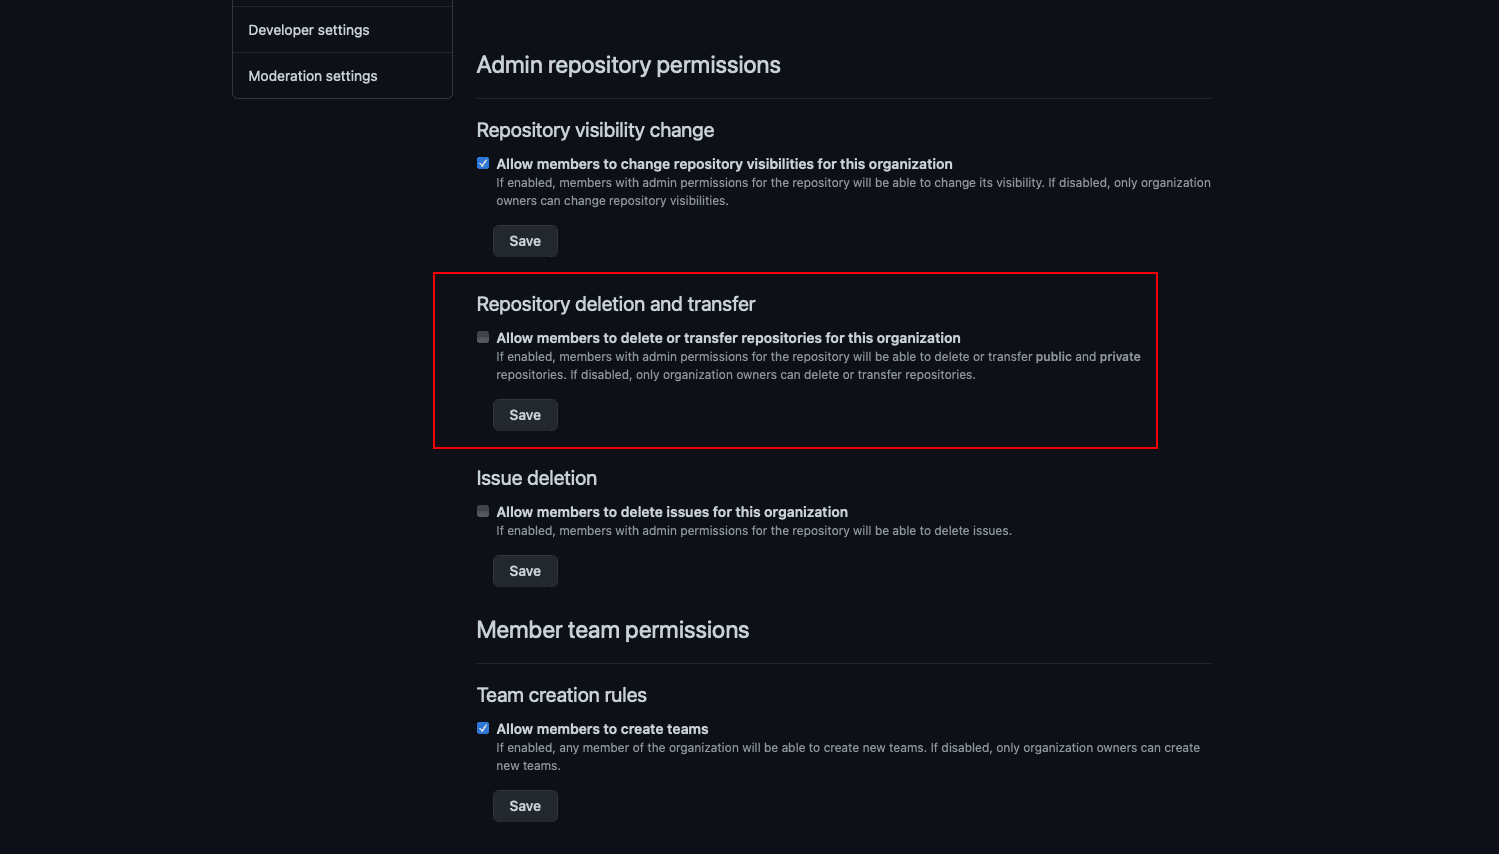
When deleting GitHub repositories, it can be hard to tell if you are on a fork or the base repository as the interface is very similar. This can lead to accidental deletions of base repositories.
To avoid this, the organisation owners should be the only members allowed to delete repositories. Follow these instructions:
- Go to your organisation | Settings | Member privileges.
- Under 'Repository deletion and transfer', ensure 'Allow members to delete or transfer repositories for this organization' is deselected
- Save
See GitHub docs Setting permissions for deleting or transferring repositories
This will ensure that even Admin users cannot accidentally delete or transfer repositories
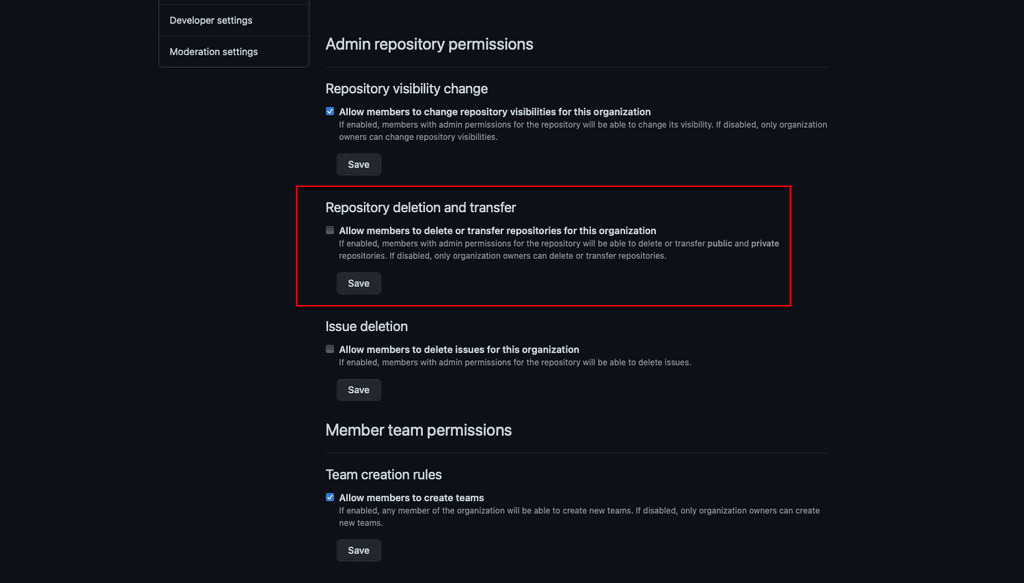
Figure: 'Allow members to delete or transfer repositories for this organization' is disabled Branch protection is a feature in version control software that allows teams to define rules and restrictions around who can make changes to specific branches, and what types of changes are allowed.
Disabling the Allow force pushes and Allow Deletions settings on your main branch will protect the branch from accidentally being deleted and the history being rewritten.
Using force push is dangerous and should be used with extreme caution, as it will override other contributor's changes with your own — and it won't stop to check if it will override any changes pushed up to remote in the process.
- Go to your repo | Settings | Branches
- If it doesn't already exist, create a branch protection rule on the 'main' or 'master' branch
- Ensure 'Allow force pushes' and 'Allow Deletions' are disabled
- Save changes
Bad example: Main branch not protected 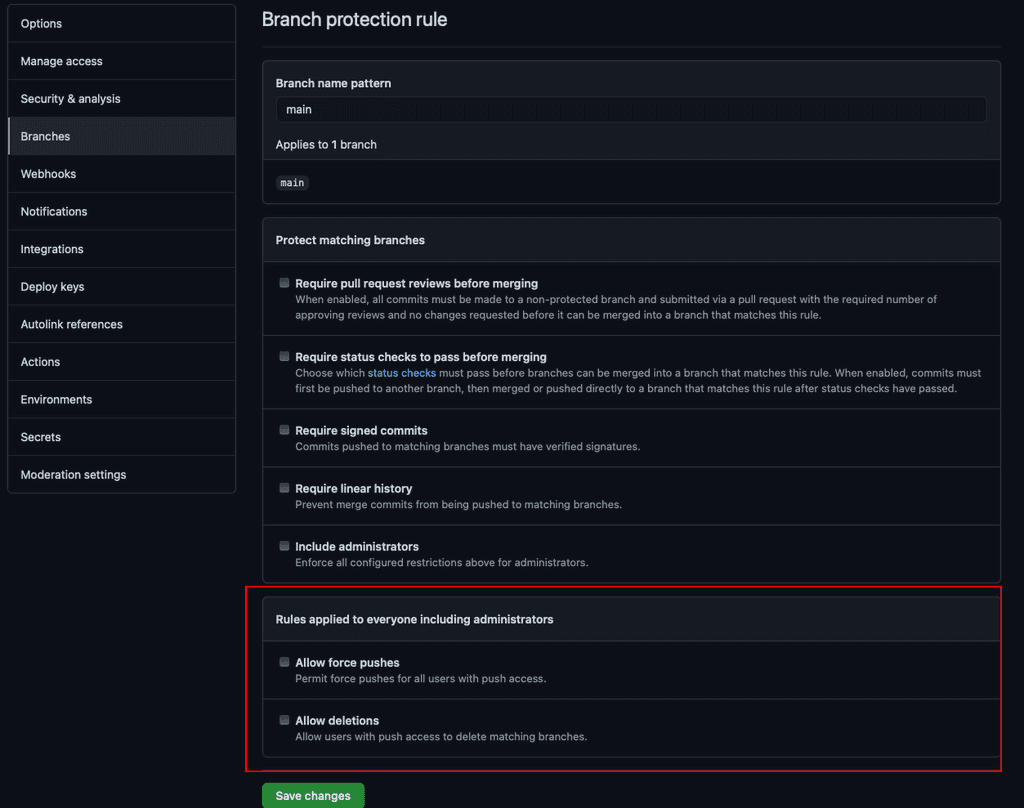
Good Example: Main branch is protected See the GitHub docs Managing a branch protection rule
You can use required status checks if you need to check that your code changes will build. Status checks are GitHub Actions that are required to succeed before the PR can be merged, so developers can't merge failing code. You can enable required status checks in the same location as Allow force pushes and Allow Deletions.
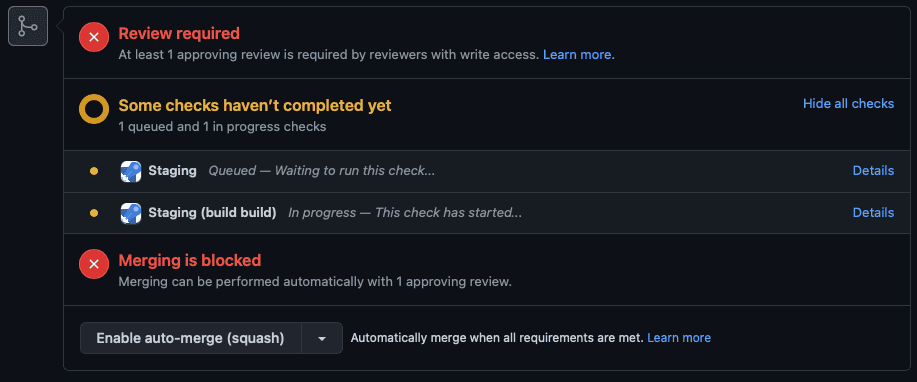
Figure: Developers can't merge until all checks have passed See the GitHub docs Require status checks before merging
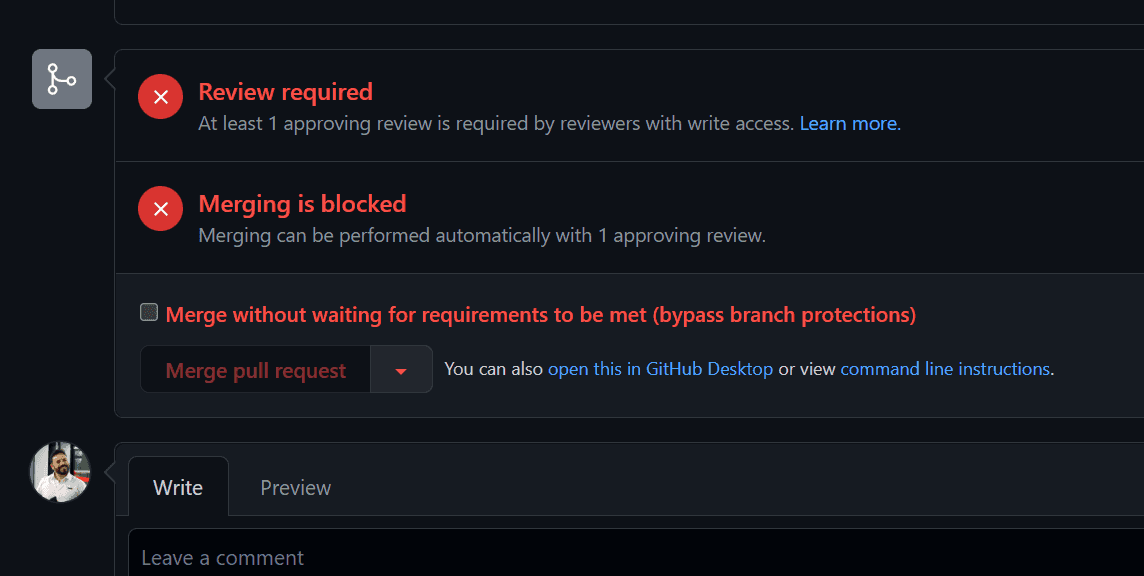
You should be using branch protection rules to protect your main branch in your source repository. These can include minimum number of reviewers, specific required reviews, passing tests, or code quality checks. These help you maintain quality standards in your product, but you can override these checks with a privileged account and, sometimes, you should.
Most source code repositories (including Azure DevOps and GitHub) allow you to set branch protection rules, meaning code must meet a set of conditions before it can be merged into the main branch. But administrators, or individuals with the appropriate delegated authority, can bypass these checks and merge code without these conditions being met.
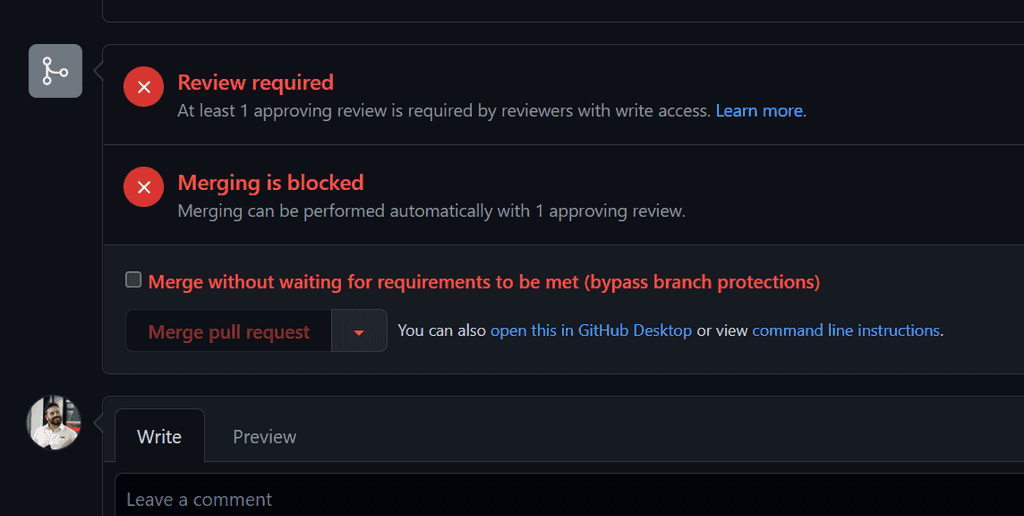
Figure: A Pull Request in GitHub that has not met the requirements of the branch protection rule. However, as the person viewing this is a repository administrator, an option is available to bypass the branch rules and merge the code When SHOULDN'T you override branch protection rules?
Just because you hold the keys, doesn't mean that you should infer a license to merge code at your own behest when it overrides protections that have been put in place for a reason.
For example, if a PR is blocked because a reviewer has requested changes, you shouldn't use your privileges to override the branch protection rules to avoid making the requested changes. Just like with any other privileged account, with great power there must also come great responsibility, and it's your responsibility to use those privileges for the purpose they were granted, and not for your own convenience.
When SHOULD you override branch protection rules?
While branch protection is an awesome feature and, when done right, can allow you to automate your review process and even remove the need for human approvers. But sometimes it creates a bottleneck that can present its own issues. One example might be if you need to merge an urgent fix to resolve a production issue. Another might be that you have a failed test runner, which could cause all of your tests to fail and block all pull requests.
What to do if you have to override branch protection rules
Depending on the severity of the situation, you may need to act quickly. But you should always attempt to get authorisation from the Product Owner first, and document it.
The most important thing to do, though, is to re-evaluate your processes. On rare occassions you may find that overriding branch protection rules was a one-off necessity, but it will often also highlight a weakness in your processes.
This doesn't necessarily mean a problem with the rules themselves (although of course it could). For example, if you have an urgent fix and your rules require at least one reviewer, but you can't find anyone to review your PR, you may need to override the protection rules on this occassion. This wouldn't highlight a need remove that protection rule, but it would highlight a need to investigate availability of reviewers.
Like any process involving privileged access, it's up to you to exercise your discretion, and use common sense to determine whether your privilege should be exercised, and whether exercising that privilege highlights a need for a change in process somewhere along the chain.
Sometimes when working on a product, you need a way to communicate with the team and users of the software that isn't limited to known issues with the product. GitHub Discussions are a great way to provide an open forum for communication.
Here's a great video by the GitHub team that quickly explains GitHub Discussions!
Video: What is GitHub Discussions? (40 sec)
What can GitHub Discussions be used for?
GitHub Discussions have many uses, and it can be hard to know where to start. The following topics provide some good guidelines to follow.
- Potential improvements (features, bugs or ideas) e.g. Feature idea - Should products have a color field
- Customer support e.g. Login help - I forgot my password and am not sure how to reset it
- FAQ e.g. Customers - Can I import my customers from a CSV?
- Product announcements e.g. New feature - users can now have a profile picture
- Technical discussions e.g. Trouble running migration - has anyone seen this before?
- Polls - Gauging community sentiment e.g. Poll - Is this product screen a better UX?
- and much more...
However, try not to constrain yourself to only these topics. The point of GitHub Discussions is to provide an open forum for communication!
1. Potential project improvements (features, bugs or ideas)
New improvements can be simple or complex. Before implementing an improvement, think about how to communicate it to the team. Generally, an improvement will go through 3 stages:
- Stage 1 - GitHub Discussions
- Stage 2 - GitHub Issues
- Stage 3 - Pull Requests
However, sometimes a stage can be skipped depending on the certainty and difficulty of implementation, so those need to be established first.
GitHub's recommendation is:
"in any given project or Sprint, you have things you need to discuss and those you need to do. Discussions are for—no surprise here—discussing things. Issues are for cataloguing the work you need to do after you’ve reached a decision about how to move forward."
✨ Stage 1 - GitHub Discussions
GitHub Discussions is the right place to start when certainty is low. Raising it in this setting lets the whole team discuss the proposal and reach a consensus about what to do. Make sure to @mention any important stakeholders e.g. @BobNorthwind

Figure: SSW Rules | GitHub | Discussions GitHub Discussions can be converted to GitHub Issues with a single click!

Figure: 1 of 2 - SSW Rules | GitHub | Discussions - Convert a Discussion to an issue 
Figure: 2 of 2 - SSW Rules Content Discussion Converted To Issue Using votes to prioritize community needs on GitHub
Voting up is available in GitHub Discussions, and they provide a great way to prioritize what the community wants most. By encouraging users to upvote feature requests, bug reports, or important discussions, maintainers can better understand which topics have the highest demand. Learn more about why reacting to GitHub Issues and Discussions matters.
✨ Stage 2 - GitHub Issues
Once things are clarified on the GitHub Discussion or if you are certain the issue doesn't need a discussion, then you need to evaluate the difficulty of implementation. If it is difficult to implement or you are unable to do it yourself, then GitHub Issues is the right place to put it since it provides a place to manage work.
✨ Stage 3 - Pull Requests
Once the work is complete or if it is an easy change you are certain you want to make (e.g. a spelling mistake), it can be turned into a Pull Request.
2. Customer support
GitHub Discussions provide a great forum for users to ask questions about how to use the product. Not only is it easy to access, but it will also help future users with the same problem.
3. FAQ
Provide new curious users with a list of the most important things they should know about the product.
4. Product announcements
GitHub Discussions are accessible to the entire user base, so when there is a new feature, let everyone know.
5. Technical discussions
The development team can discuss issues publicly. If they need help with a problem, and Stack Overflow has failed them, then GitHub Discussions offers a way to relay with their team.
6. Poll - Gauging community sentiment
Community engagement is hard to achieve but can provide invaluable insights into contentious parts of the application. A poll in GitHub discussions can be invaluable.
Categorization
GitHub Discussions allow you to set up categories. Getting these going is important to help users sift through the different topics. Keep the categories simple and easy to follow so that anyone who jumps in will know where to begin.
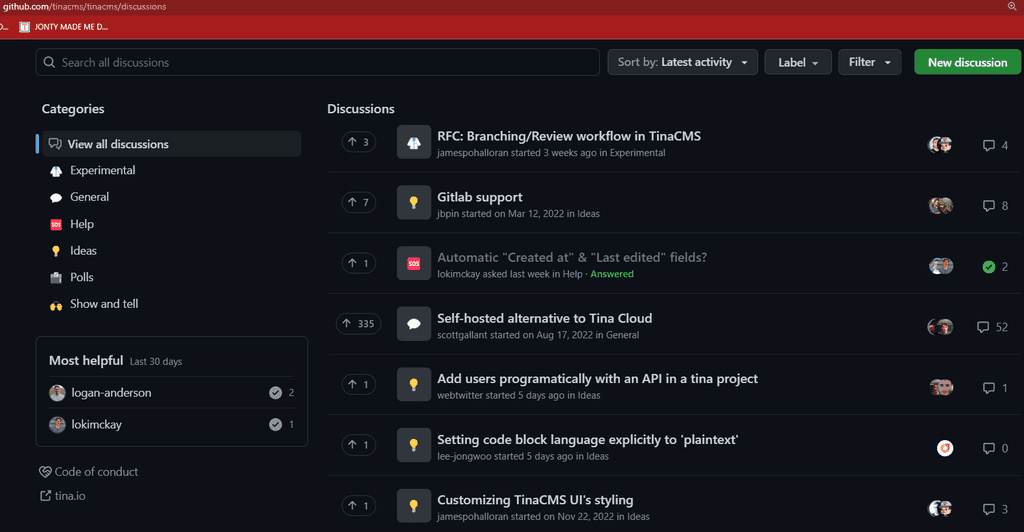
Figure: Good example - TinaCMS use GitHub Discussions well Source: TinaCMS
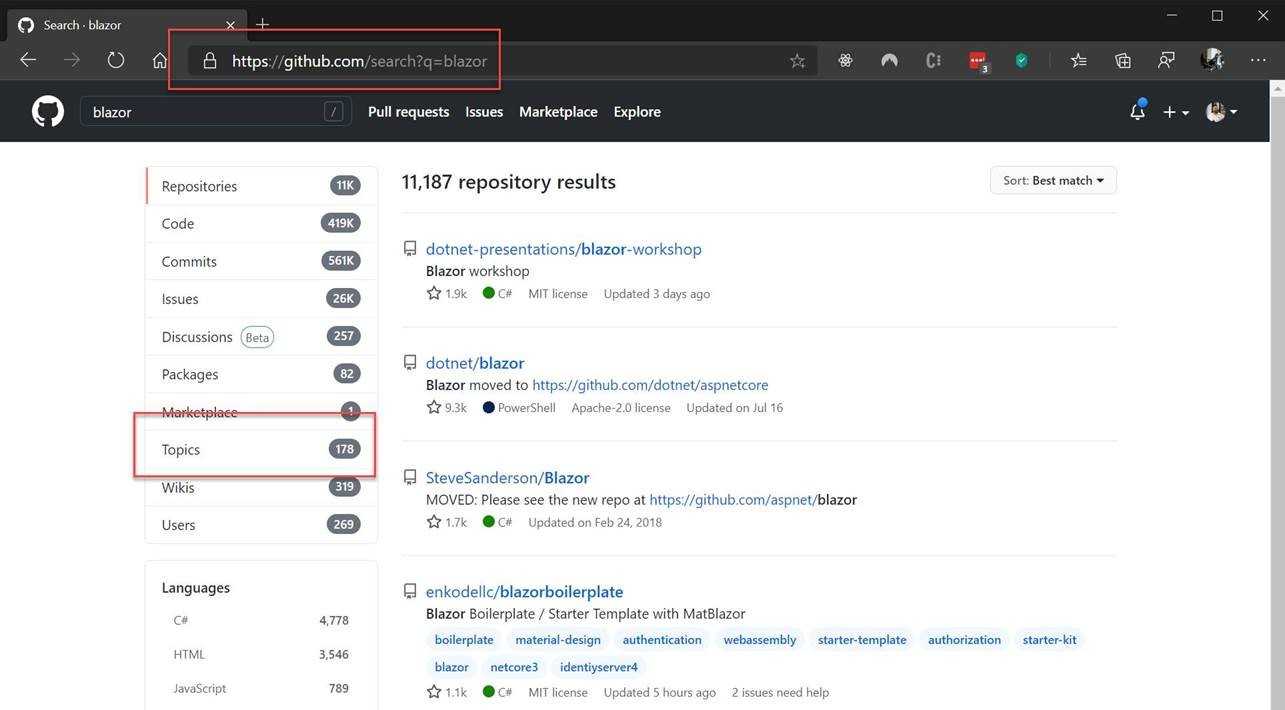
Topics are a great way to classify your repositories on GitHub.
Topics are free text tags that help identify the technologies, purpose, and intent of your project.
Adding topics can increase the discoverability of your repos for both bots and human searchers.
GitHub introduced topics in 2017, and you can use topics to search for repositories. For example, if you are looking for Blazor examples or libraries, you can enter Blazor as a search term, and then refine the search to repositories that have been tagged with the ‘Blazor’ topic.
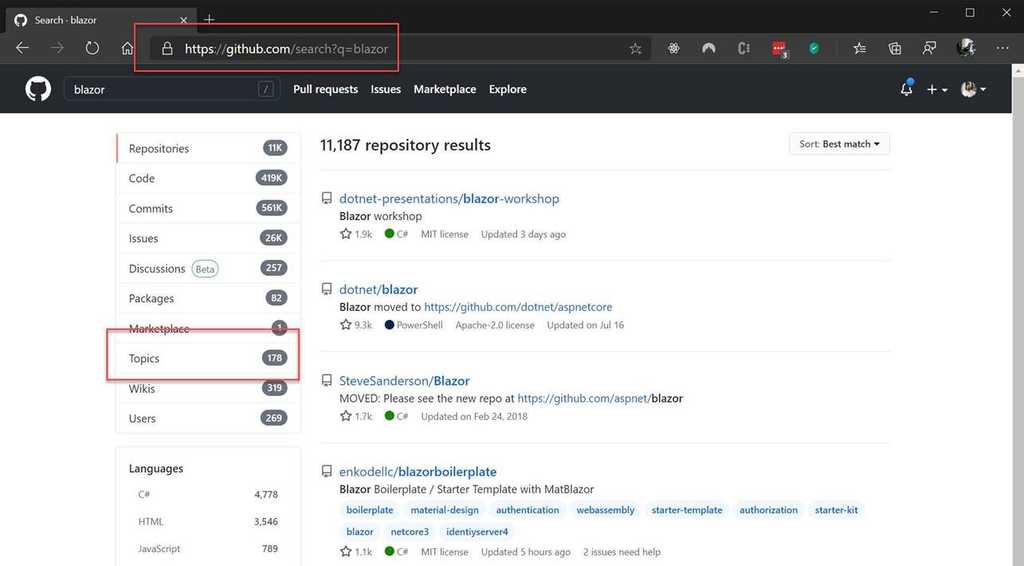
Figure: Searching for repositories by topic Topics also help others to find your repository and increase the visibility and discoverability of your work.
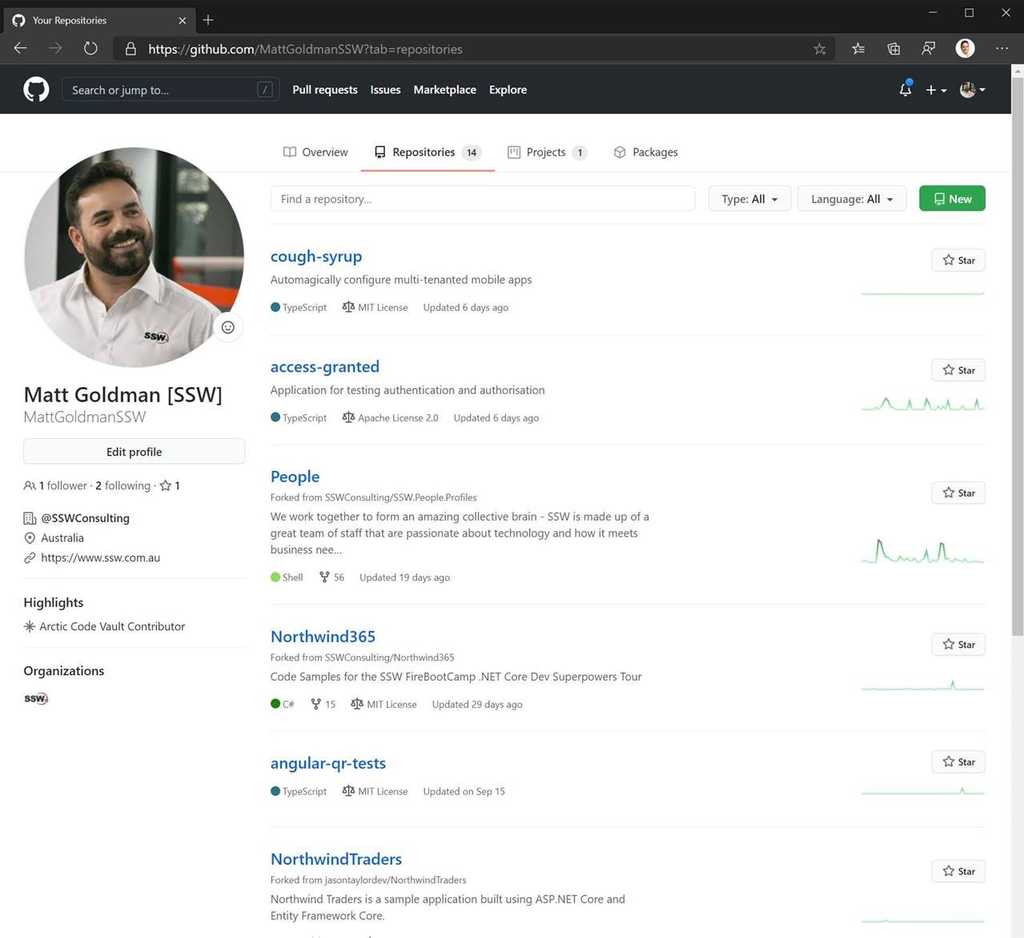
Figure: Bad Example – no repositories tagged with topics on the first page 
Figure: Great example – every repository is meticulously tagged with topics Reacting to GitHub Issues and Discussions is a simple yet powerful way to show that you've seen and acknowledged a report or suggestion.
When maintainers or contributors use reactions, it signals to the original poster and the community that their input has been noticed, even if a full response isn't immediate.
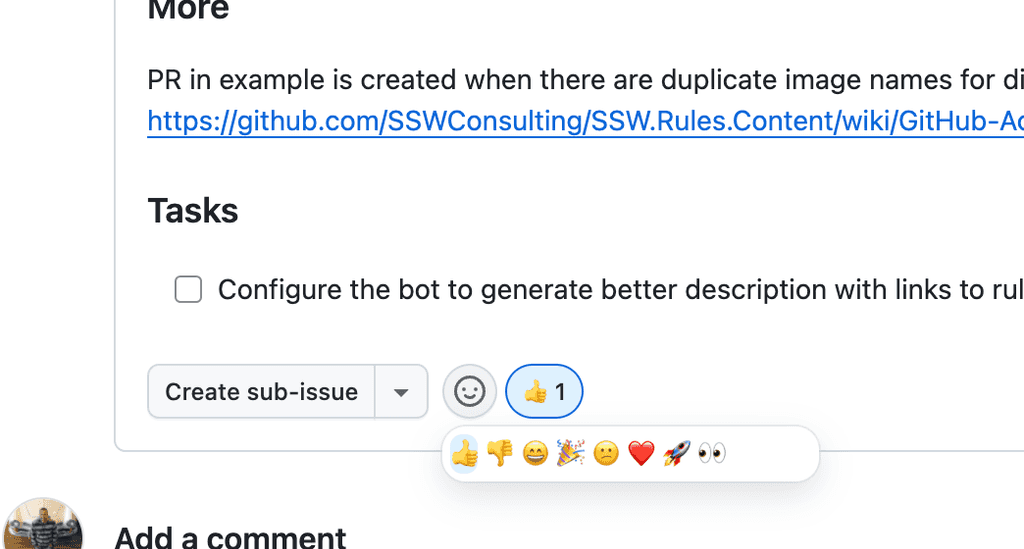
Figure: A simple reaction let others know you read and acknowledged some feedback A quick 👍, 👀, or ❤️ can keep discussions more engaging, reducing uncertainty about whether some feedback is being considered.
Vote up on GitHub Discussions
With GitHub Discussions, voting up adds an extra layer of valuable feedback. Maintainers can see what the community prioritizes most, making it easier to focus on high-impact requests.
Votes help streamline decision-making and ensure that development aligns with user needs By embracing interactions to GitHub Issues and Discussions, teams create a more responsive and organized backlog, strengthening collaboration and keeping the project moving forward.
Note: For more detailed feedback, comments are the best way to provide deeper insights and should be encouraged.
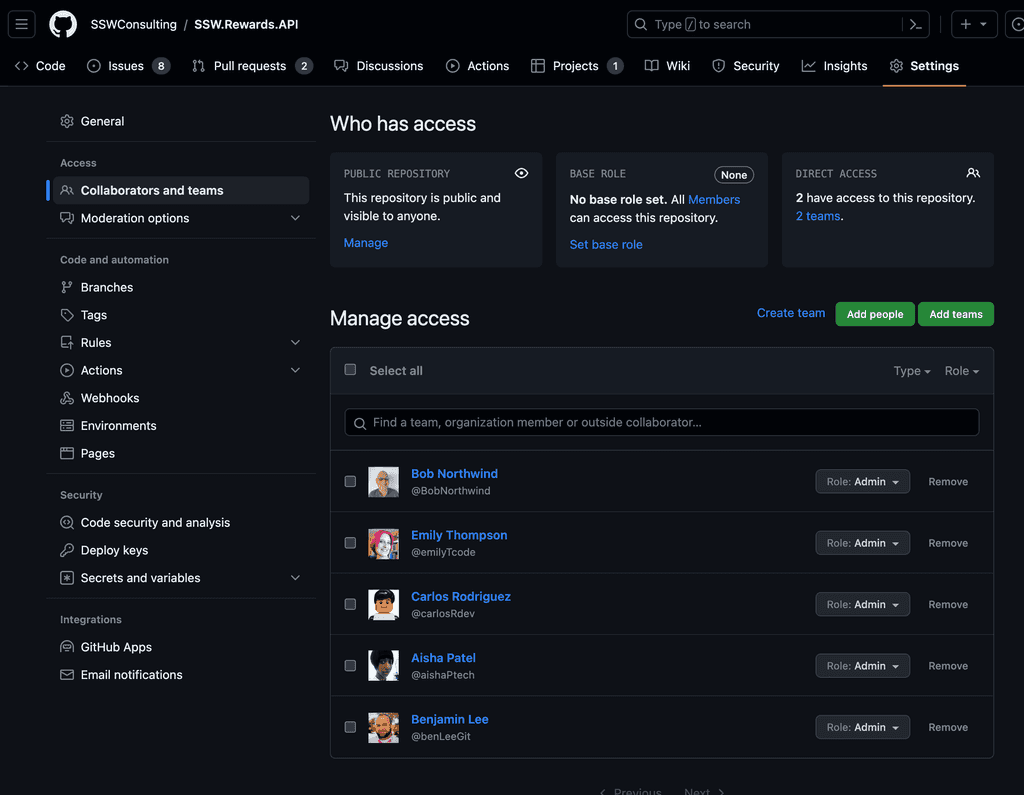
You can use teams within a repository to manage a whole group's permissions instead of setting permissions for each new member of the organisation.
See Organizing members into teams.
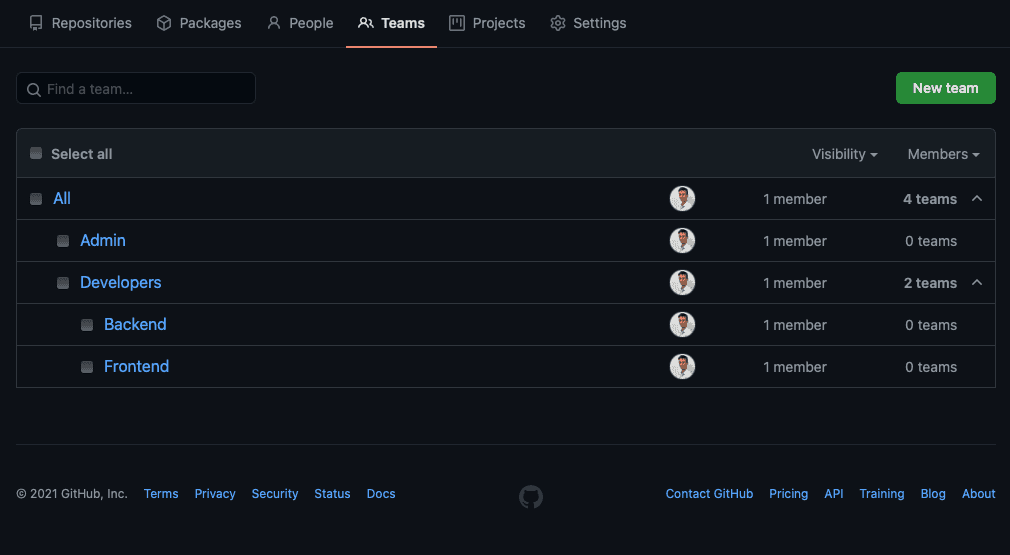
Figure: Good example - Using a good teams structure to organize access Correctly configuring your organisation's teams structure will make it easy to give members the permissions level that they need. You can add teams to repositories to manage their roles.
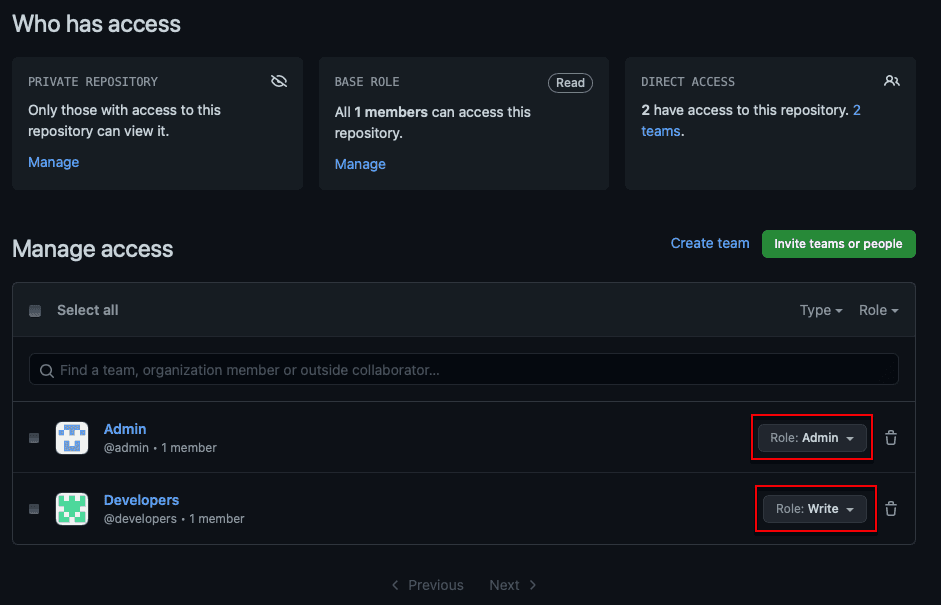
Figure: Good example - Using teams to assign roles in a repository Another benefit of using teams is that you can mention a whole team in a discussion instead of individual members. See Mentioning people and teams
Use teams as maintainers over individuals
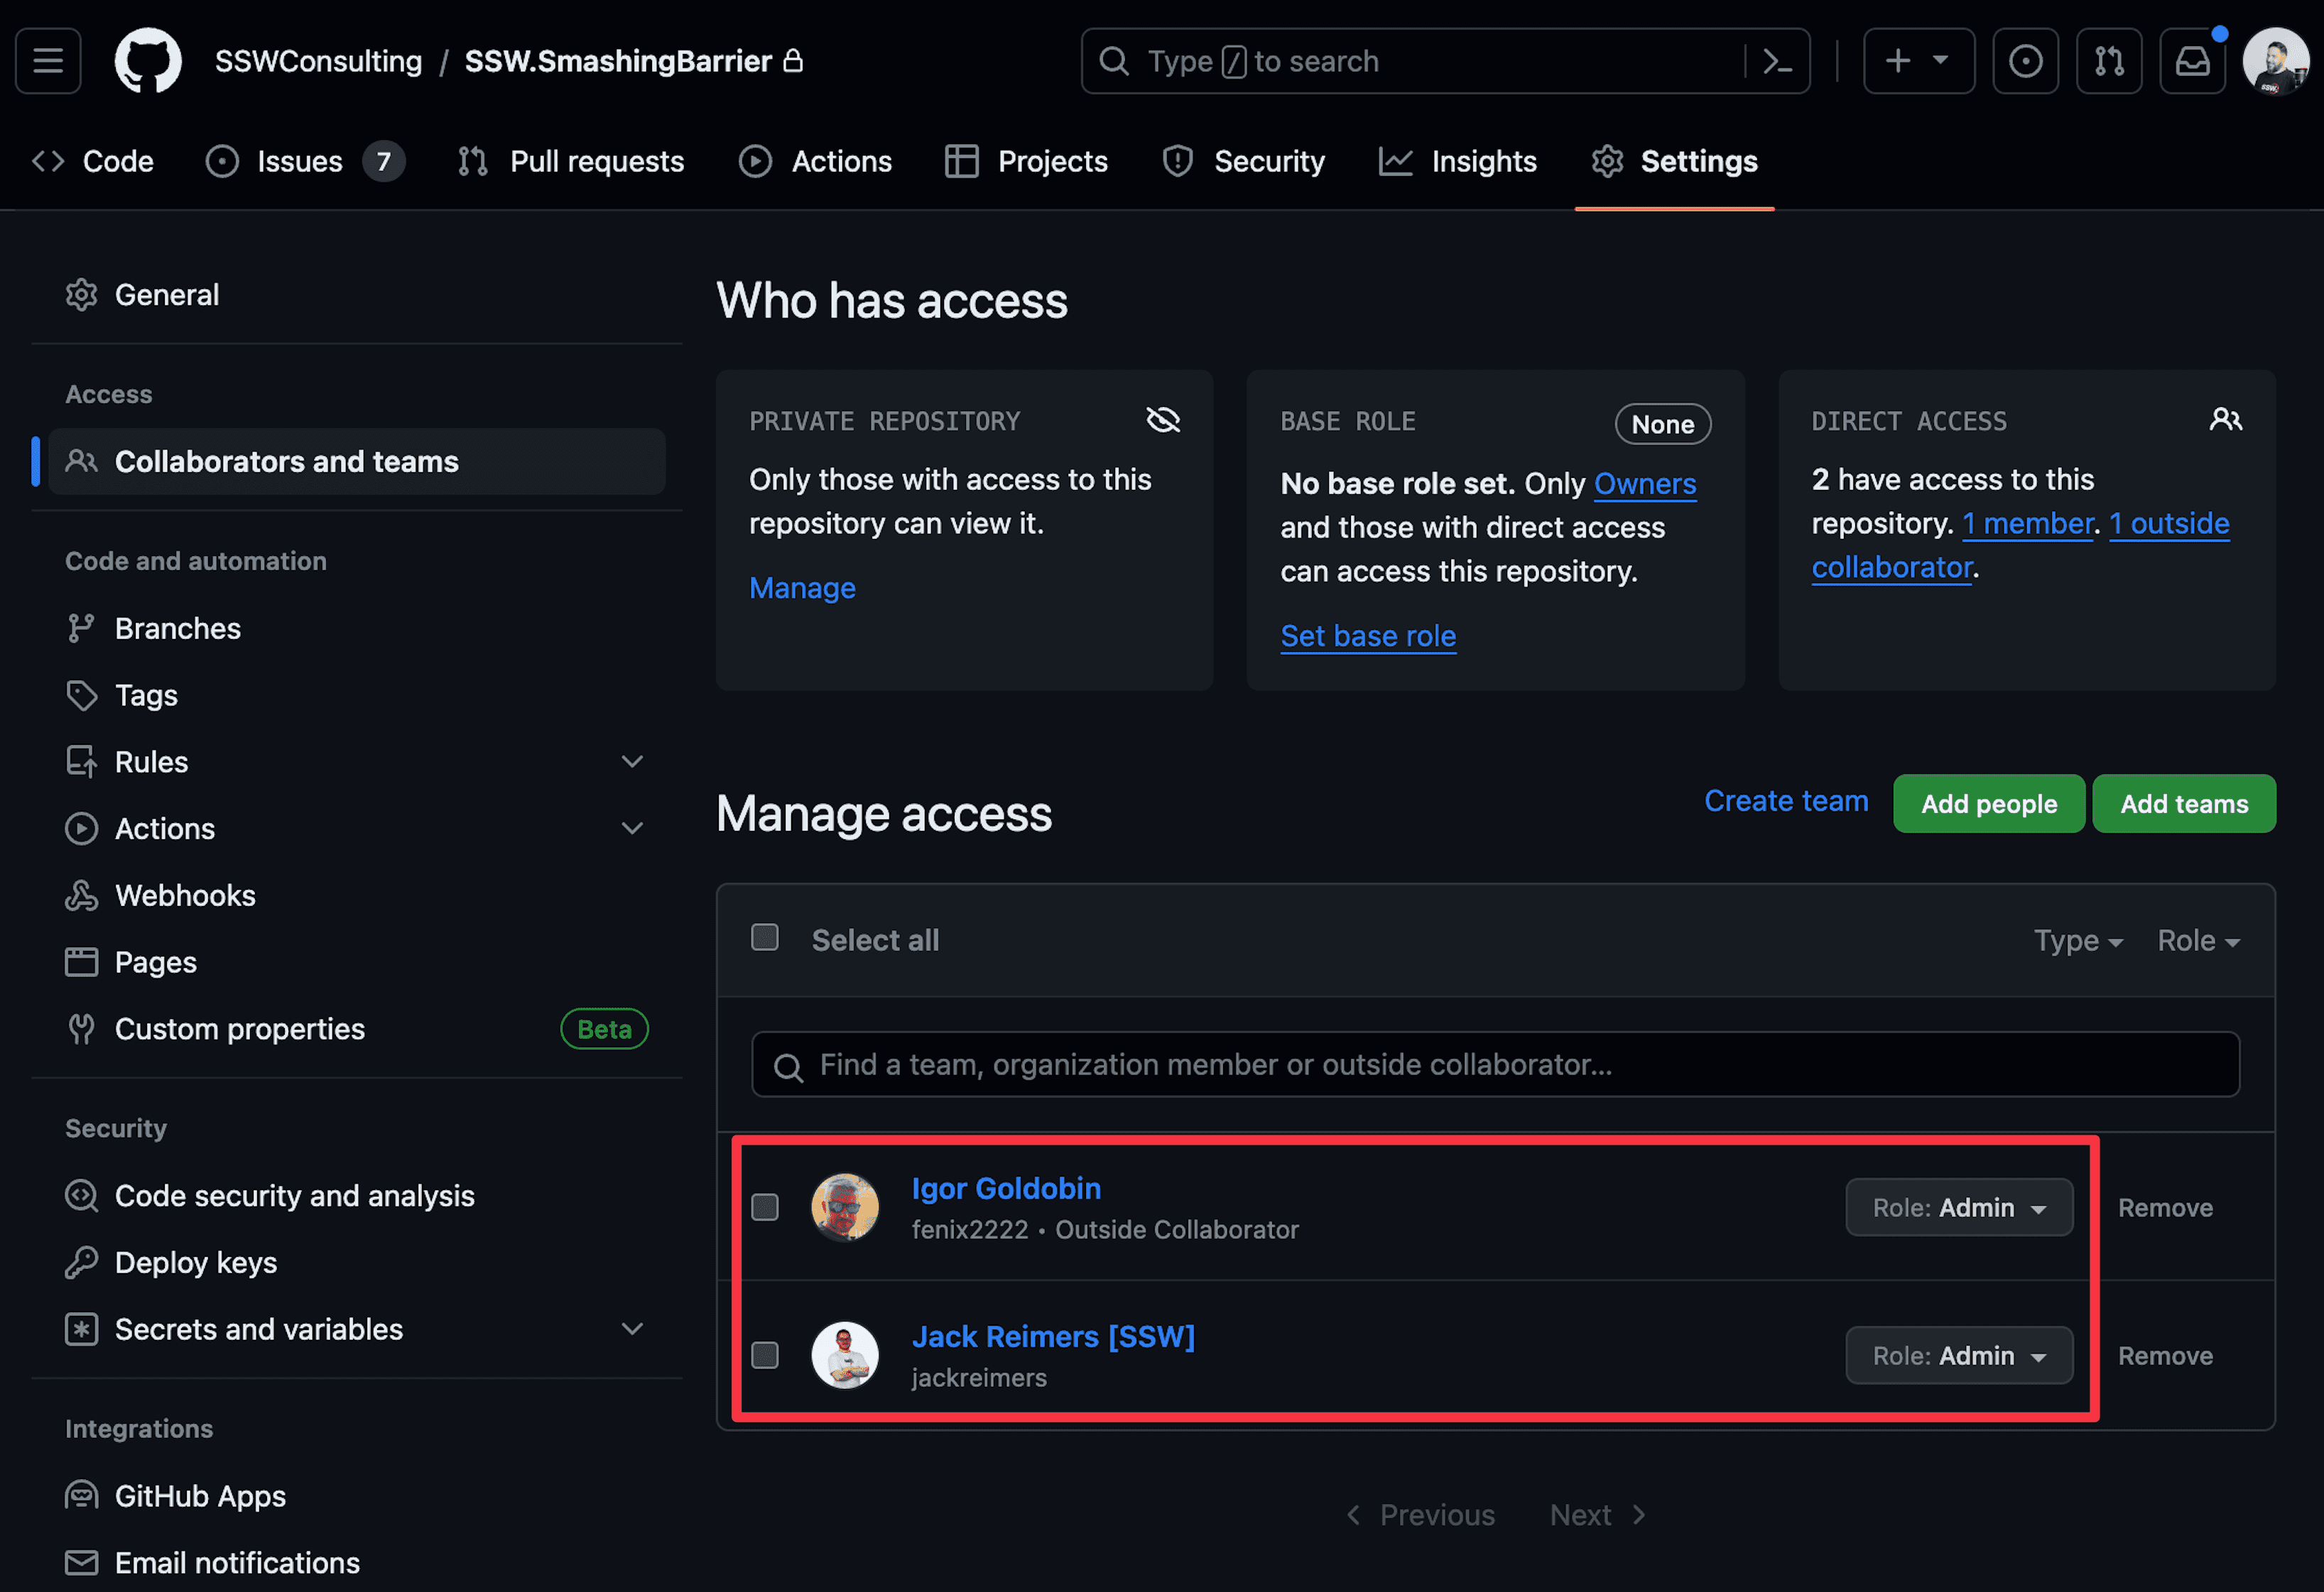
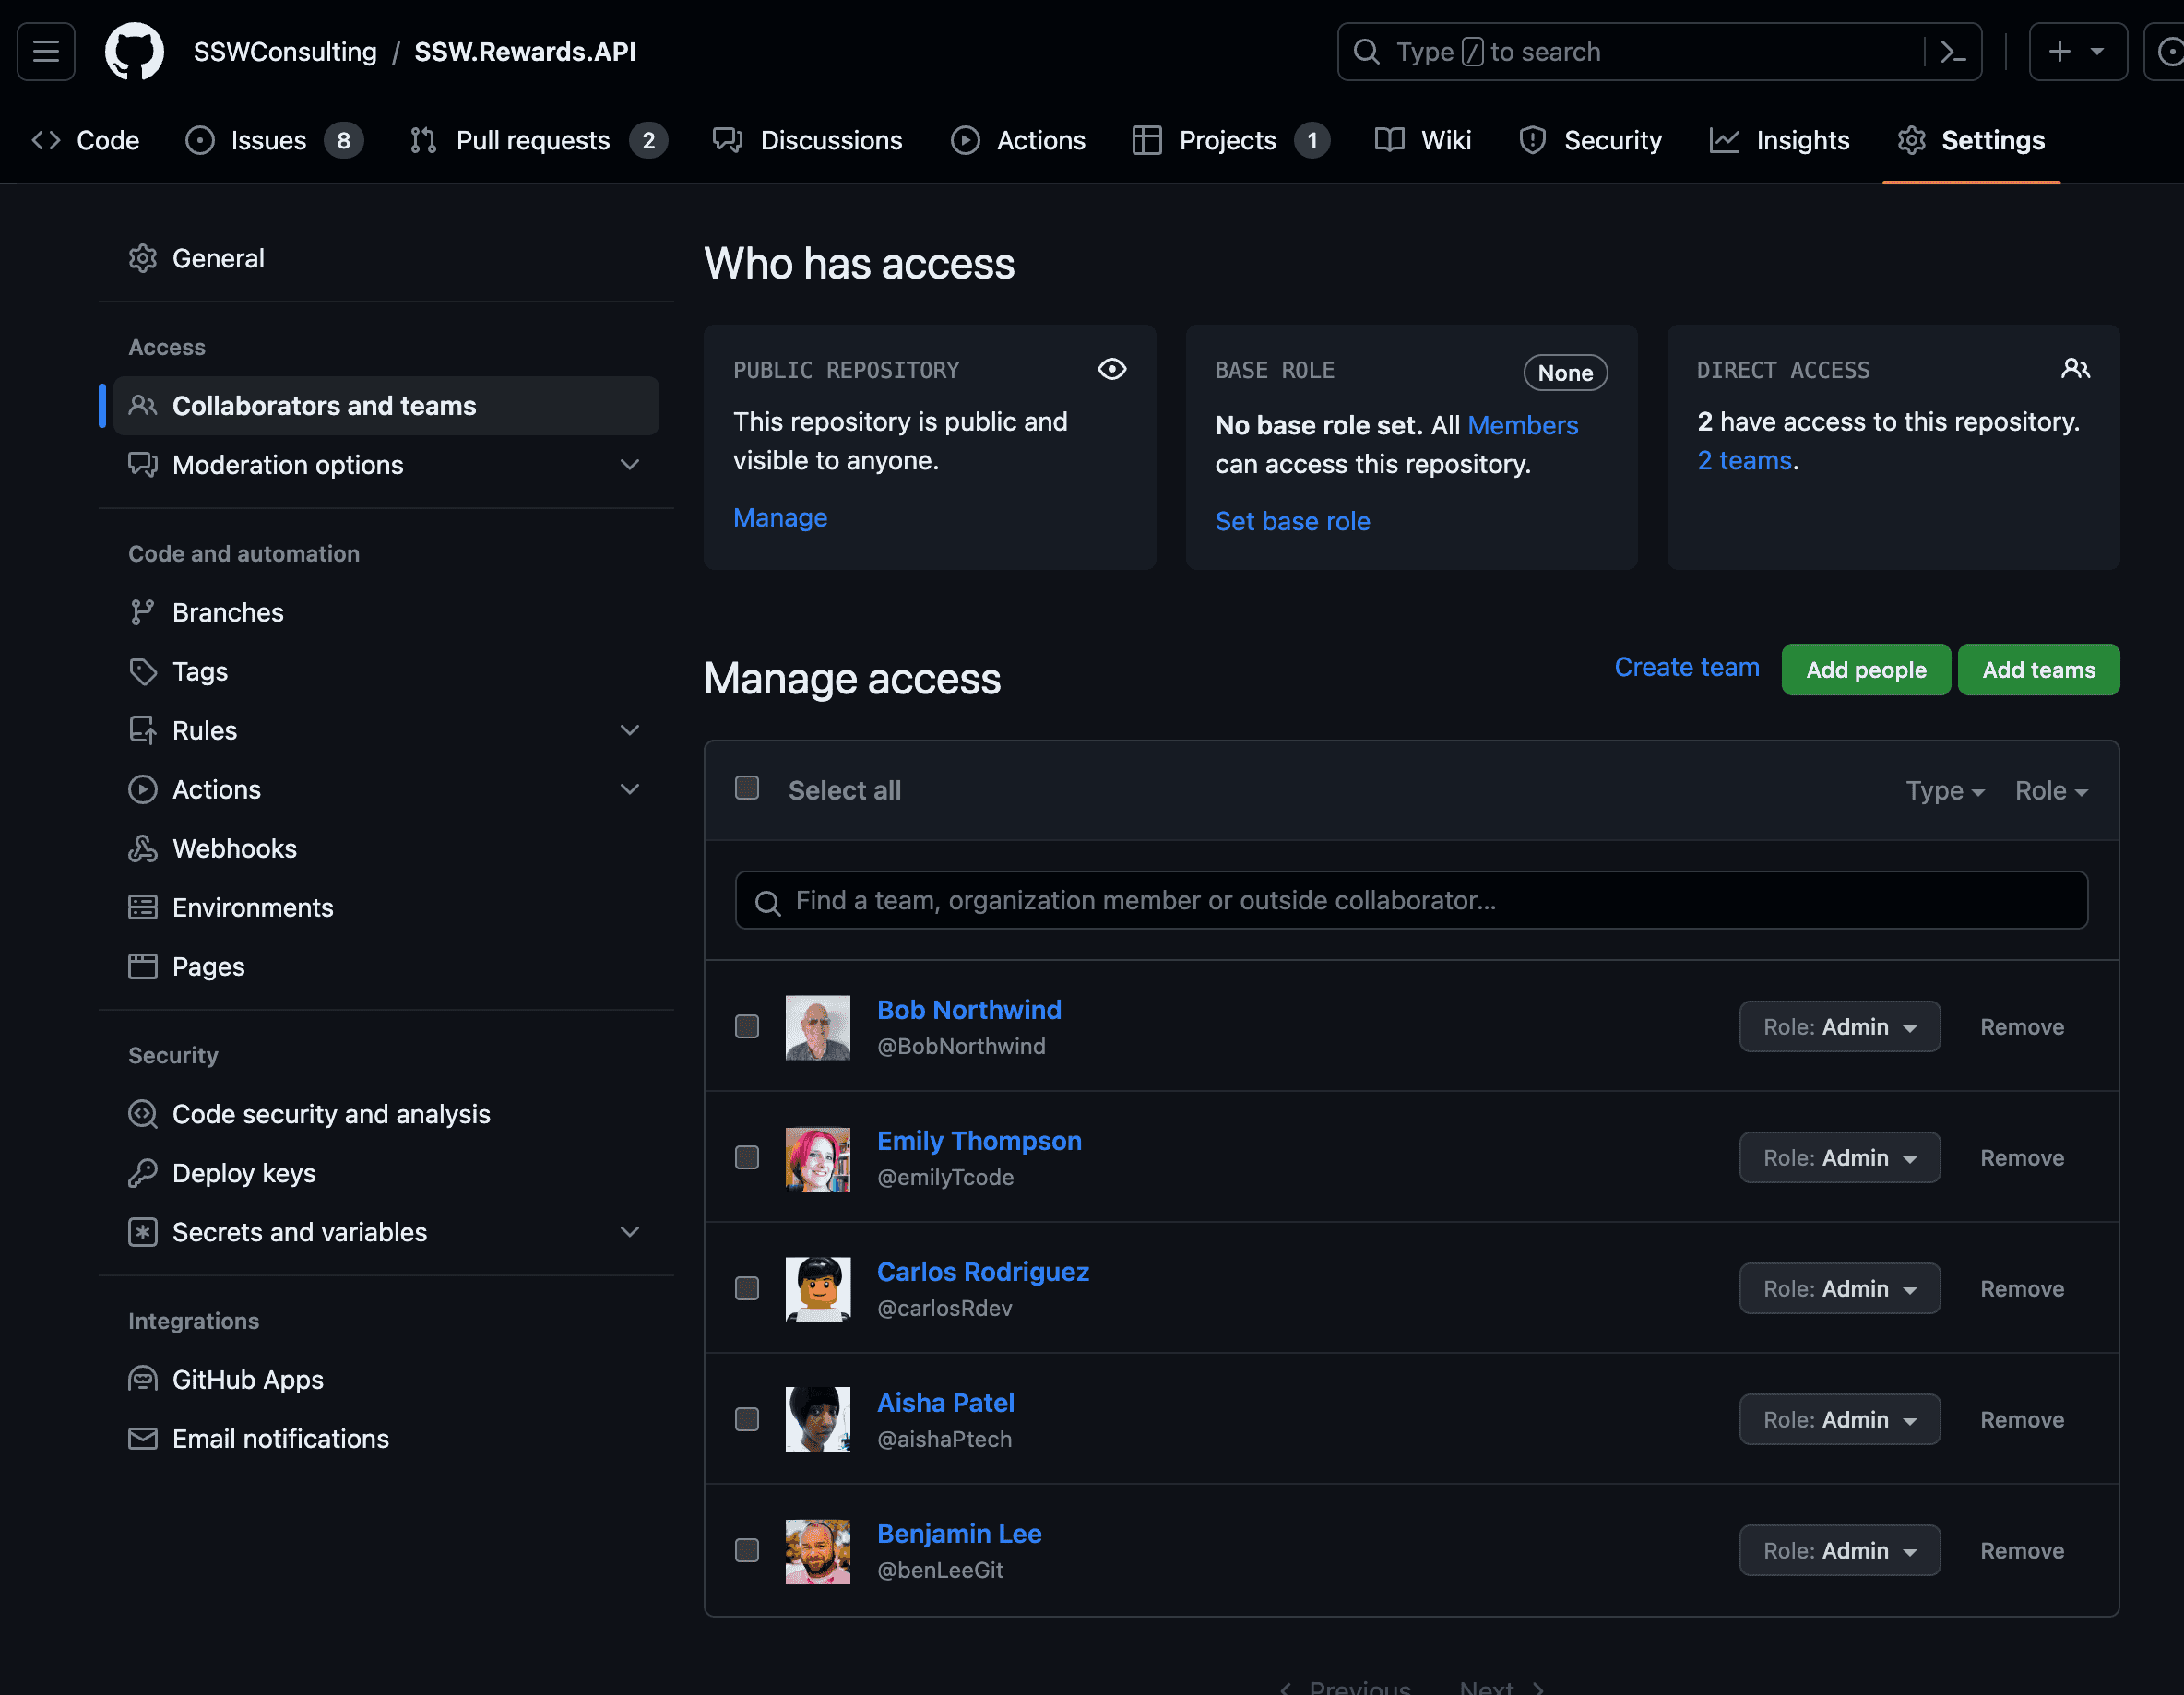
When you add a team to a repository, you can give the team a role that determines their access level to the repository. You can also add teams to issues and pull requests to manage their access to those resources. Often individuals are added to repositories as administrators, but this is not a good idea as it gives them destructive access to the repository. Instead, add a team to the repository and give the team the maintainer role.
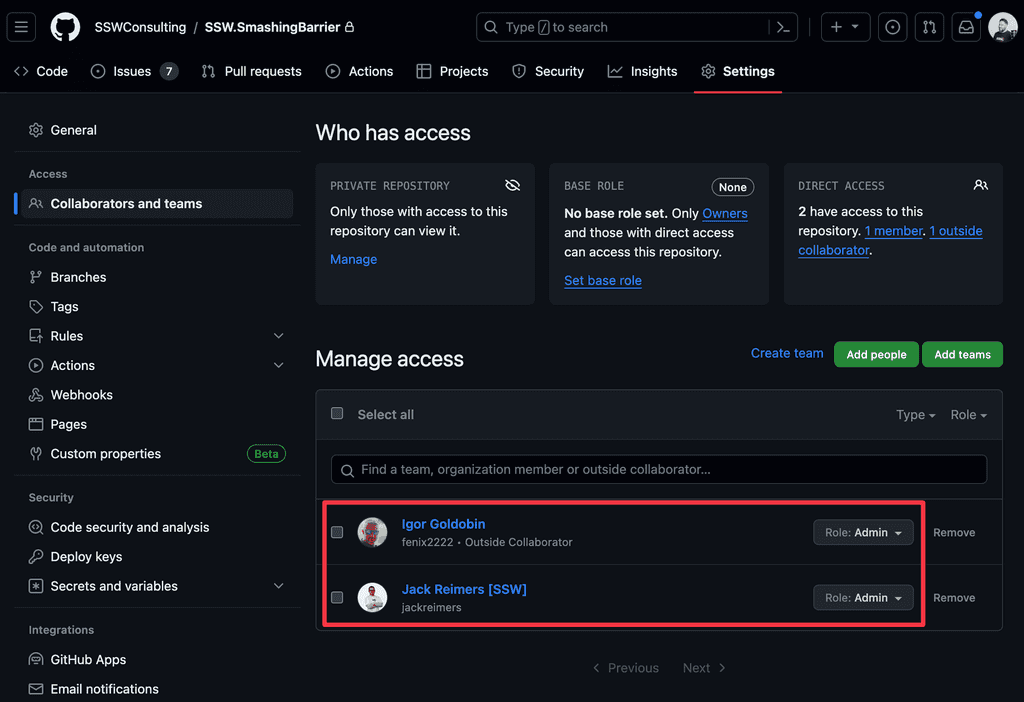
Figure: Bad example - Individuals should not have Admin access to a repository 
Figure: Good example - Teams should have Maintainer access to a repository As a developer you're likely using GitHub all the time - it's one of the main repositories for code. When keeping a good work-life balance, it's not ideal for someone to be blocked by a pull request review that would take you 1 minute - just because you're out getting some fresh air.
Having GitHub on your mobile helps you unblock people quickly, and leave comments all while you’re on the go. Devs are more productive when they get regular breaks - so why not review pull requests in the park!
✅ Benefits of having GitHub on your phone
- Unblock others - Nothing is more frustrating for a developer than waiting hours or even days for a small PR approval or a comment on an issue
- Stay updated - It’s easier to fall behind on comments and issues if you’re only able to check GitHub from your computer
- Get notifications - Custom notification settings are easy to set
GitHub Contributions Widget
Seeing contributions can be a great motivator and helps you keep track of your activity. Add the GitHub contributions widget to your phone’s home screen to see recent contributions at a glance.
-
iOS:
- Tap and hold the home screen until the icons jiggle
- Tap the “+” icon in the top-left corner and search for “GitHub”
- Choose the GitHub contributions widget and place it on the home screen
-
Android:
- Tap and hold the home screen and select “Widgets”
- Search for the GitHub contributions widget and add it to the home screen
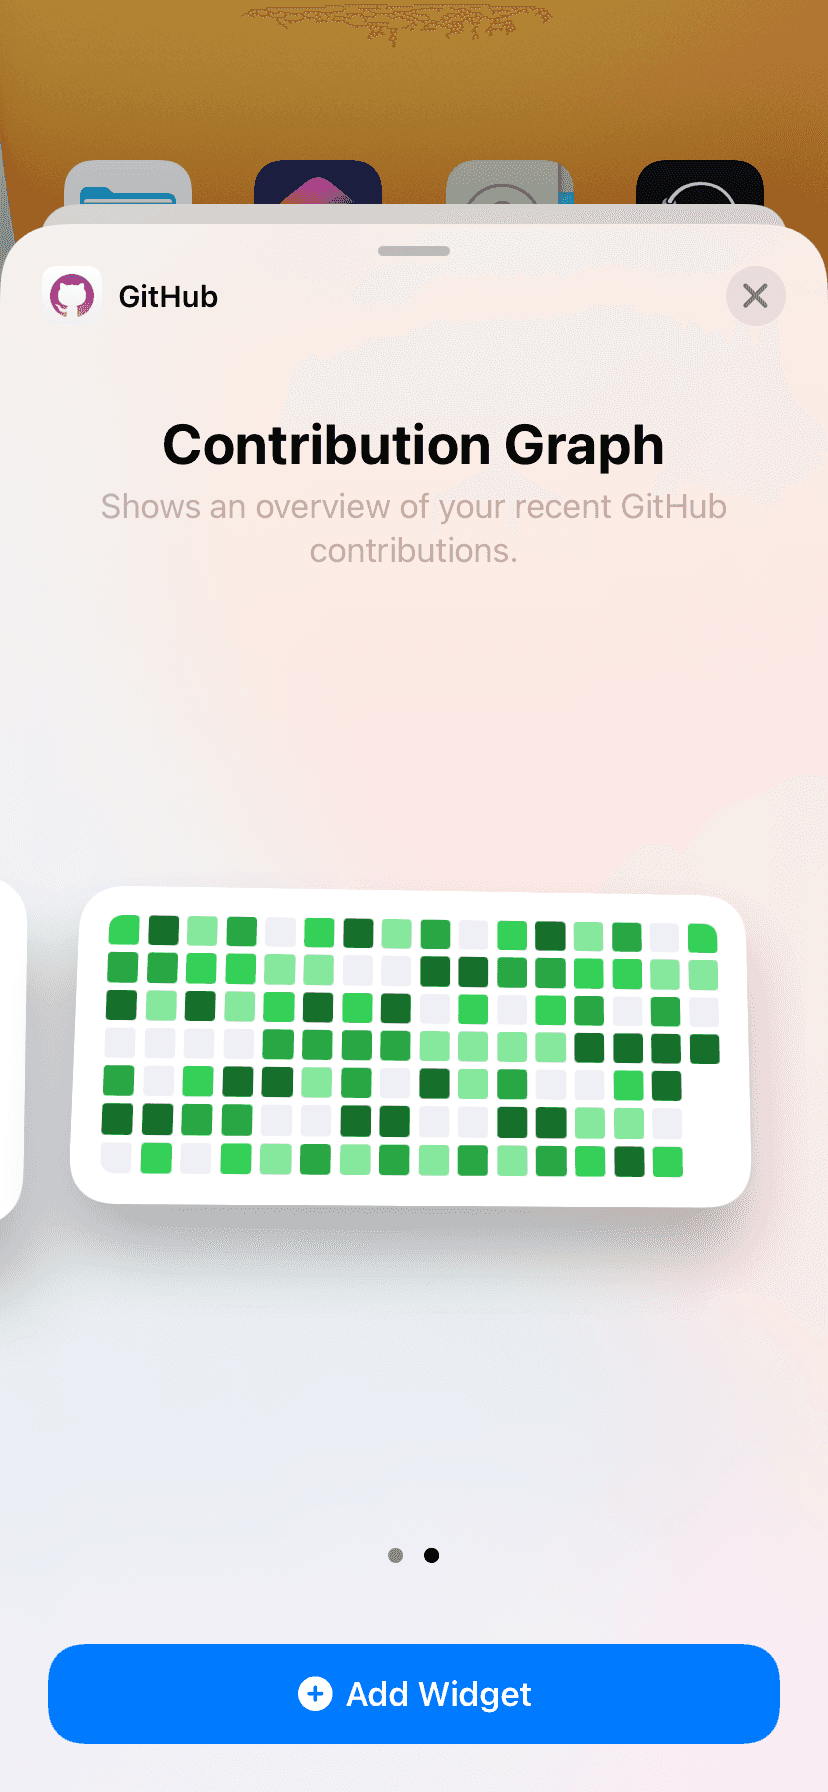
Figure: Good example - You can see your contributions from the home screen 🤖 When you have a public project in GitHub you have some graphs available that give you some statistics helping you to understand who is using your project and why they are using it. These graphs can be found under the Insights tab.

Figure: Under your project name, click Insights Read more about the project’s graphs: https://help.github.com/en/github/visualizing-repository-data-with-graphs/about-repository-graphs
Some project graphs available:
Pulse Graph

Figure: Pulse graph shows a summary of the project activity Read more about Pulse Graph : https://help.github.com/en/github/visualizing-repository-data-with-graphs/viewing-a-summary-of-repository-activity
Contributors Graph
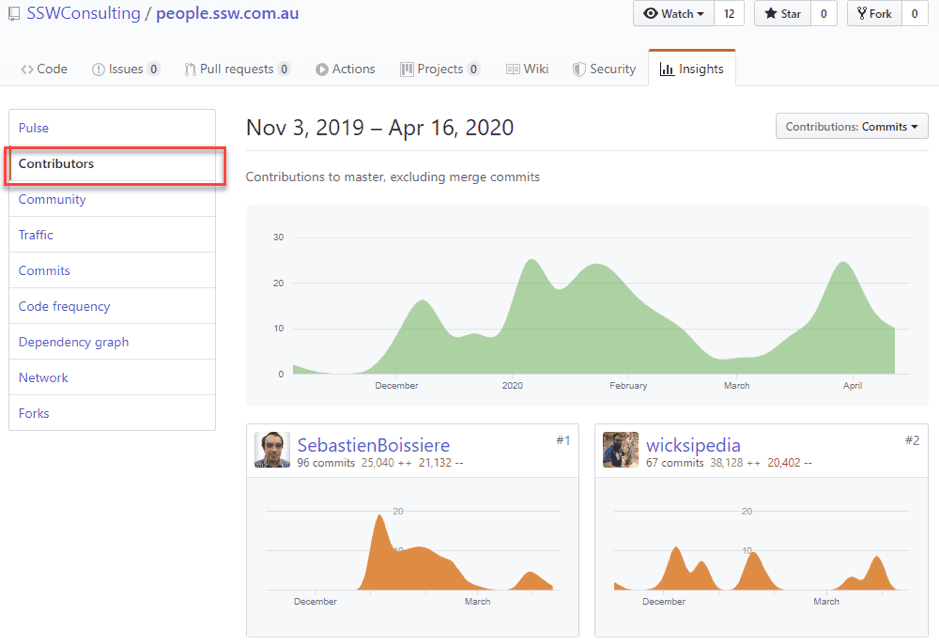
Figure: Contributors graphs show the top 100 contributors to the project Read more about Contributors Graph : https://help.github.com/en/github/visualizing-repository-data-with-graphs/viewing-a-projects-contributors
Traffic Graph
Figure: Traffic graphs show the project’s traffic, including clones, visitors in the past 14 days, referring sites and popular content to anyone with push access to the project Read more about Traffic Graph : https://help.github.com/en/github/visualizing-repository-data-with-graphs/viewing-traffic-to-a-repository
Increasing a member's permissions also increases the amount of damage they can do. As a good rule of thumb, only give members the access that they need to complete their work.e.g. You do not want developers to have force-push permissions on the main branch, as they might accidentally delete branches and code by mistake!
💡 Tip: GitHub has a role called "Maintainer" which is like an Admin but without the destructive powers
⚠️ Note: If you are still using Azure DevOps, force-push permissions into a repo is only allowed for Project Administrators, so pick your administrators well.
See GitHub docs Repository permission levels for an organization
Bad Example: All members are Admins 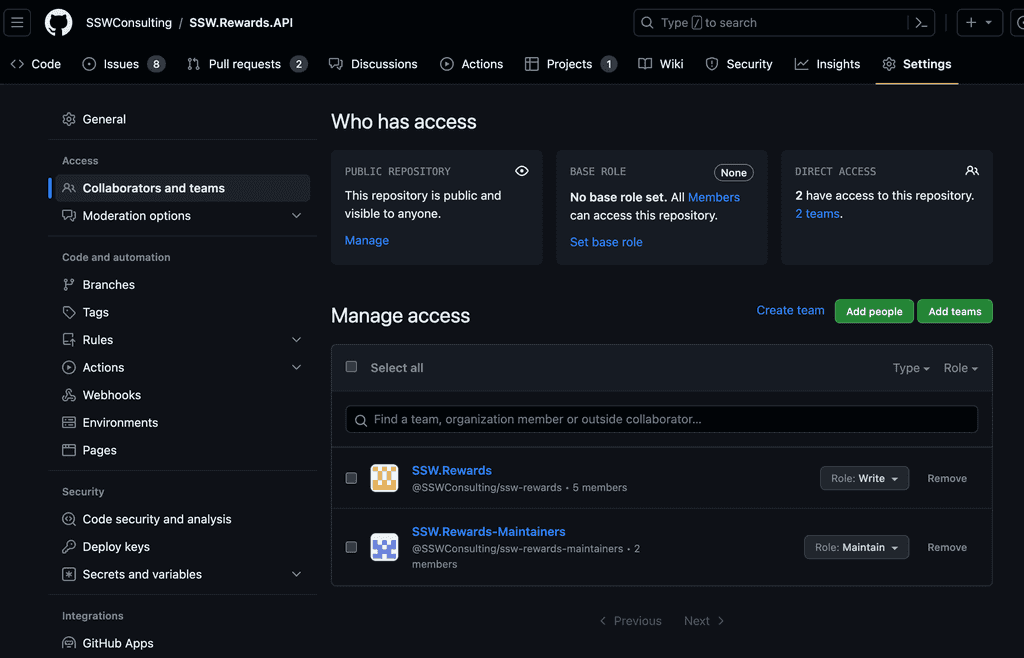
Good Example: Most users have push access, some can maintain the repo Using GitHub Webhooks, you can set some default permissions for every new repository inside an organisation.
You can use the repository event to trigger a GitHub action to set the permissions.
See the GitHub docs Permissions API
Add example of a GitHub action that sets the permissions
By adding this to your organisation,every new repo will already have the optimal permissions and privileges.
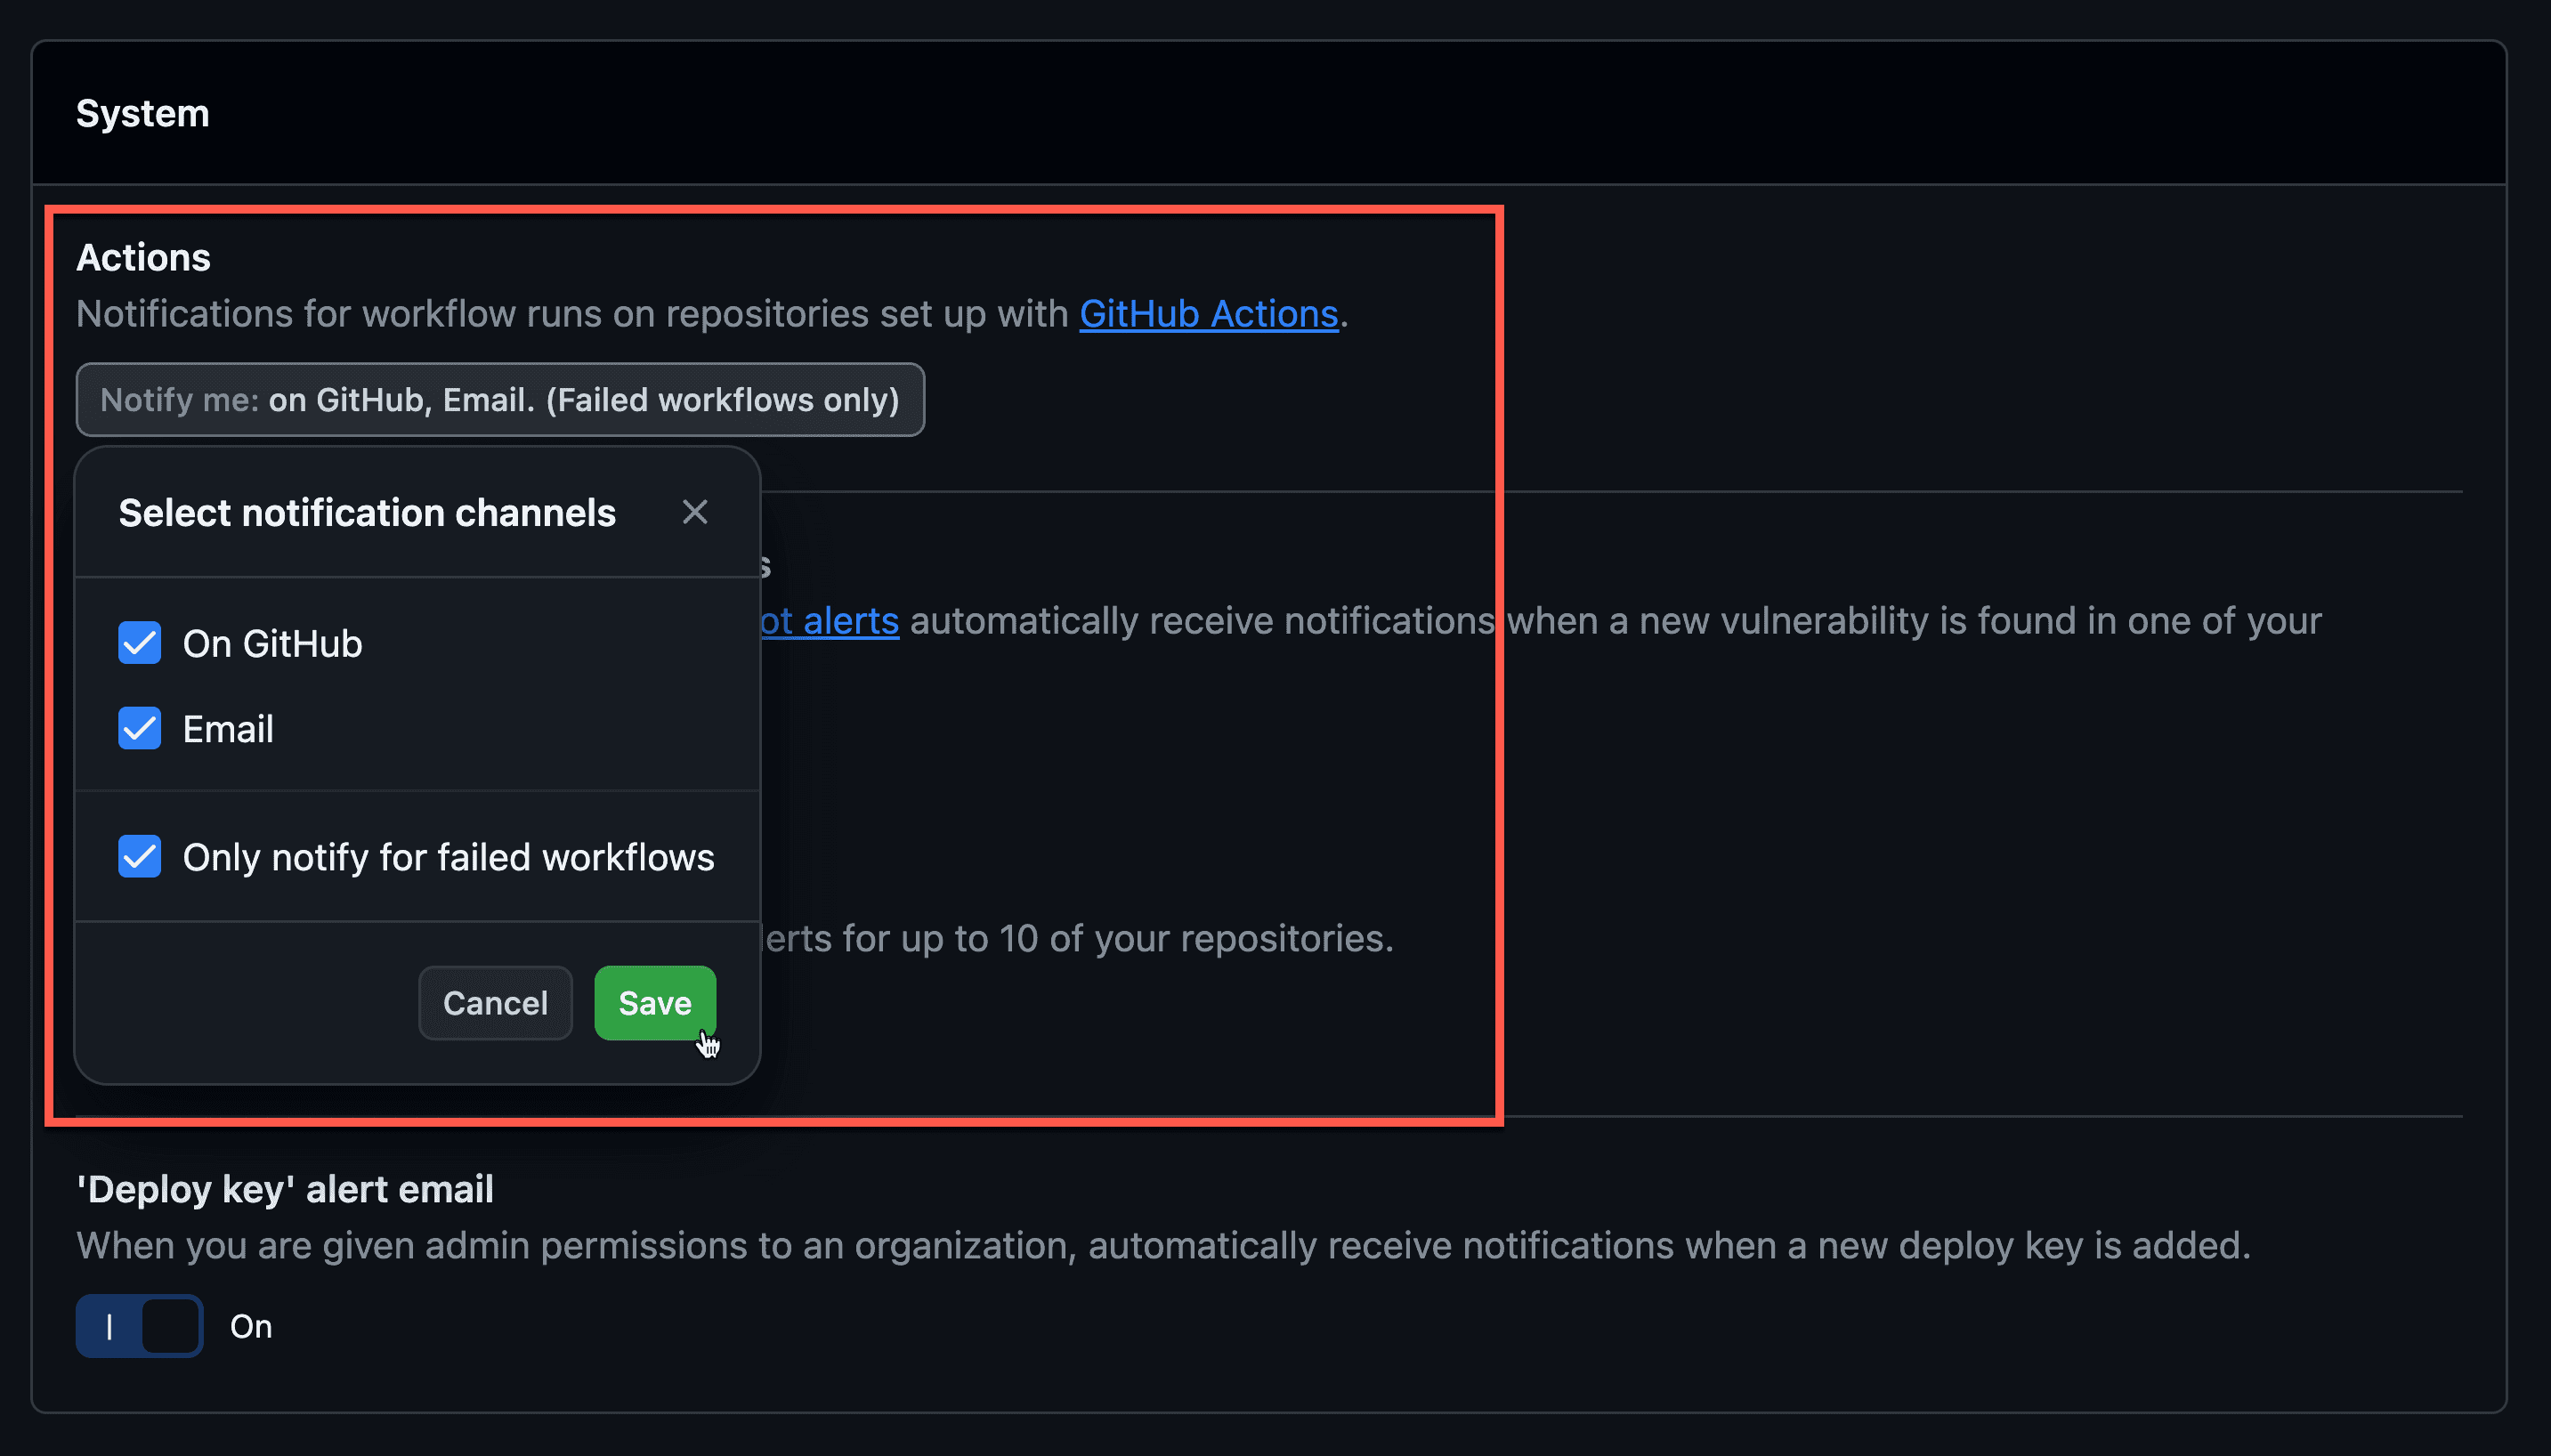
GitHub notifications can be frustrating if they are not setup for your personal preferences. For example, you may not want to receive an email everytime an automated GitHub action runs against the repo. To configure how many and how you receive your GitHub notifications follow this process.
- From GitHub Profile Dropdown | Settings | Notifications

Figure: First navigate to your notifications - Customise the settings as you see fit.

Figure: The recommended notification setup for non-technical users
From the default remove:
- Automatic watching x2
- Dependabot alerts x5
- GitHub Actions x1
- Email notification preferences | Pull Request pushes x1
- From GitHub Profile Dropdown | Settings | Notifications
GitHub issues (classic) offers a great way to have an agile development process following a kanban process. Unfortunately it requires a bit of effort (or a 3rd party tool) to set it up for good Scrum.
Note: Based on GitHub Scrum workflow.
How it works
- Product Backlog Items (PBIs) are reported as issues
- Points and metadata are assigned to PBIs as labels
- milestones are used to group issues in Sprints
1. Create issues as Product Backlog Items
To create a new backlog item, it is best practice to configure GitHub issue templates for your repository. See Configuring issue templates for your repository
Make sure you assign suitable labels to the issue. Later on during the Sprint Forecast meeting, the issue should be prioritized and added to a Sprint (milestone) if appropriate.
Issues allow you to have a conversation about the item and even allow you to create task lists inside the issue using GitHub's markdown.
2. Add labels to issues
Add the following labels to your repository:
Estimates
estimate labels allow you to set estimates in your backlog. E.g.:
Label Time Estimate estimate: 12 hour estimate: 24 hours estimate: 41 day estimate: 82 days estimate: 164 days estimate: 322 weeks estimate: 641 month Your actual estimates should align with the rule Estimating - Do you know how to size Product Backlog Items (PBIs) effectively?
Types
type labels allow you to easily filter PBIs in the dashboard. E.g.:
Label Type type:bugbug type:chorechore, maintenance work type:featurenew feature type:infrastructureinfrastructure related type:performanceperformance related type:refactorrefactor type:testtest related Others
You can define and assign custom labels that you need within your workflow or organization.
3. Define Sprints as milestones
You can create a milestone for every Sprint and add Product PBIs from the backlog to a milestone.
This process allows you to group PBIs in Sprints and track them by milestone in your issue dashboard (github.com/issues when logged in).
The backlog then consists of all PBIs that have no
milestoneattached to them.Tip: Use
no:milestonein the search field on your issue dashboard to find PBIs.See Rules to Awesome Documentation to follow best practices on setting up a projects README.
Notifications from GitHub can be quite a pain, as they send a lot of emails. This leads to many developers ignoring the important emails they receive.
Github
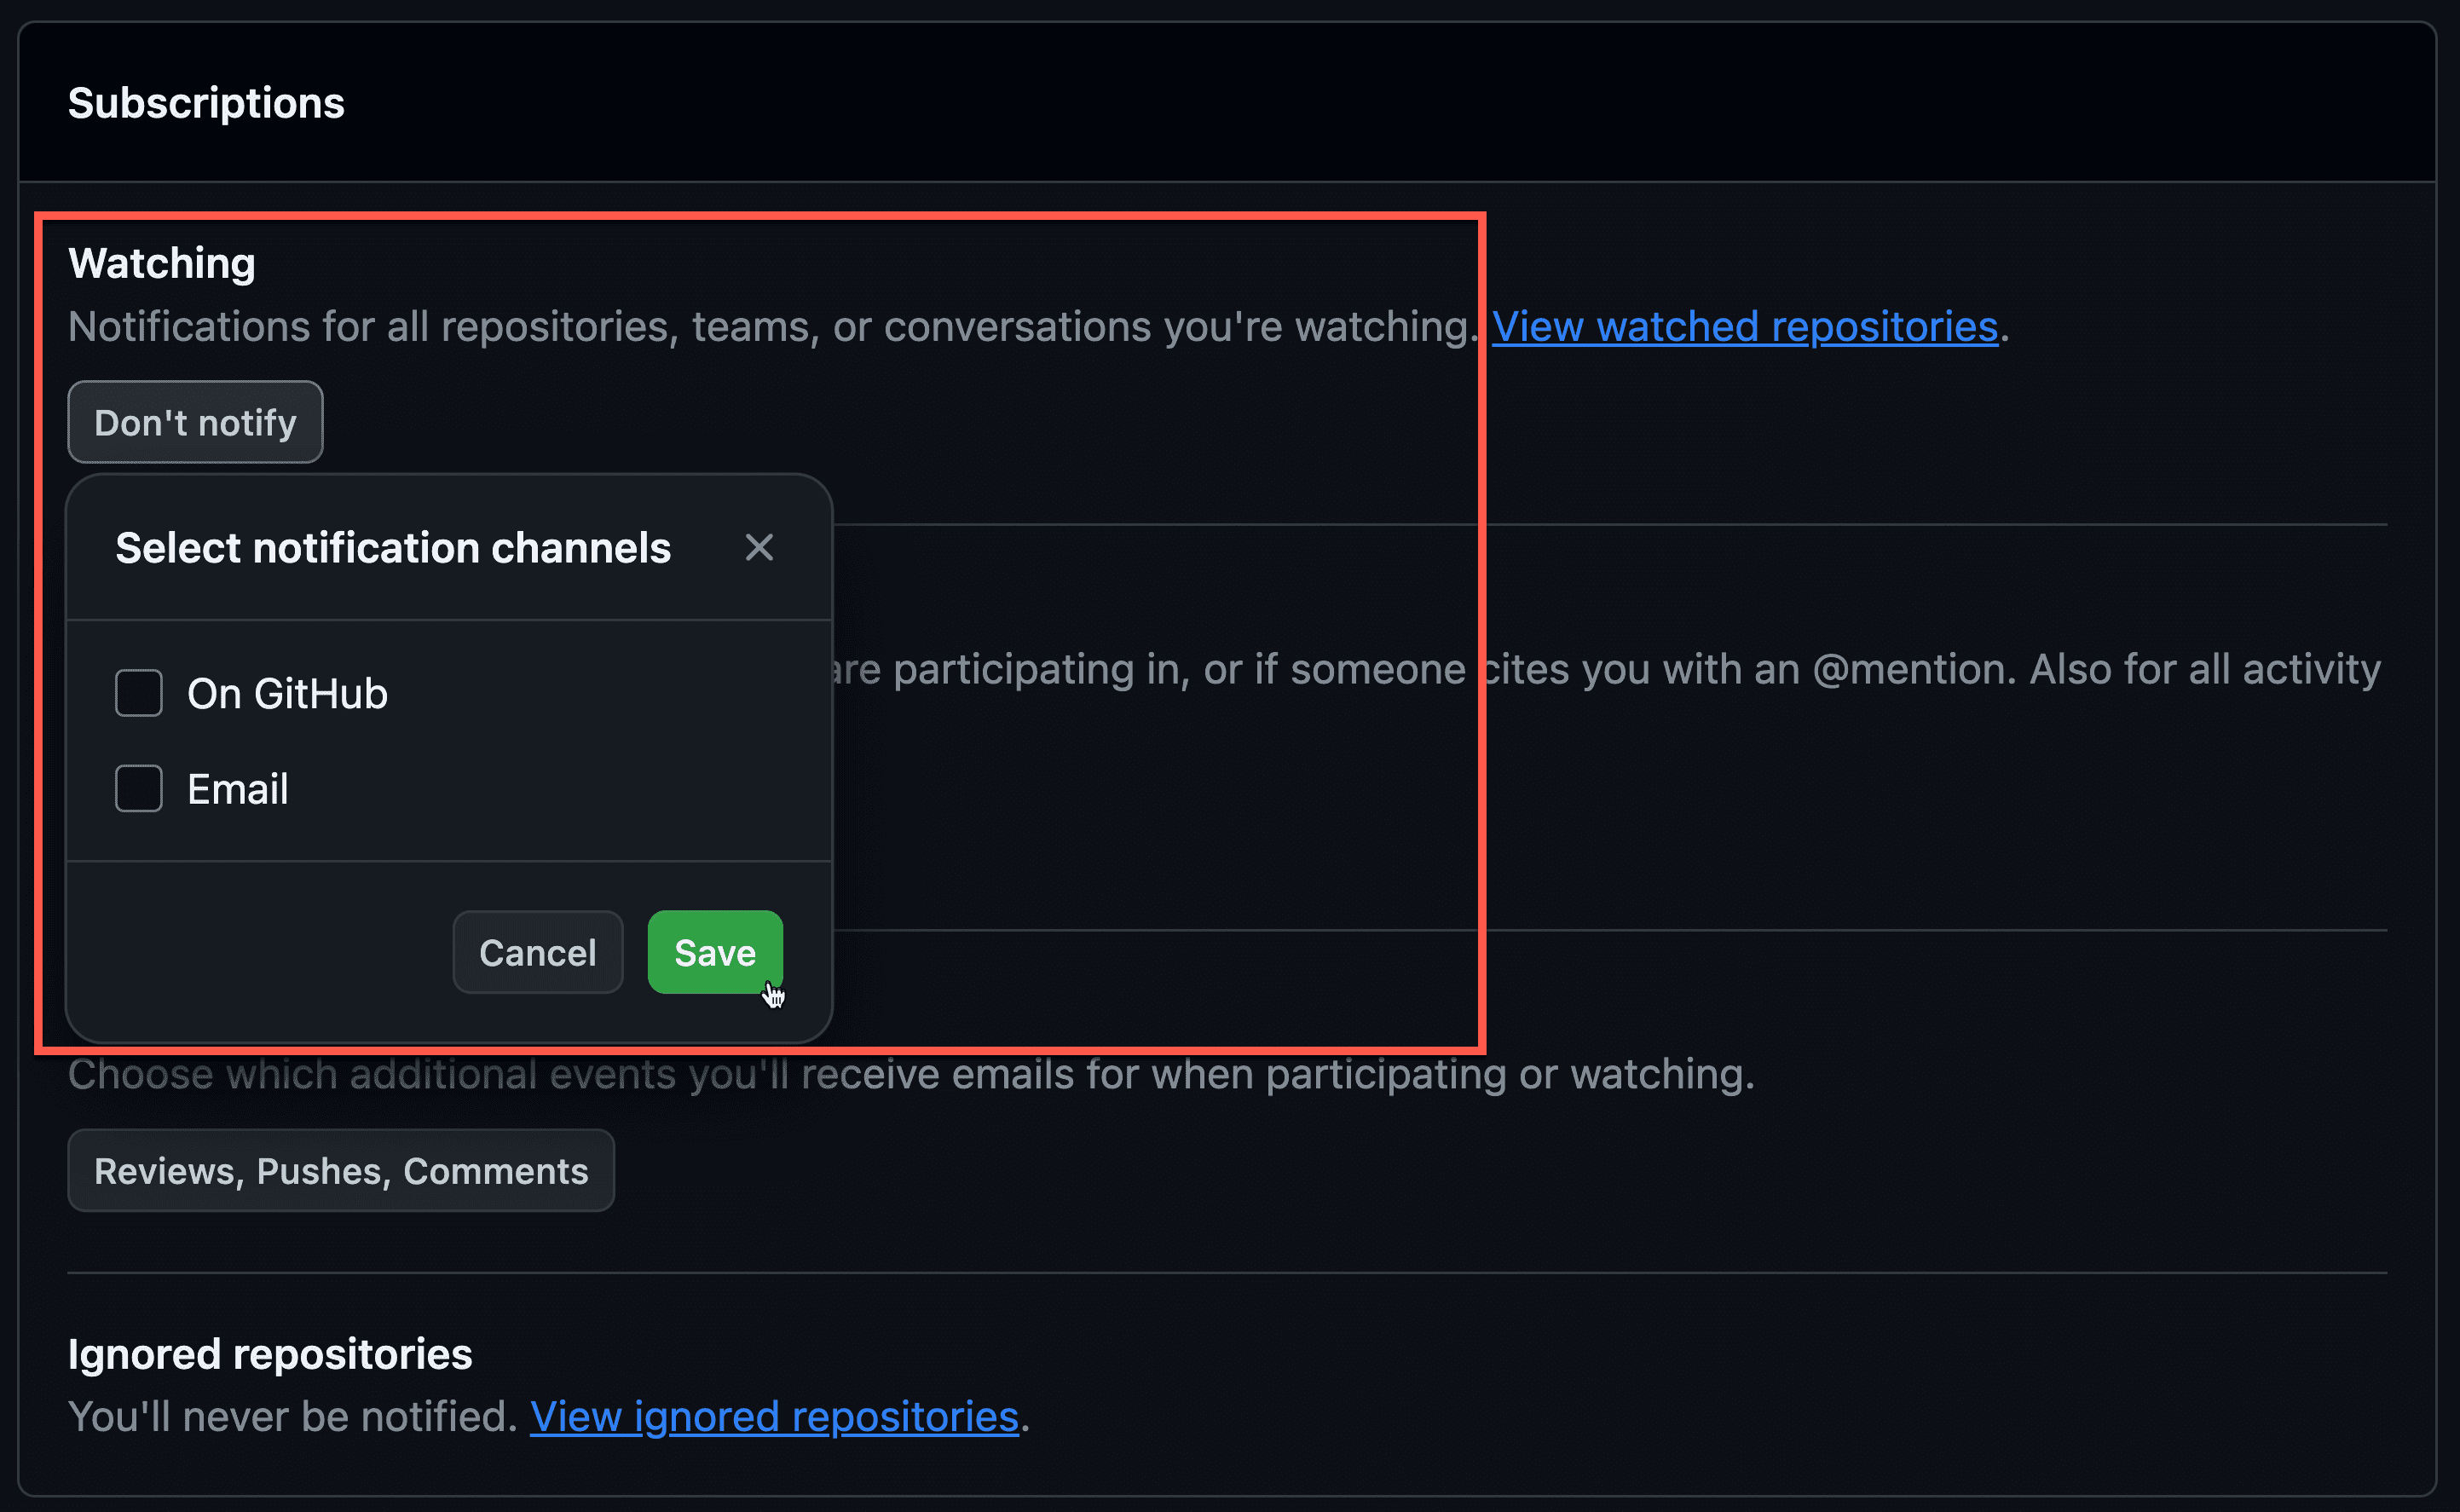
Figure: Bad example - lots of notifications To reduce this spam and to make the notifications have value, make sure to configure your GitHub Notifications.
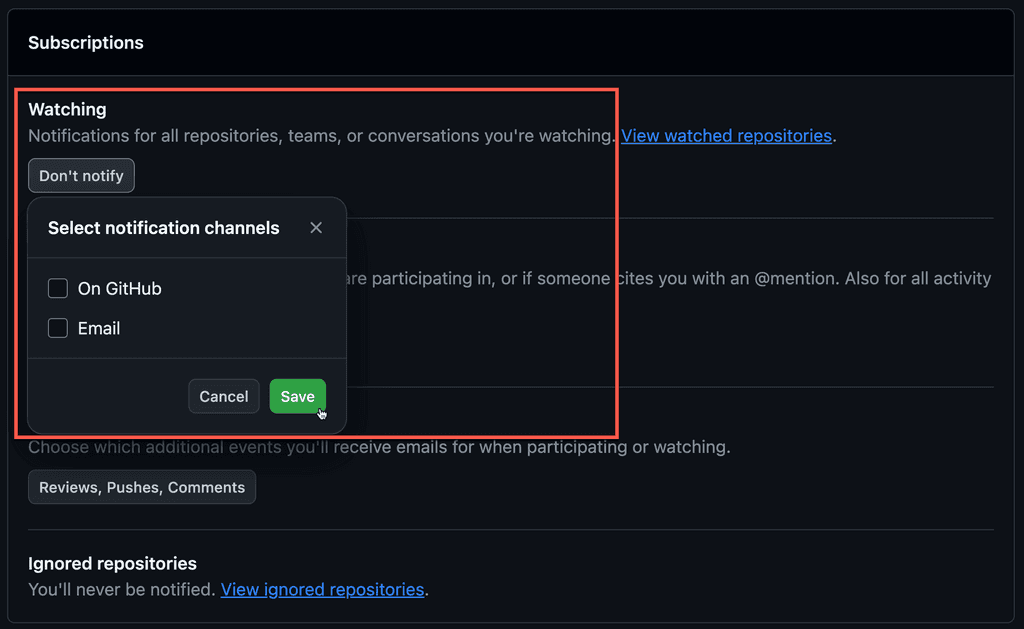
Figure: Good example - Turn off Watching settings Turning off Watching notifications significantly reduces the number of spam emails you receive. With this setting, you won't get notified about actions like PR approvals or comments that aren't related to you.
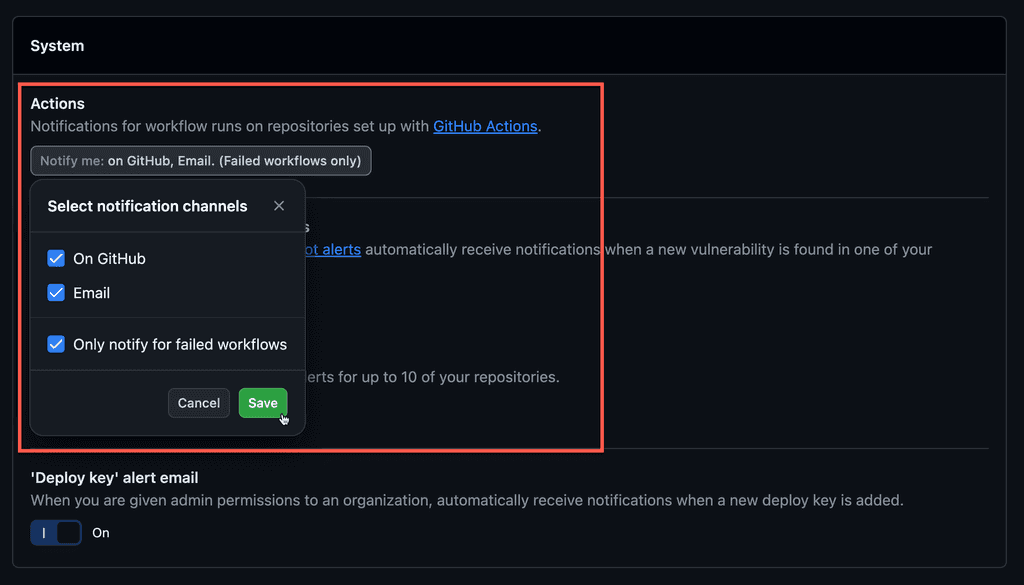
Figure: Good example - Workflow notification settings The important one here is to make sure the item marked Send notifications for failed workflows only is checked, so that you receive emails for failures in your deployments.
Outlook
You often want to receive emails when you’re @mentioned or someone requests your review on a pull request, but you probably don’t want to then subscribe to every future thing that happens about it.
You can add a rule in Outlook to automatically delete these:
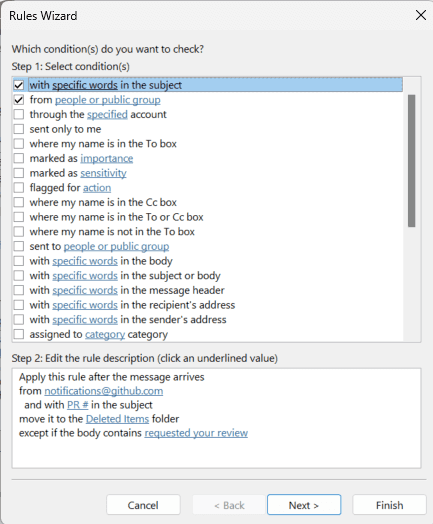
Figure: How to configure the rule in Outlook GitHub Actions are awesome but it can be really painful when you need to go digging through hundreds of lines of log output to find a problem. So, there has been a huge amount of requests for Markdown reporting analytics in GitHub Actions.
Job Summaries solves this problem by allowing you to generate and group custom Markdown content on the Actions and publish them when the action finishes. This summary is awesome because it gives you a quick visual indicator at a glance.
For example, when running a series of tests, it's so good to see all the green ticks and crosses showing which ones succeeded.

Figure: Job Summaries with Markdown Custom Markdown content can be used for a variety of creative purposes, such as:
- Aggregating and displaying test results
- Generating reports
- Custom output independent of logs
GitHub Secrets and Variables are an invaluable way to store sensitive information such as API keys, tokens, and passwords for use in your GitHub Actions. However, it's important to understand how special characters are handled in order to avoid issues in your workflows.
When storing Secrets and Variables in GitHub, it's common that these are stored with special characters (for example: "$", "&", "(", ")", "<", ">"). We have a few ways to use these in our GitHub Actions:
- ❌ Bad - Referencing the raw text as-is
- ✅ Good - Referencing the raw text in enclosing quotes
- ✅ Best - Escaping all special characters when saving the Secret or Variable
❌ Referencing as-is
Storing text containing special characters Secret or Variable and referencing this directly in our Action can lead to issues as it might not be interpreted as text as intended.
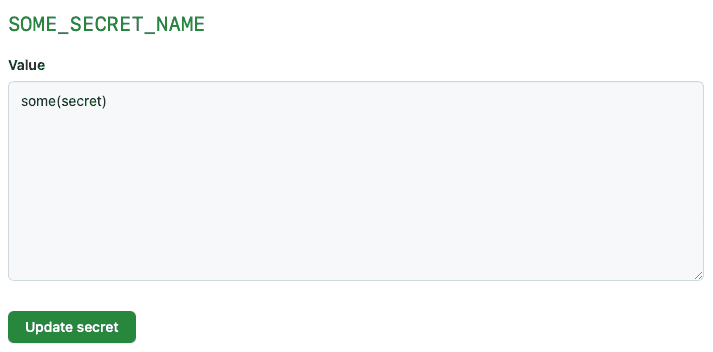
Figure: A Secret or Variable with special characters can cause issues if improperly handled 
Figure: Bad example - Accessing this Secret as-is will lead to a syntax error in our Action 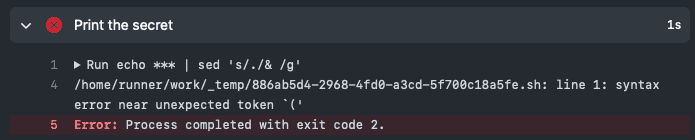
Figure: A syntax error is thrown due to the special characters ✅ Referencing in quotes
One simple way to avoid this is to wrap your Secrets or Variables in single or double quotes when using them in your GitHub Actions. This will ensure that these are not interpreted incorrectly and will be treated as a string.

Figure: Good example - Wrapping our Secret in quotes means it will be correctly treated as text 
Figure: Our Secret is now handled correctly when wrapped in quotes However, it's important to note that this can still cause issues in certain scenarios. For instance, if the Secret or Variable contains double quotes and is also wrapped by double quotes in our Action, it will have trouble parsing this and will throw an error.
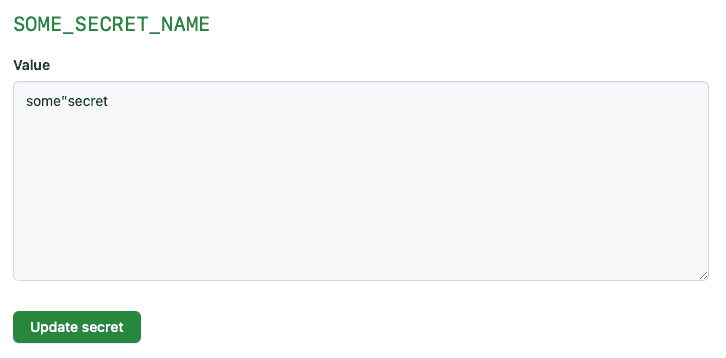
Figure: Bad example - Trying to wrap this Secret in double quotes will lead to an error 
Figure: The lone double quote character means this string cannot be interpreted correctly ✅ Escaping all special characters when storing Secret or Variable (Recommended)
A better way to handle this is to escape these special characters when storing your Secret or Variable. This can be done by adding a backslash ("") before each special character. This will ensure that these characters are interpreted as literal characters and will also help prevent potential ambiguity from using enclosing quotes.
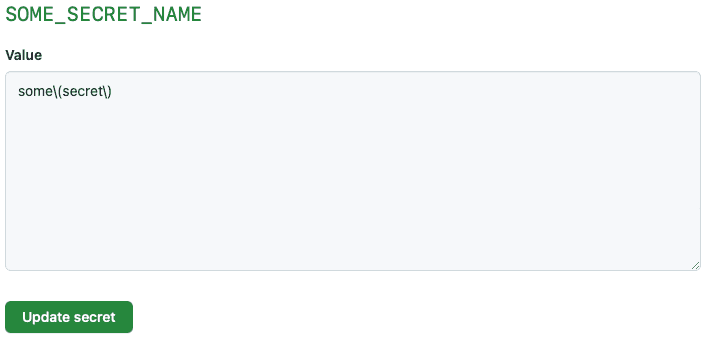
Figure: Good (best) example - Escaping the special characters mean this string will be interpreted correctly 
Figure: The escaped characters mean our string is now interpreted correctly without the need to wrap in quotes When creating pipelines for a company there is often secrets that need to be used by more than 1 repository. This is something that GitHub can't do natively. A developer is also unable to read the secrets in GitHub once they are entered. Although this is for security a simple typo can't be found and instead the entire secret needs to be reentered. There is also no visible history for GitHub secrets and no ability to revert to an earlier version of a secret.
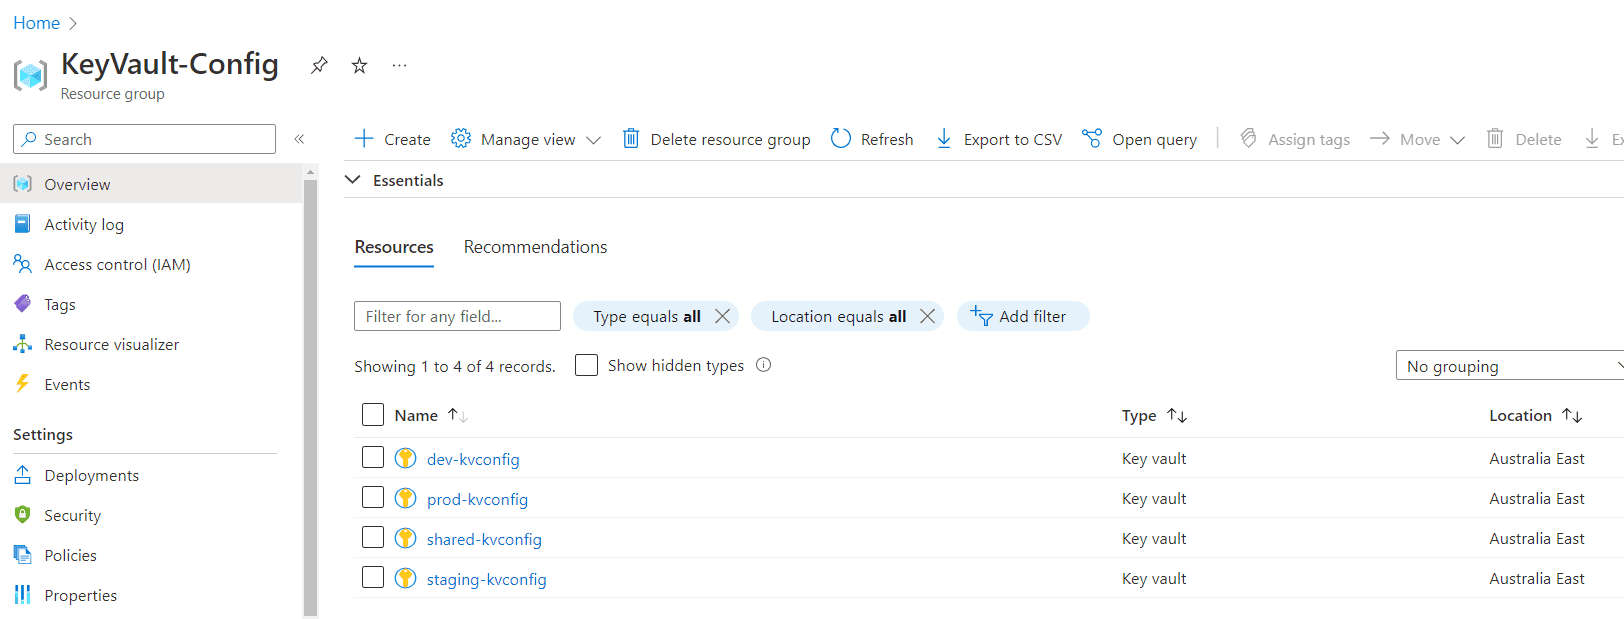
Solution: Store them in Azure KeyVault.
Create the KeyVaults
- Create a seperate Resource Group in Azure
- Add 1 x shared KeyVault - These will store any values that would be the same no matter which environment you are deploying to.
- Add 1 KeyVault for each environment you will deploy to - These are to store any values that are specific to the development environment (i.e. dev, staging, prod)
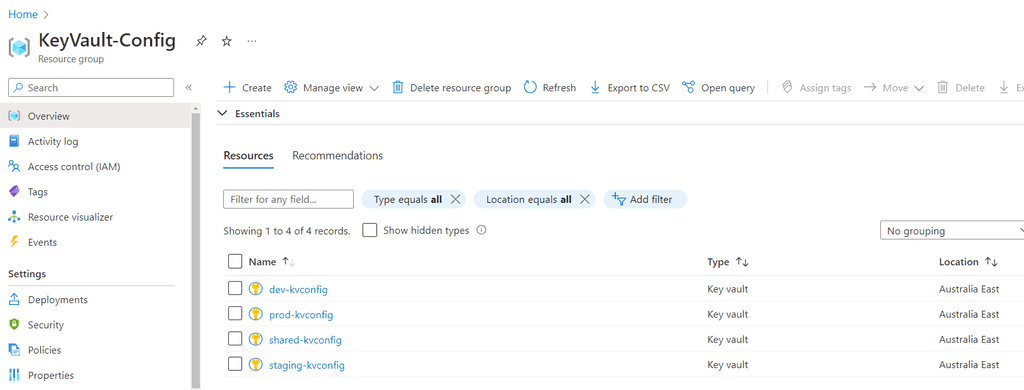
Figure: Resource Group with 4 Azure KeyVaults ready to go Use the KeyVaults in your CICD pipeline
- In a GitHub action use the following code:
- name: Azure CLI script
  uses: azure/CLI@v1
  with:
    inlineScript: |
      az keyvault secret show --vault-name dev-kvconfig --name myAppInsightsKey --query value
Figure: Retrieve KeyVault Secrets to use in GitHub Actions
- Bicep - In the file that you wish to use a secret add this code:
resource environmentKeyVault 'Microsoft.KeyVault/vaults@2022-07-01' existing = {
  name: '${environmentName}-kvconfig'
  scope: resourceGroup(envSubscriptionId, envResourceGroup)
}
Then reference the value like this to provide parameters for other bicep modules:
module azuredeployment 'environment-keyvault.bicep' ={
  name: '${projectName}-${lastDeploymentDate}'
  scope: resourceGroup()
  params: {
    location: location

    tags: tags
    AppInsightsKey: environmentKeyVault.getSecret('myAppInsightsKey')
}
Figure: Retrieve KeyVault Secrets using Bicep
- PowerShell - Access the same secrets directly from PowerShell:
Get-AzKeyVaultSecret -VaultName "$environmentName-kvconfig" -Name myAppInsightsKey -AsPlainTextFigure: Retrieve KeyVault Secrets using PowerShell
When starting to work on a project, it's common to wonder whether to fork an existing repository or create a new branch for it. Before making this decision, it's important to consider the key differences between the two options.
Figuring out whether to fork or branch
Generally, branching is a default option if you're working on a team developing a product. However, if you run into someone else's product and have new ideas you want to try, then forking is a good option because you can work on your ideas in isolation.
Tip: If unsure ask yourself 3 questions...
If your answer is 'no' to any of the following questions, then you should go for a fork:- Do you have access to the existing repository to clone a new branch?
- Is the change going to be part of that project and has it been approved by the Product Owner?
- Do you or anyone you're working with on that project own the existing repository?
Summary - Forking vs Branching
Fork Branch Purpose Create a separate copy of a repository for significant changes or different directions Develop new features or fix bugs without disrupting the main codebase Relationship to the original codebase Completely independent repository Linked to the original repository Ownership Owned by the user who created them Owned by the repository owner Scope of changes Typically involve significant changes Typically involve smaller changes Collaboration Used to develop ideas in isolation from the main team Used to develop ideas that the main team is working on The PR author is responsible to follow up and get PRs merged as soon as possible. An "over-the-shoulder" review is one of the best ways to avoid merge debt.
When a pull request (PR) is ready to be reviewed, get someone with you either in-person or on call, and go through the PR together. This not only allows you to demo the content of the PR but also talk with the person taking feedback when needed.
When you have finished coding, don't just create a PR and throw it over the fence. Part of finishing a PR is getting it approved.
The best way to get it approved is via an "over the shoulder" review.- Adam Cogan
Drafting PRs
A good way to avoid someone merging your PR before you have done an over the shoulder review is to keep the Pull Request in draft mode until you are ready for it to be reviewed for merging.

Figure: Bad example - Pressing commit and forgetting about it. PR has been left open for a over 2 weeks 
Figure: Good example - Devs reviewing a PR on a call - no merge debt! In a blazing-fast CI/CD pipeline, we've got everything automated for maximum efficiency! From building, testing and finally deploying our code. But sometimes we need to pause prior to large operations such as deployments and make sure that they are manually approved by someone with insight and oversight.
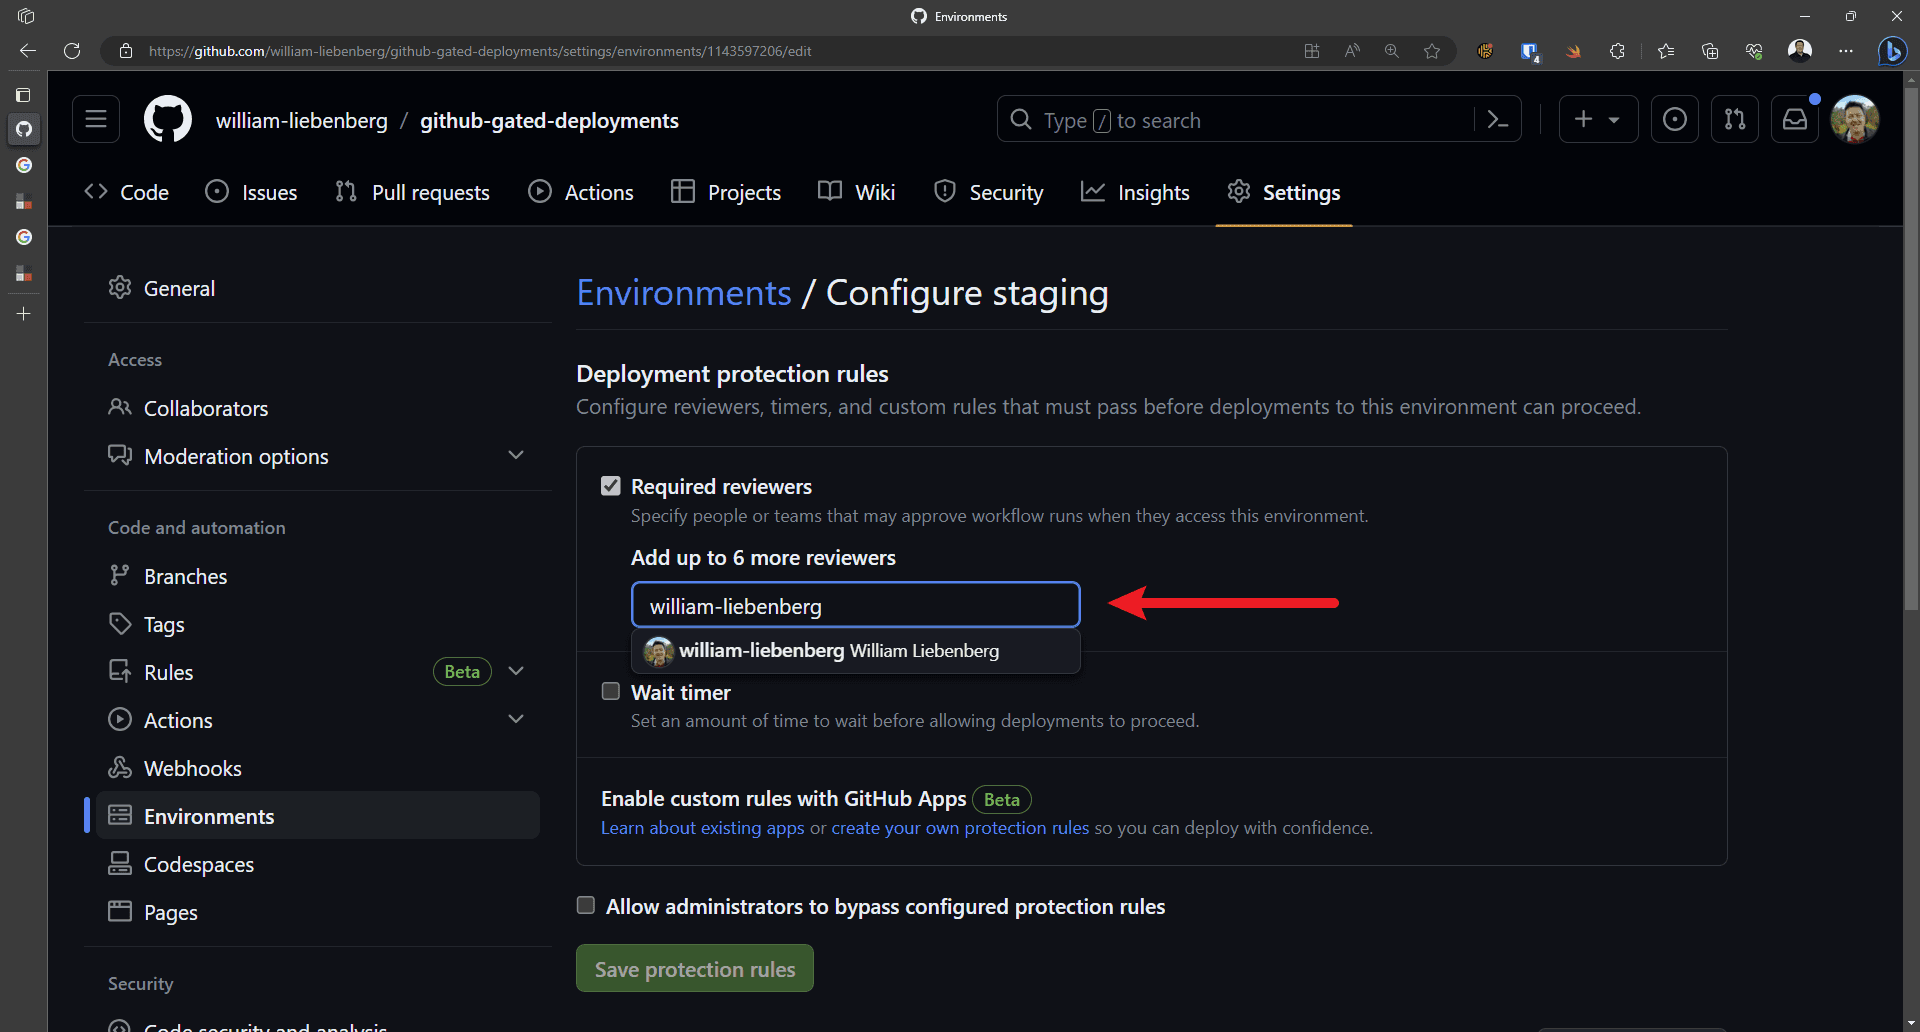
GitHub enables us to add manual approval steps in our workflow via the environments feature.
Environments also allow us to add per-environment secrets, timers, and protection rules. To use environments we have to consider if our repository is:
- Public - awesome! all public repo's have the environments feature enabled
- Private - environments is only enabled for private repos on GitHub Pro, Team, Enterprise pricing tiers
Only repository administrators can configure environments reviewers, timers, and secrets.
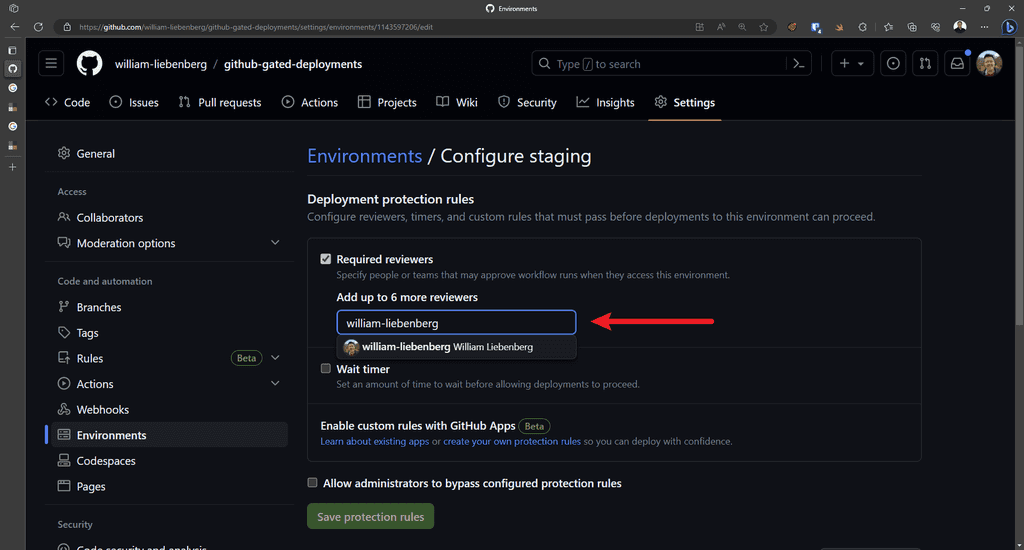
Figure: Add required reviewers Once approvals are configured, and a deployment workflow is triggered the GitHub workflow will pause on an approval step and notify the required approvers to manually review the deployment. Reviewers can approve or reject the deployment and add any comments if necessary. Once a deployment is approved, the GitHub workflow will continue running.
GitHub will also display the review information in the deployment summary.
Example workflow
For most projects we create multiple environments such as
dev,staging, andprod. You can add as many environments as needed to suit your team or project.Here is a high-level workflow for building and deploying a project:
-
In Parallel:
- Build the .NET WebAPI application
- Build the UI application
- Run Unit Test
- Automatically deploy the applications to
dev - After review and manual approval by Release Master, deploy the applications to
staging - After review and manual approval by Release Master, deploy the applications to
prod
The Release Master can use the approvals to control the number of changes released into the Staging environment for QA / Testers and to not disrupt the current testing efforts.
The manual approval steps also allows the Release Master to prevent any known issues with the application from being released to the real-life users in the Production environment.
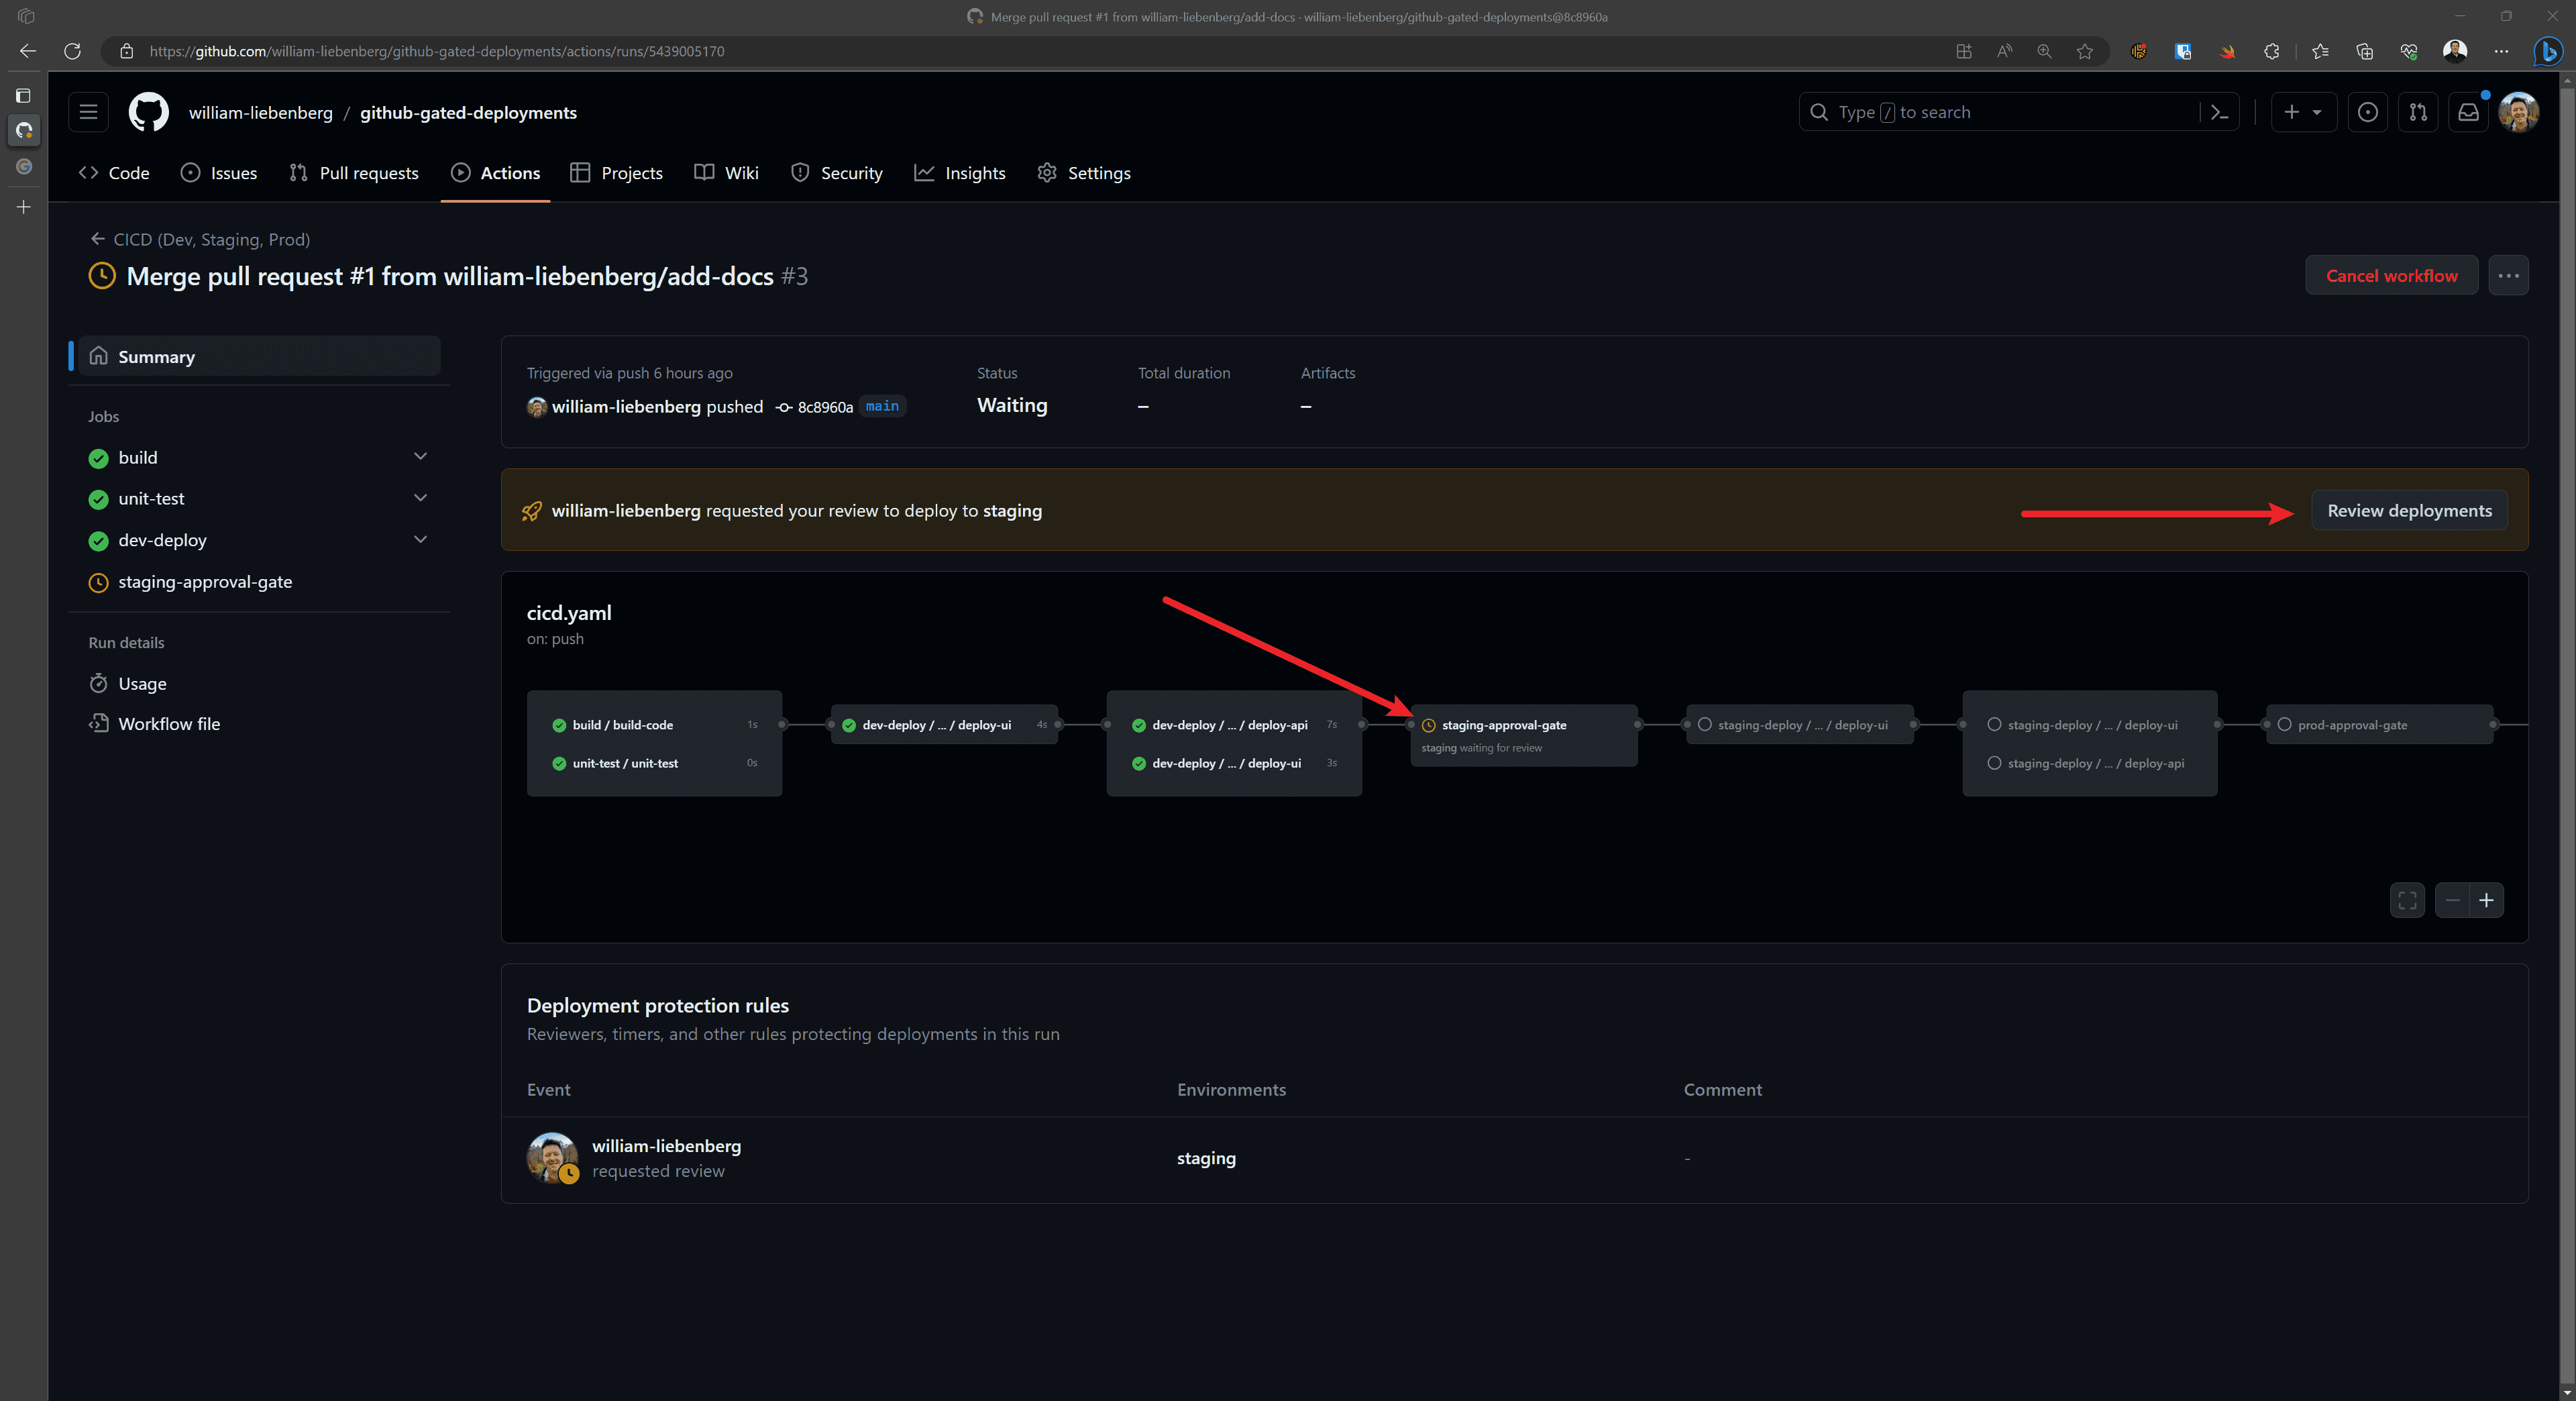
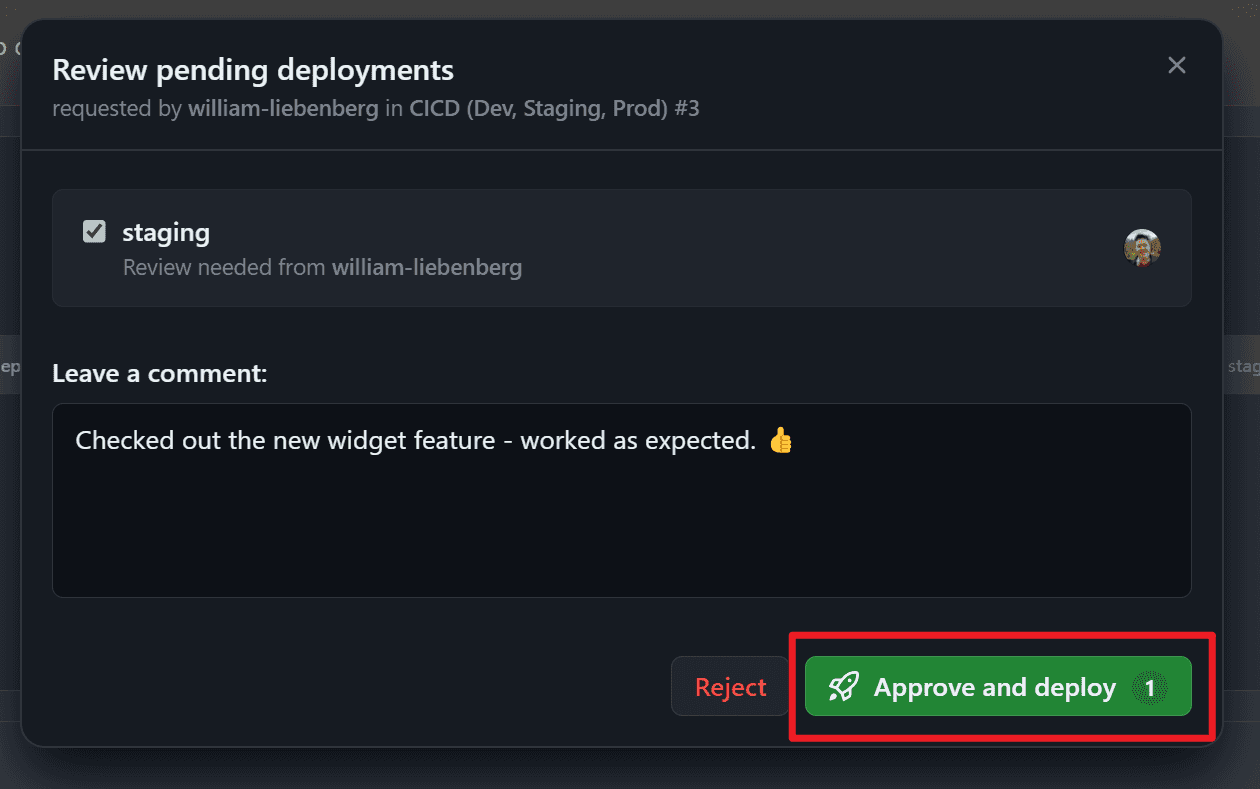
Here is an example of a workflow waiting for manual approval from a required reviewer before deploying to the
stagingenvironment:
Figure: Waiting for manual approval to deploy to Staging Once the reviewer is notified, they can manually approve which will then let the deployment process continue.

Figure: Manually approving a review before deploying to next environment Check out the sample repo for an example GitHub workflow with gated deployments.
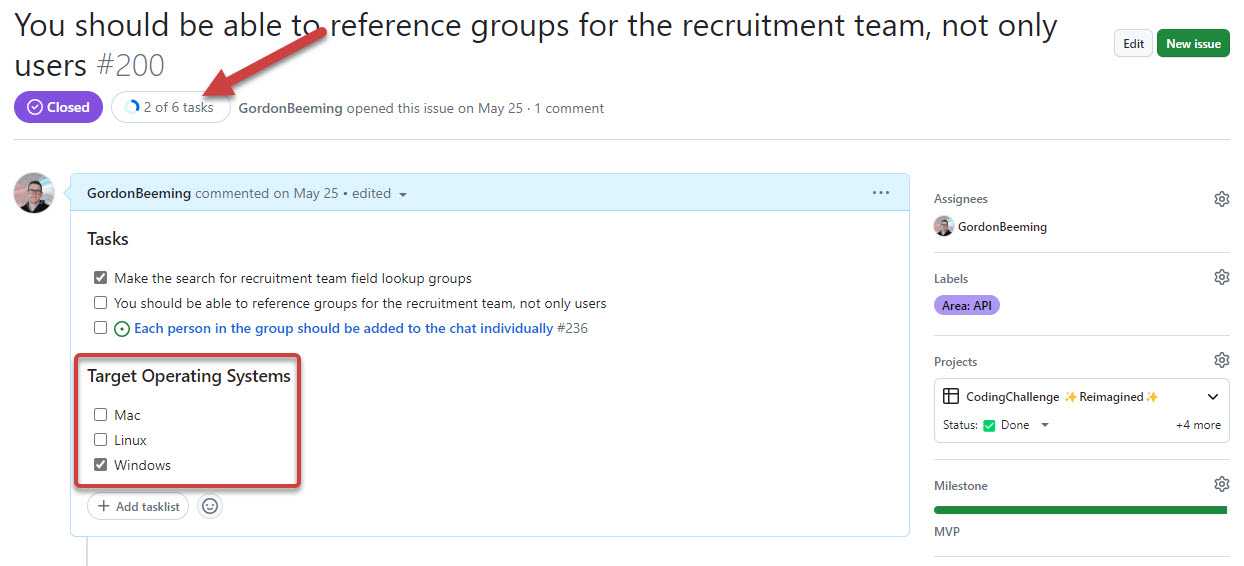
There are many ways to write tasks in PBIs, but the best way is to use tasklists. This allows you to see the progress of the PBI at a glance as well as avoid any unintentional tasks being tracked. Below is the different ways you could write tasks in PBIs.
Video: GitHub Tips - Why YOU should use tasklists (4 min)Numbering tasks
When sending tasks in email, you might number your tasks to make it clear what you want.
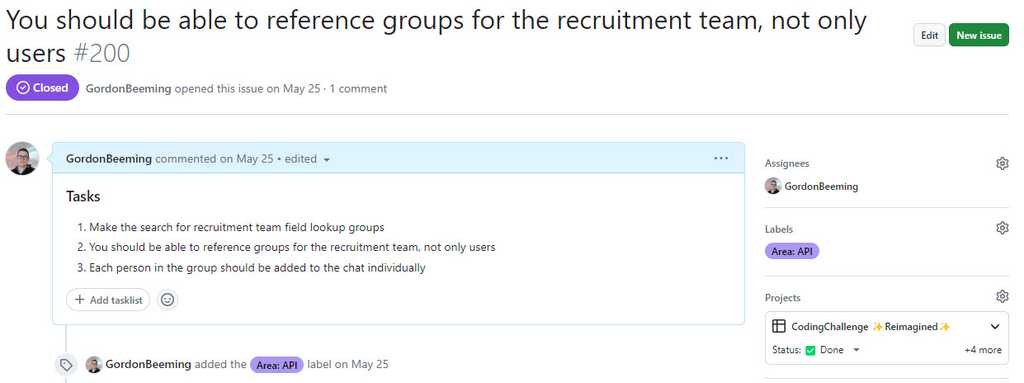
Figure: Numbering tasks in PBIs works but isn't fully utilizing the platform Although this would work in PBIs, it's not the best way to do it in GitHub.
Using checklists
You can use checkboxes in PBIs to create a checklist for tasks
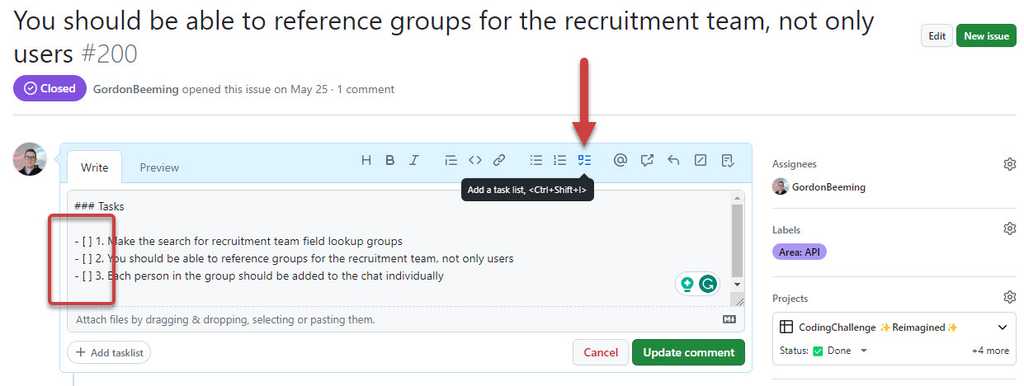
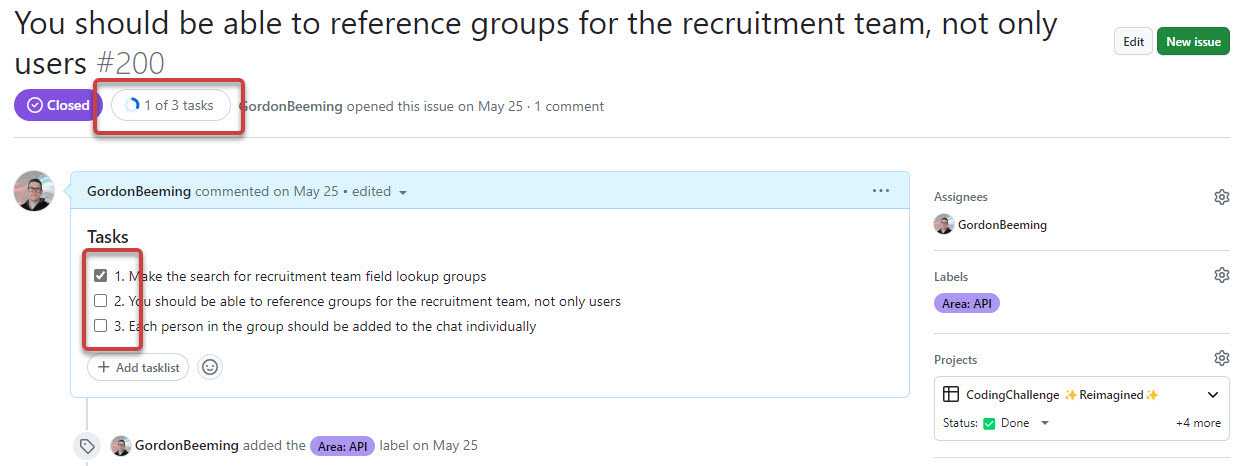
Figure: You can click the tasks toolbar button or simple type in a task which is recognized as "- [ ]" This will show a visual que as to how many tasks you've completed for the PBI.

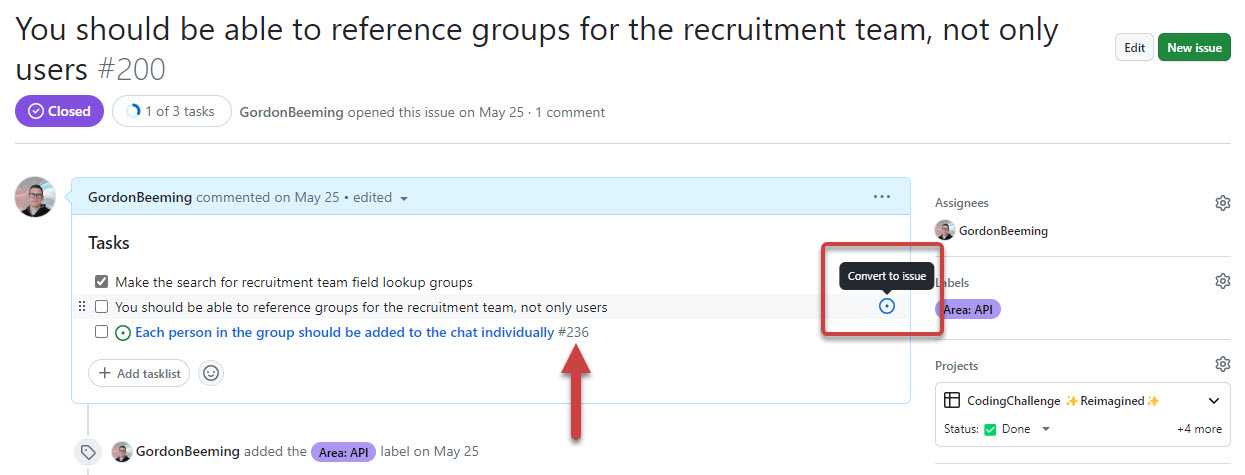
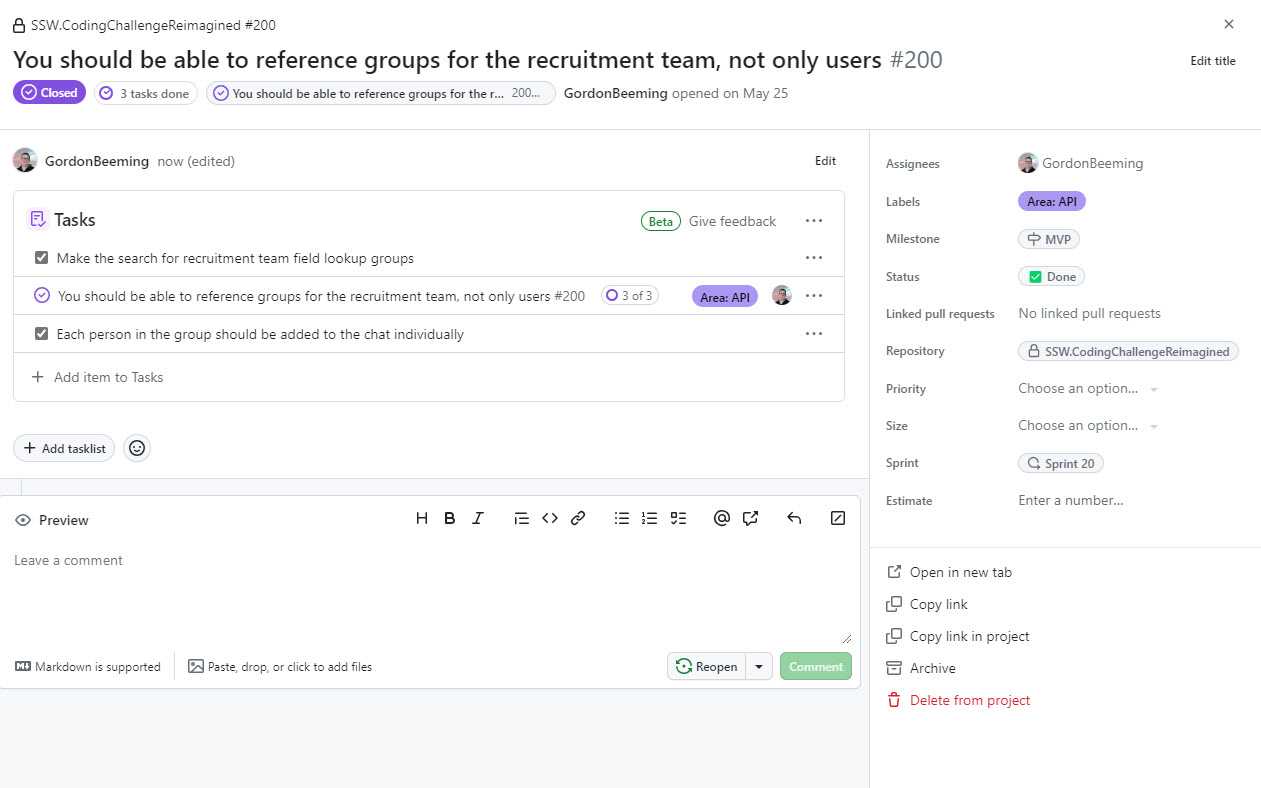
Figure: OK example - Using tasks we can easily see which are completed These tasks are numbered, but if we were to re-order them we'd need to re-number them so the list makes sense again. A better approach to numbering tasks would be to convert a task into it's own issue, this allows you to detail it out further or have more in-depth conversations around the issue specifically.
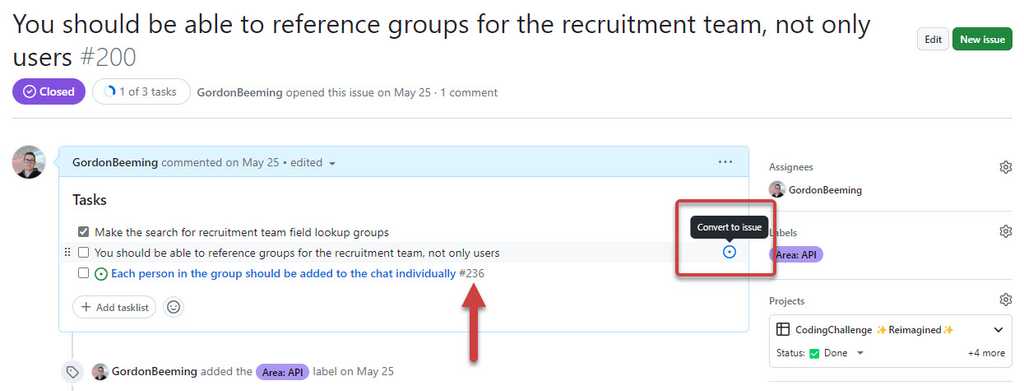
Figure: Good example - Create issues from tasks to get an immutable reference One of the downsides to using checklists is that any checkbox in the issue description would show up as a task. This means that if you had a checkbox in the description that wasn't a task, it would show up as a task. This is why we recommend using tasklists.

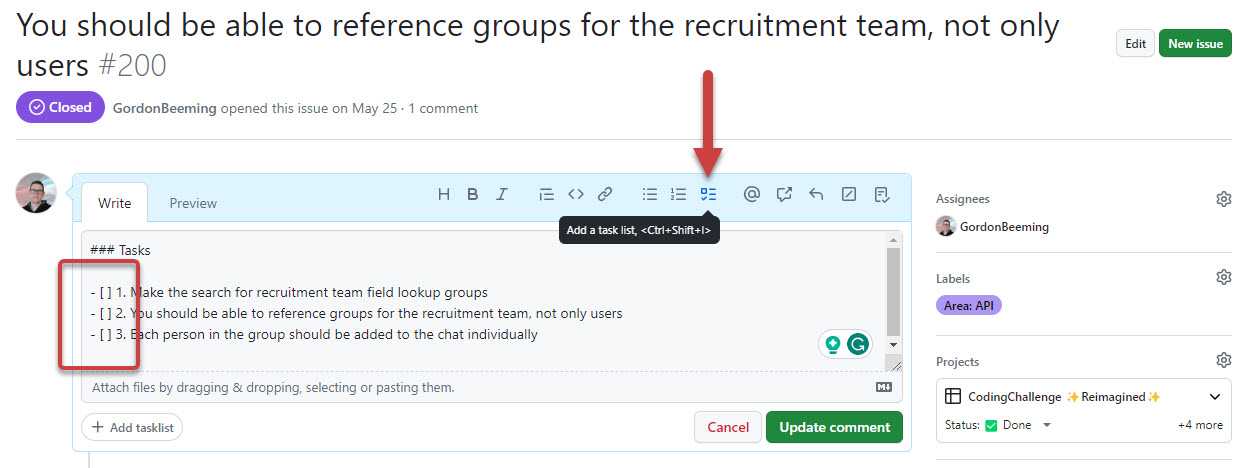
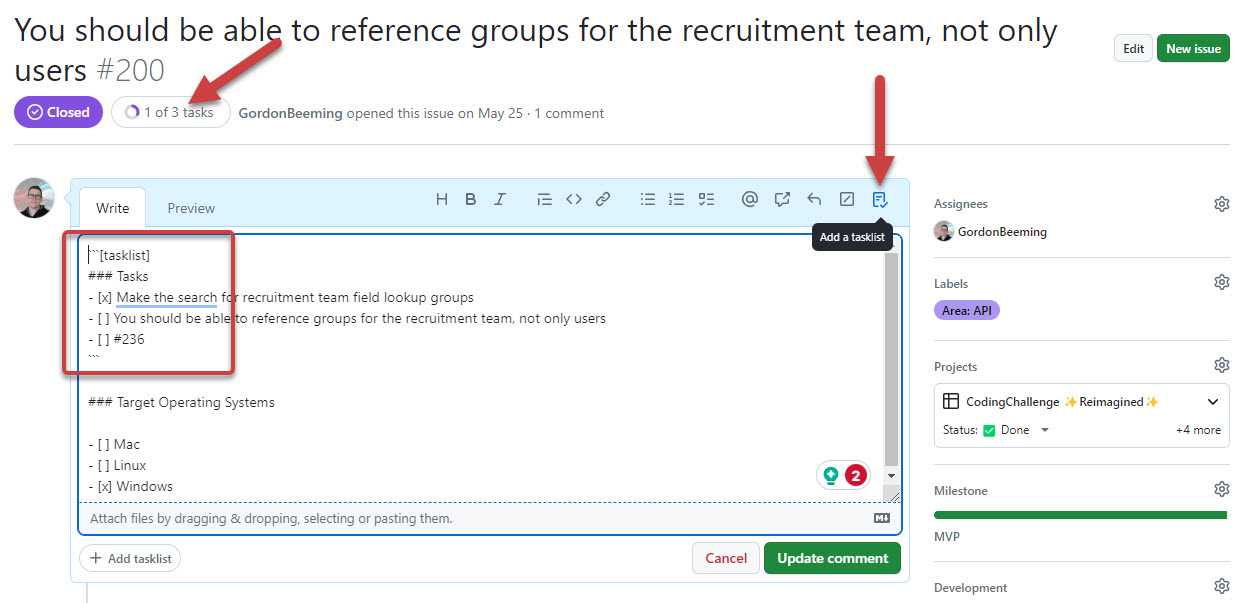
Figure: When you have more checkboxes, e.g. for bug reports. Your task indicator will not be accurate Using tasklists (recommended)
Lastly you should use the tasklist for your tasks, this gives the same advantages as standard checklists without interference from other checkboxes.

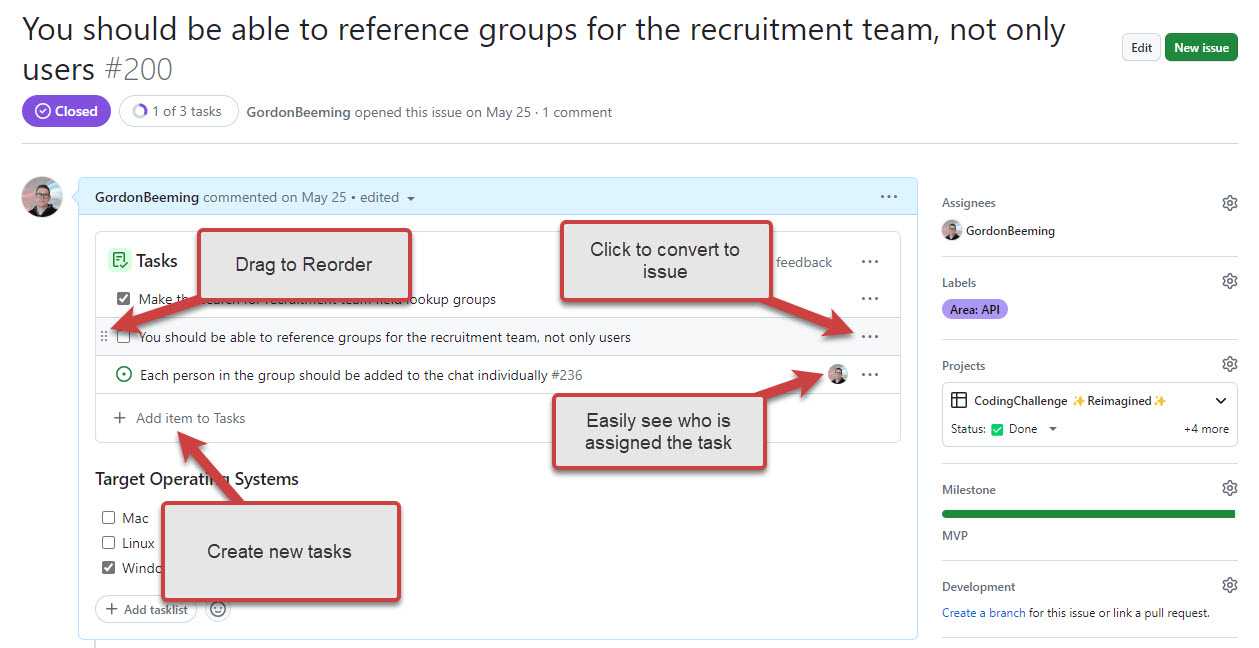
Figure: Using tasklist requires a little extra markdown around your checkboxes Besides the benefits described above, there's also the advantage of having a UI component built specifically to markup a tasklist.
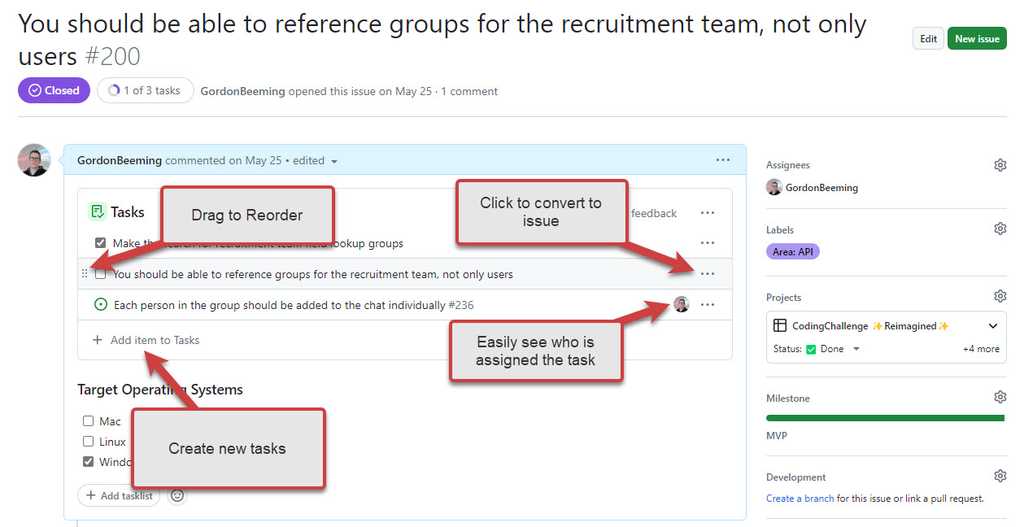
Figure: Using tasklist requires a little extra markdown around your checkboxes You can see from the UI component there is a convenient button to add a task, easily see who is assigned to tasks; As well as a menu list of options to convert to issue, rename and remove tasks, all through the UI. This is great for team members who don't feel comfortable with markdown.
PBIs/Issues, tasks, PRs and goals are the backbone of work regardless of whether they are stored in Azure DevOps, GitHub, Jira, Trello, or some other platform. When you finish a task, marking it as done is satisfying, but remember to add a closing comment for future context. This allows others to understand the PBI was closed and what the outcome was.
For example, if you have UI changes, a Done video or a couple of screenshots can go a long way to help the team understand what was completed. Similarly, if there are changes to architecture documents (e.g. the readme), providing a link to those artifacts helps others get across the change.
Note: A comment is critical when closing a PBI as "Won't Fix" or "Duplicate" but is valuable in all scenarios and should be the default approach.
When you look at a PBI, you can navigate through the commits or pull requests that were linked to the PBI. This is great for understanding the code changes, but that doesn't easily show you what the outcome was.
These are sentences you should add to include context when closing a PBI / Issue:
- "For more details, see {{ DONE VIDEO }} / {{ SCREENSHOT(S) }}"
- "The document/page was updated: {{ LINK }}"
- "Done - see email: {{ EMAIL SUBJECT }}"
- "As per conversation with {{ @NAME(S) }}"
If you are closing a PBI as duplicate:
- "Duplicate of {{ LINK TO THE OTHER PBI }}"
If you are closing a PBI as "Won't Fix", mention the reason why it is not being fixed:
- "Not done - {{ REASON }}"
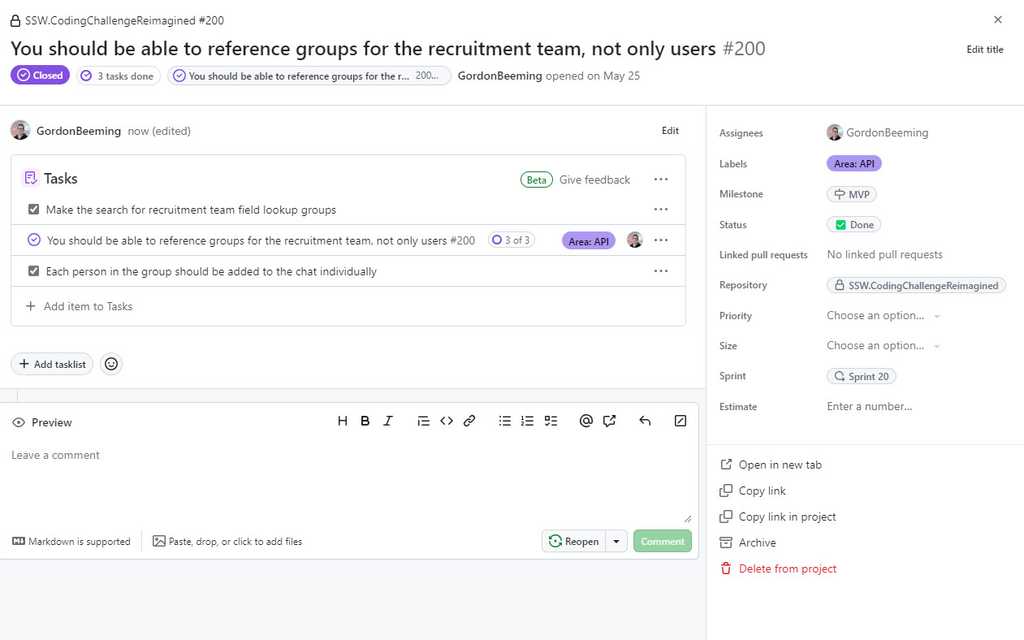
Figure: Bad example - This PBI is closed with no context around changes made 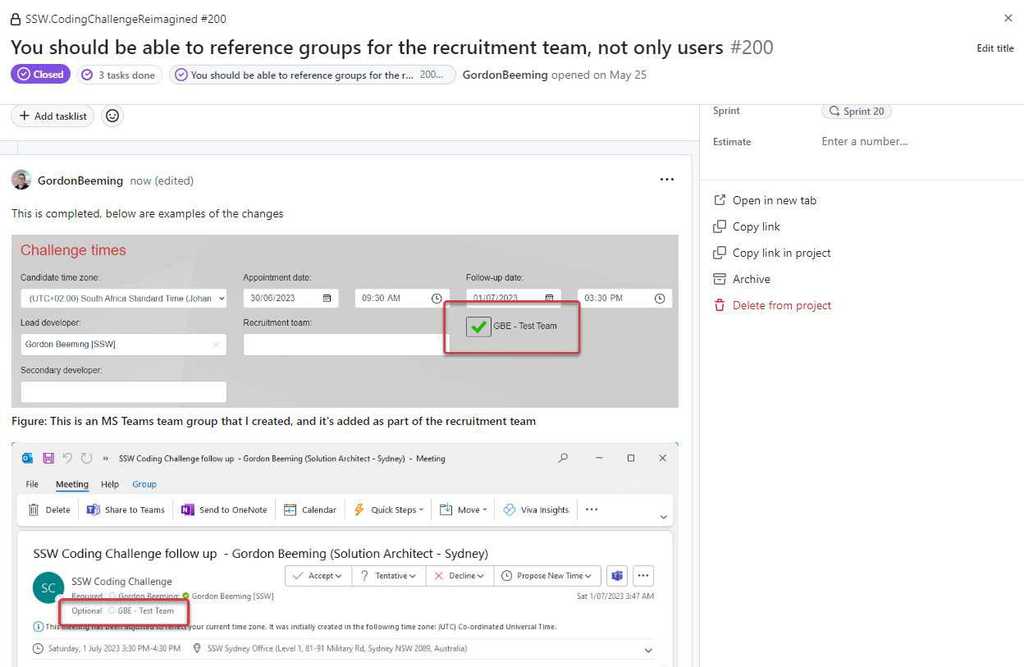
Figure: Good example - This PBI informs the team that the work is complete and contains some examples of what the changes look like Be aware of auto-closing Issues in GitHub
In GitHub, there is a feature that allows PBIs to be automatically closed when a pull request (PR) is merged. Ideally, the PR contains all the context that would normally be included in a 'Done' reply to the PBI, streamlining the process. This feature is particularly useful as it ensures the issue is linked to the PR and eliminates the common 'I forgot to close the PBI' oversight. This feature is good for some teams.
Be aware, this auto-closes the issue and assumes merging the PR is the only work required. This is not always true depending on your Definition of Done and deployment process.
See rule on avoiding auto-closing Issues.
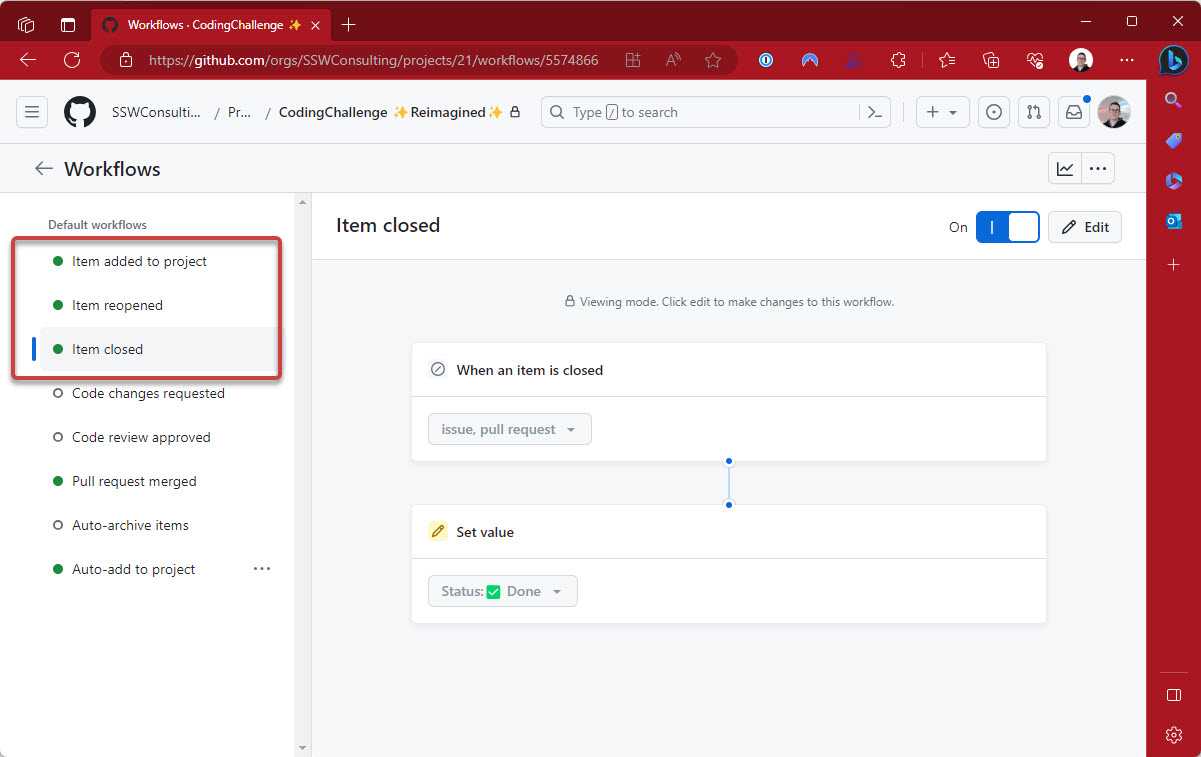
Check GitHub project workflows
If you are using GitHub projects you will want to make sure you've checked the workflows for the your project. This is to make sure the team understands the behavior of the work when it's state changes in the project.
You can open the Hamburger menu | Workflows to view all the workflows
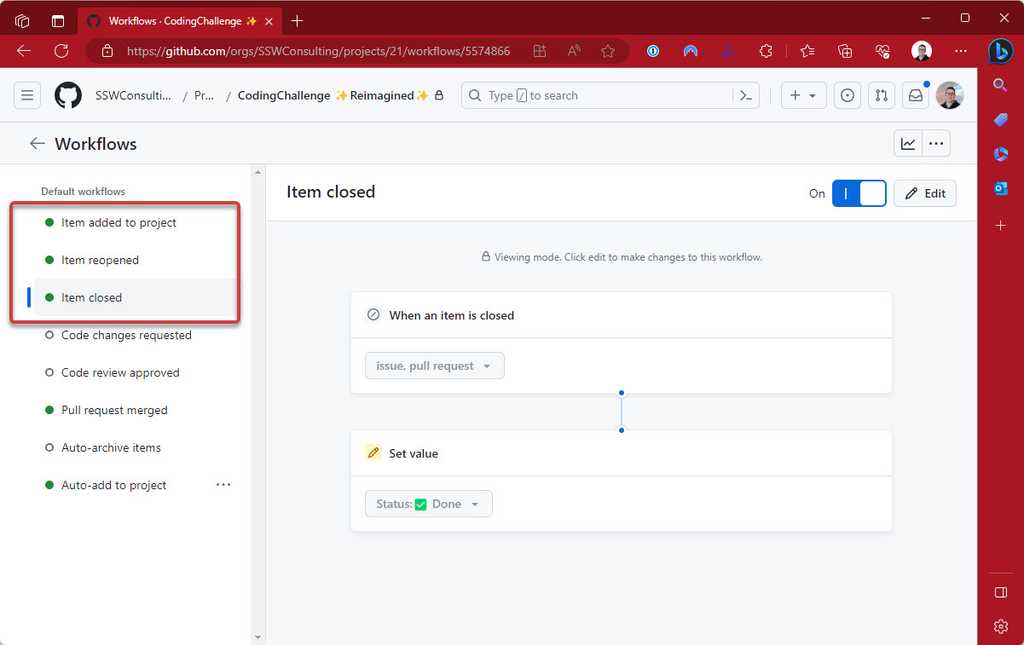
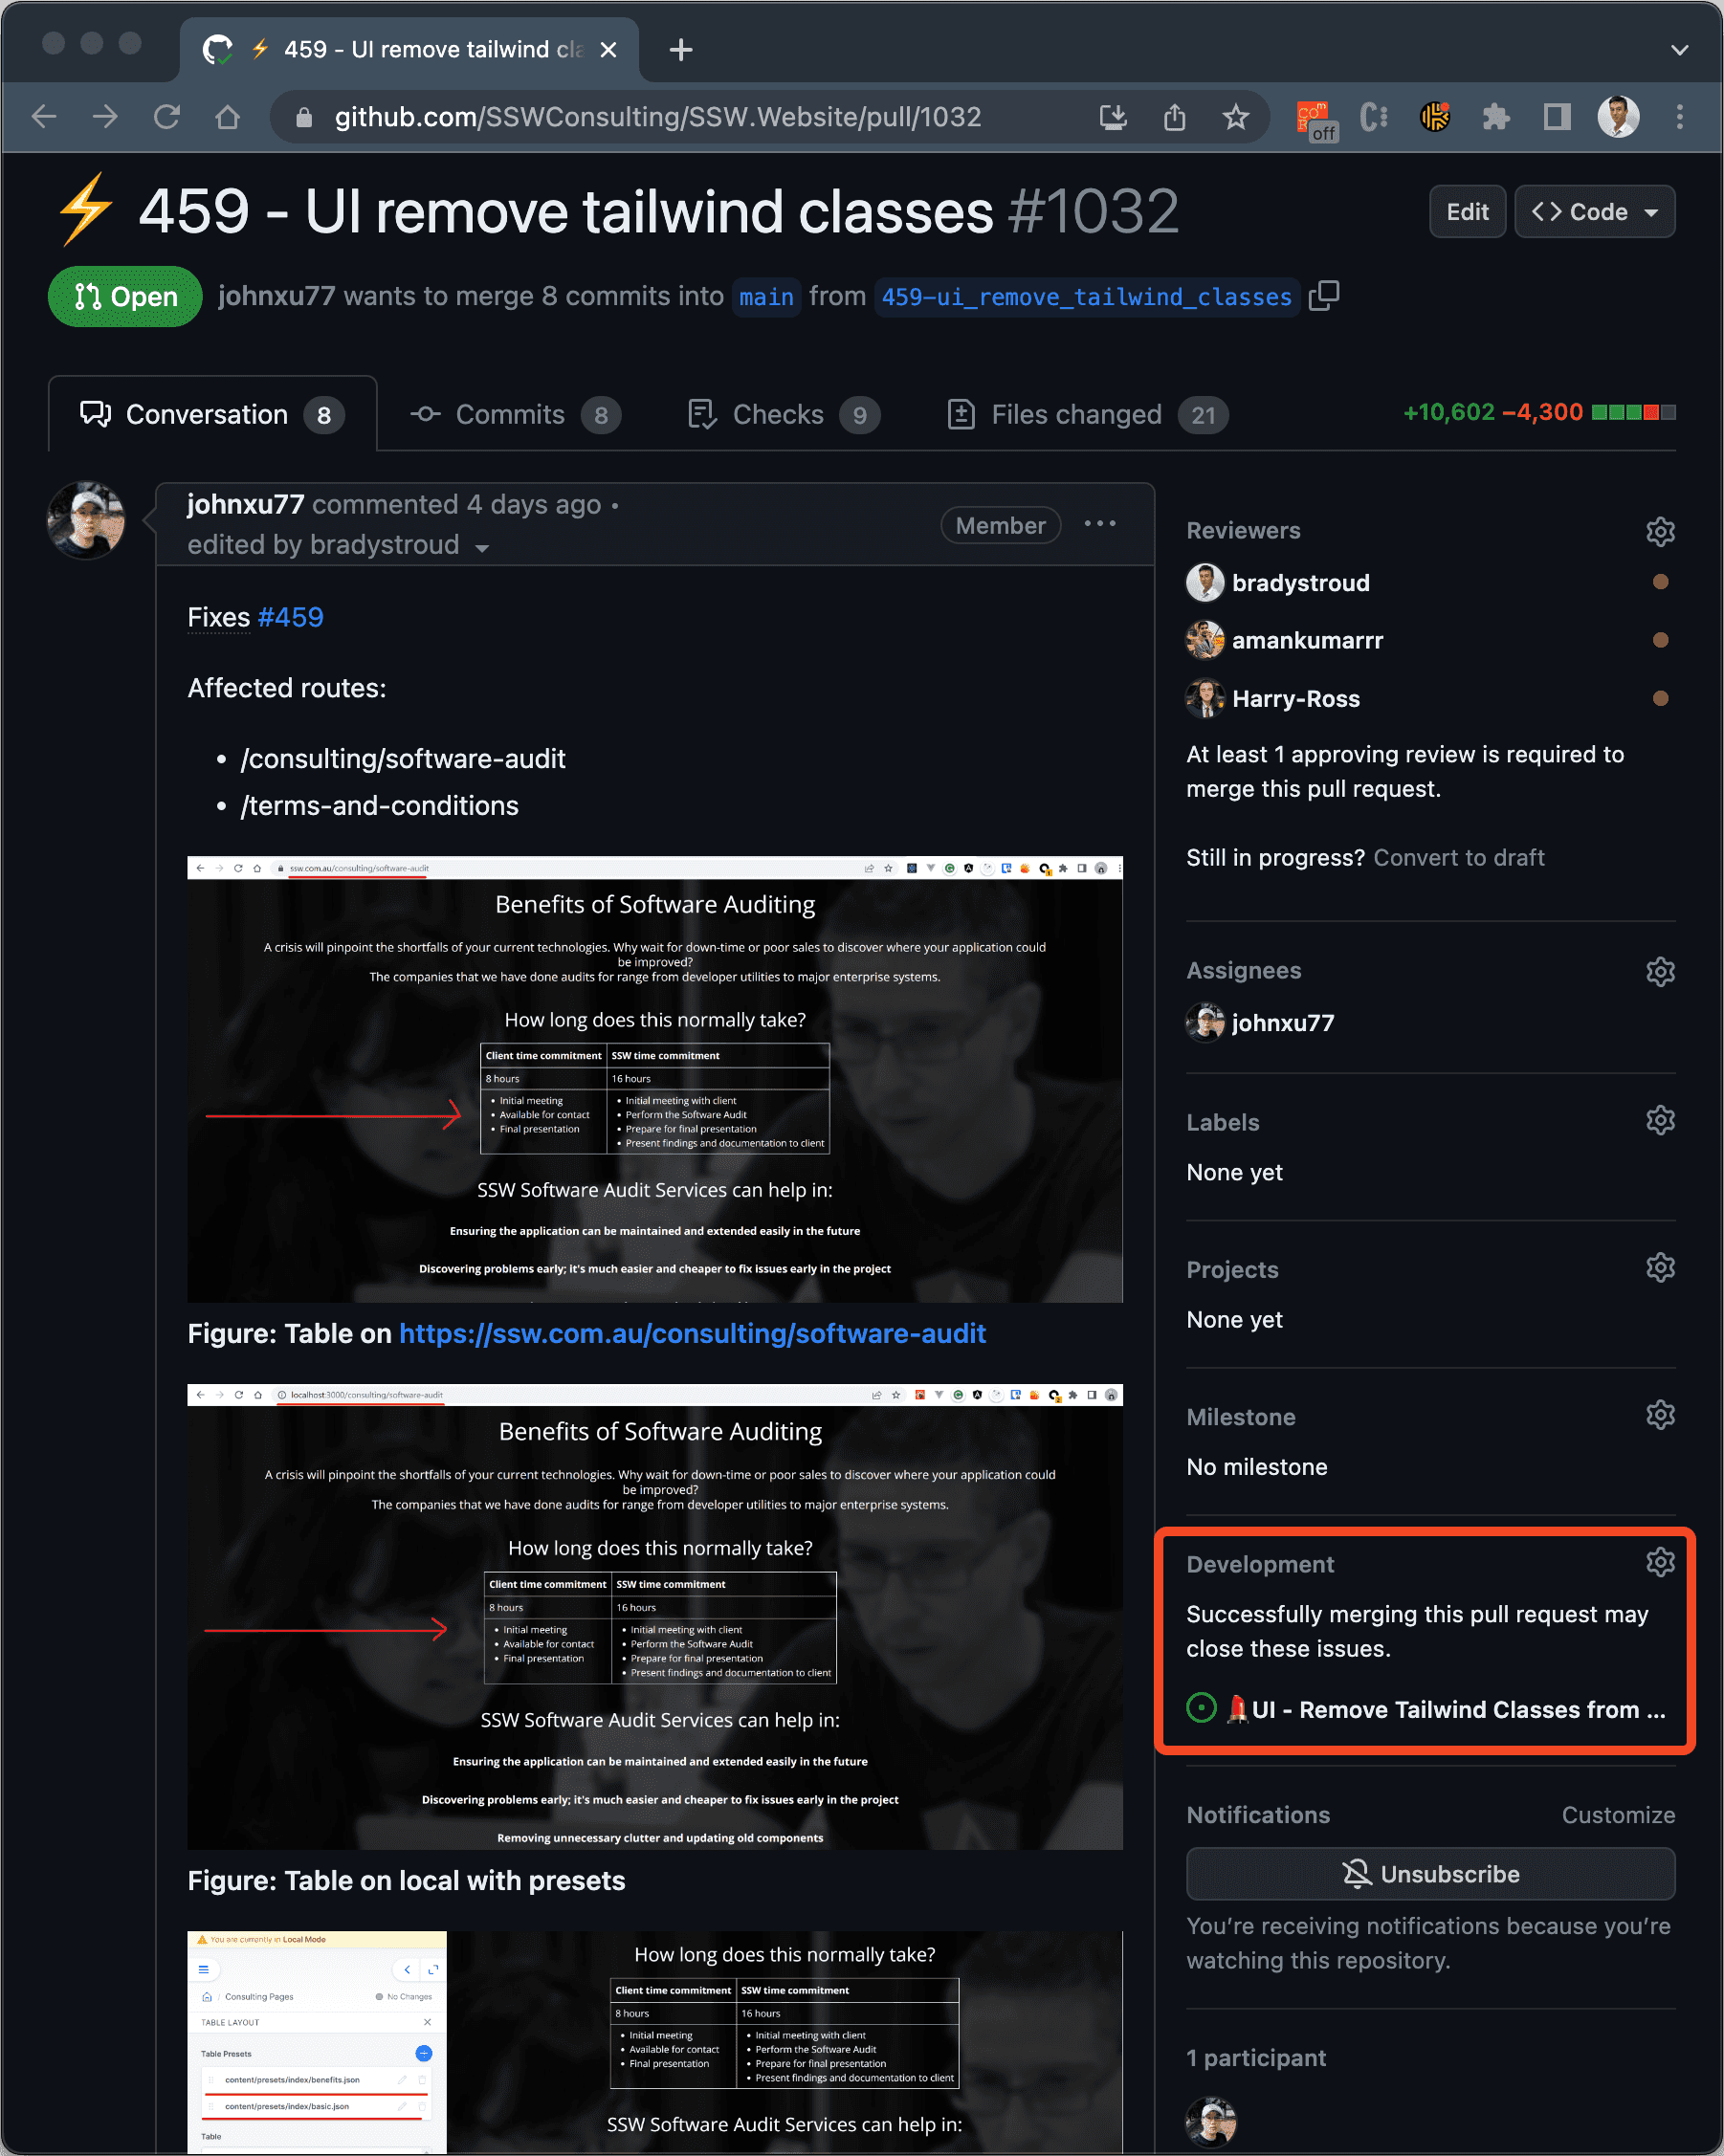
Figure: For Issues specifically, it's recommended you have workflows configured and enabled GitHub provides a way to link issues to PRs. This is useful to see what PRs are associated with what issues. However, when you make this link, the issue will close when the PR is merged.
This is not a good idea because it can cause Issues to be closed prematurely. This can lead to confusion and lost work.
Issues should not be closed until all the tasks are complete and have a done comment as per closing PBIs with context.
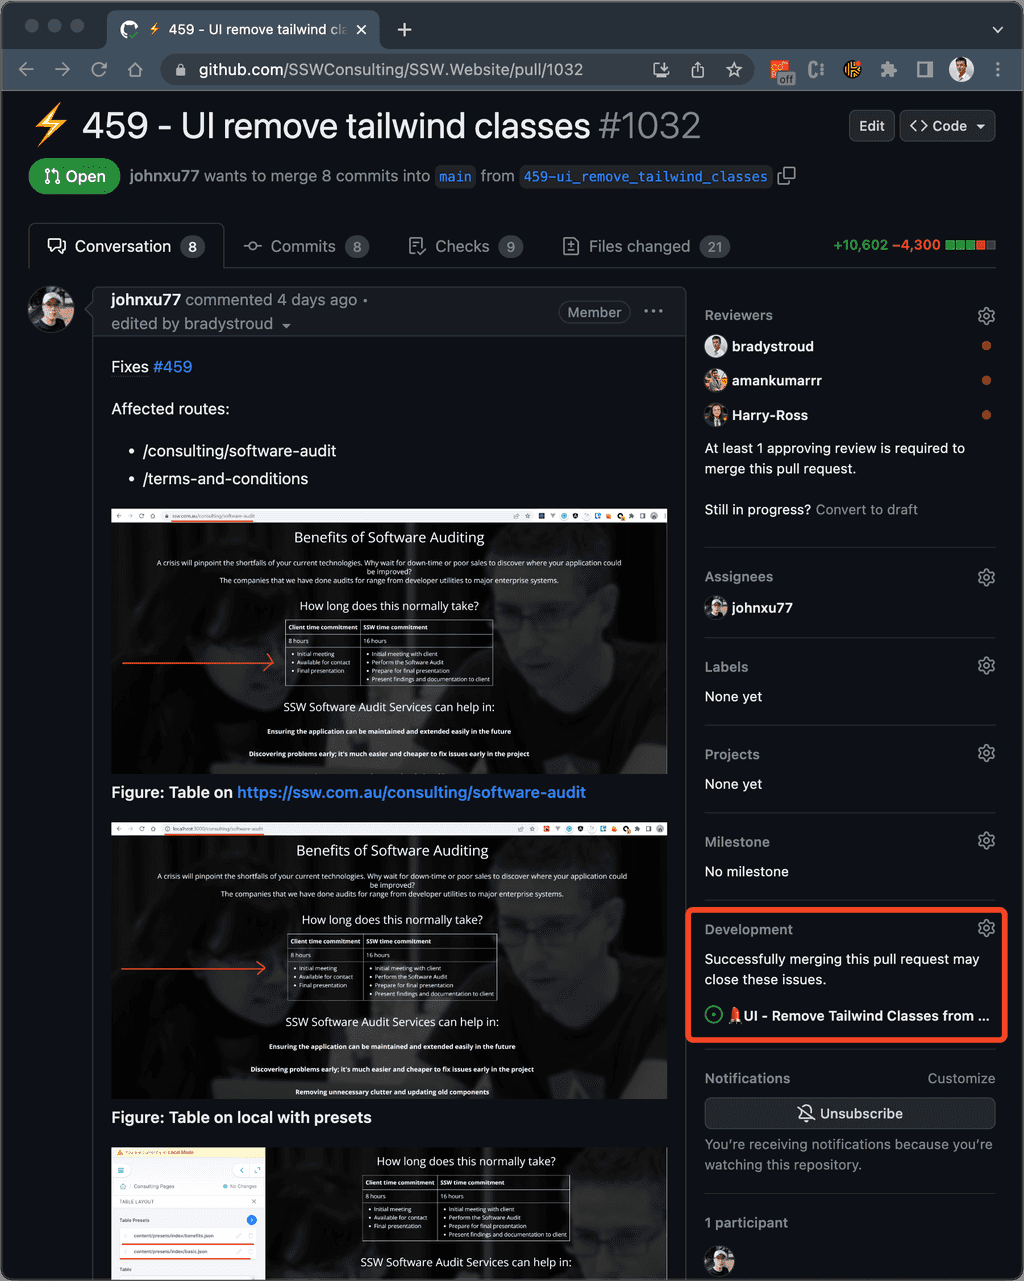
Figure: Bad example - Linking Issues to PRs might cause premature closing Tip: Avoid using closing keywords e.g. "closes #123" or "fixes #123" in PR descriptions. This will automatically link the issue to the PR and close it on PR merge. Instead, use terms like "relates to #123" or "addresses #123" to link the issue to the PR without closing it.
This was a feature GitHub added but it is not a good idea to use it, if you agree the behaviour should be changed, upvote this discussion.
Managing secrets is hard. It's not just about storing them securely, but also ensuring that the right people and systems have access to them in a controlled manner, with an auditable trail, while minimizing friction for the processes that legitimately need them, like DevOps pipelines. You wouldn't leave your front door key under the mat, but at the same time you don't want it to take 7 minutes and approval from 4 people to unlock your front door.
In a development ecosystem, secrets are the lifeblood that makes many processes tick smoothly – but they're also a potential point of vulnerability. When multiple repositories and workflows require access to shared secrets, like an Azure Service Principal or credentials for a service account, the management overhead increases. Imagine the pain of secrets expiring or changing: the need to update each and every repository that uses them emerges. Beyond the inconvenience, doing this manually for each repository is not only tedious but fraught with risks. An erroneous secret entry might break a CI/CD pipeline or, even worse, pose a security risk. Let's explore ways to handle secrets more efficiently and securely.
Scenario: Every time a new repository is set up, developers manually add secrets to it.
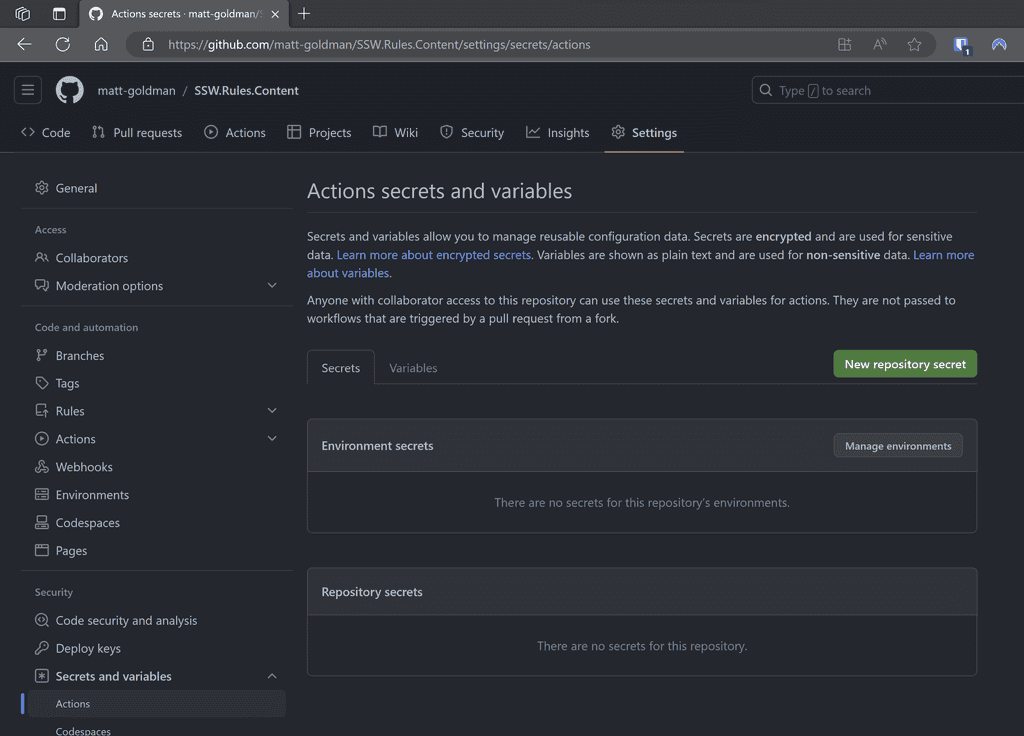
Figure: Secrets added to each repository Problems:
❌ High maintenance if secrets need to be changed or rotated.
❌ Greater risk of inconsistencies between repos.
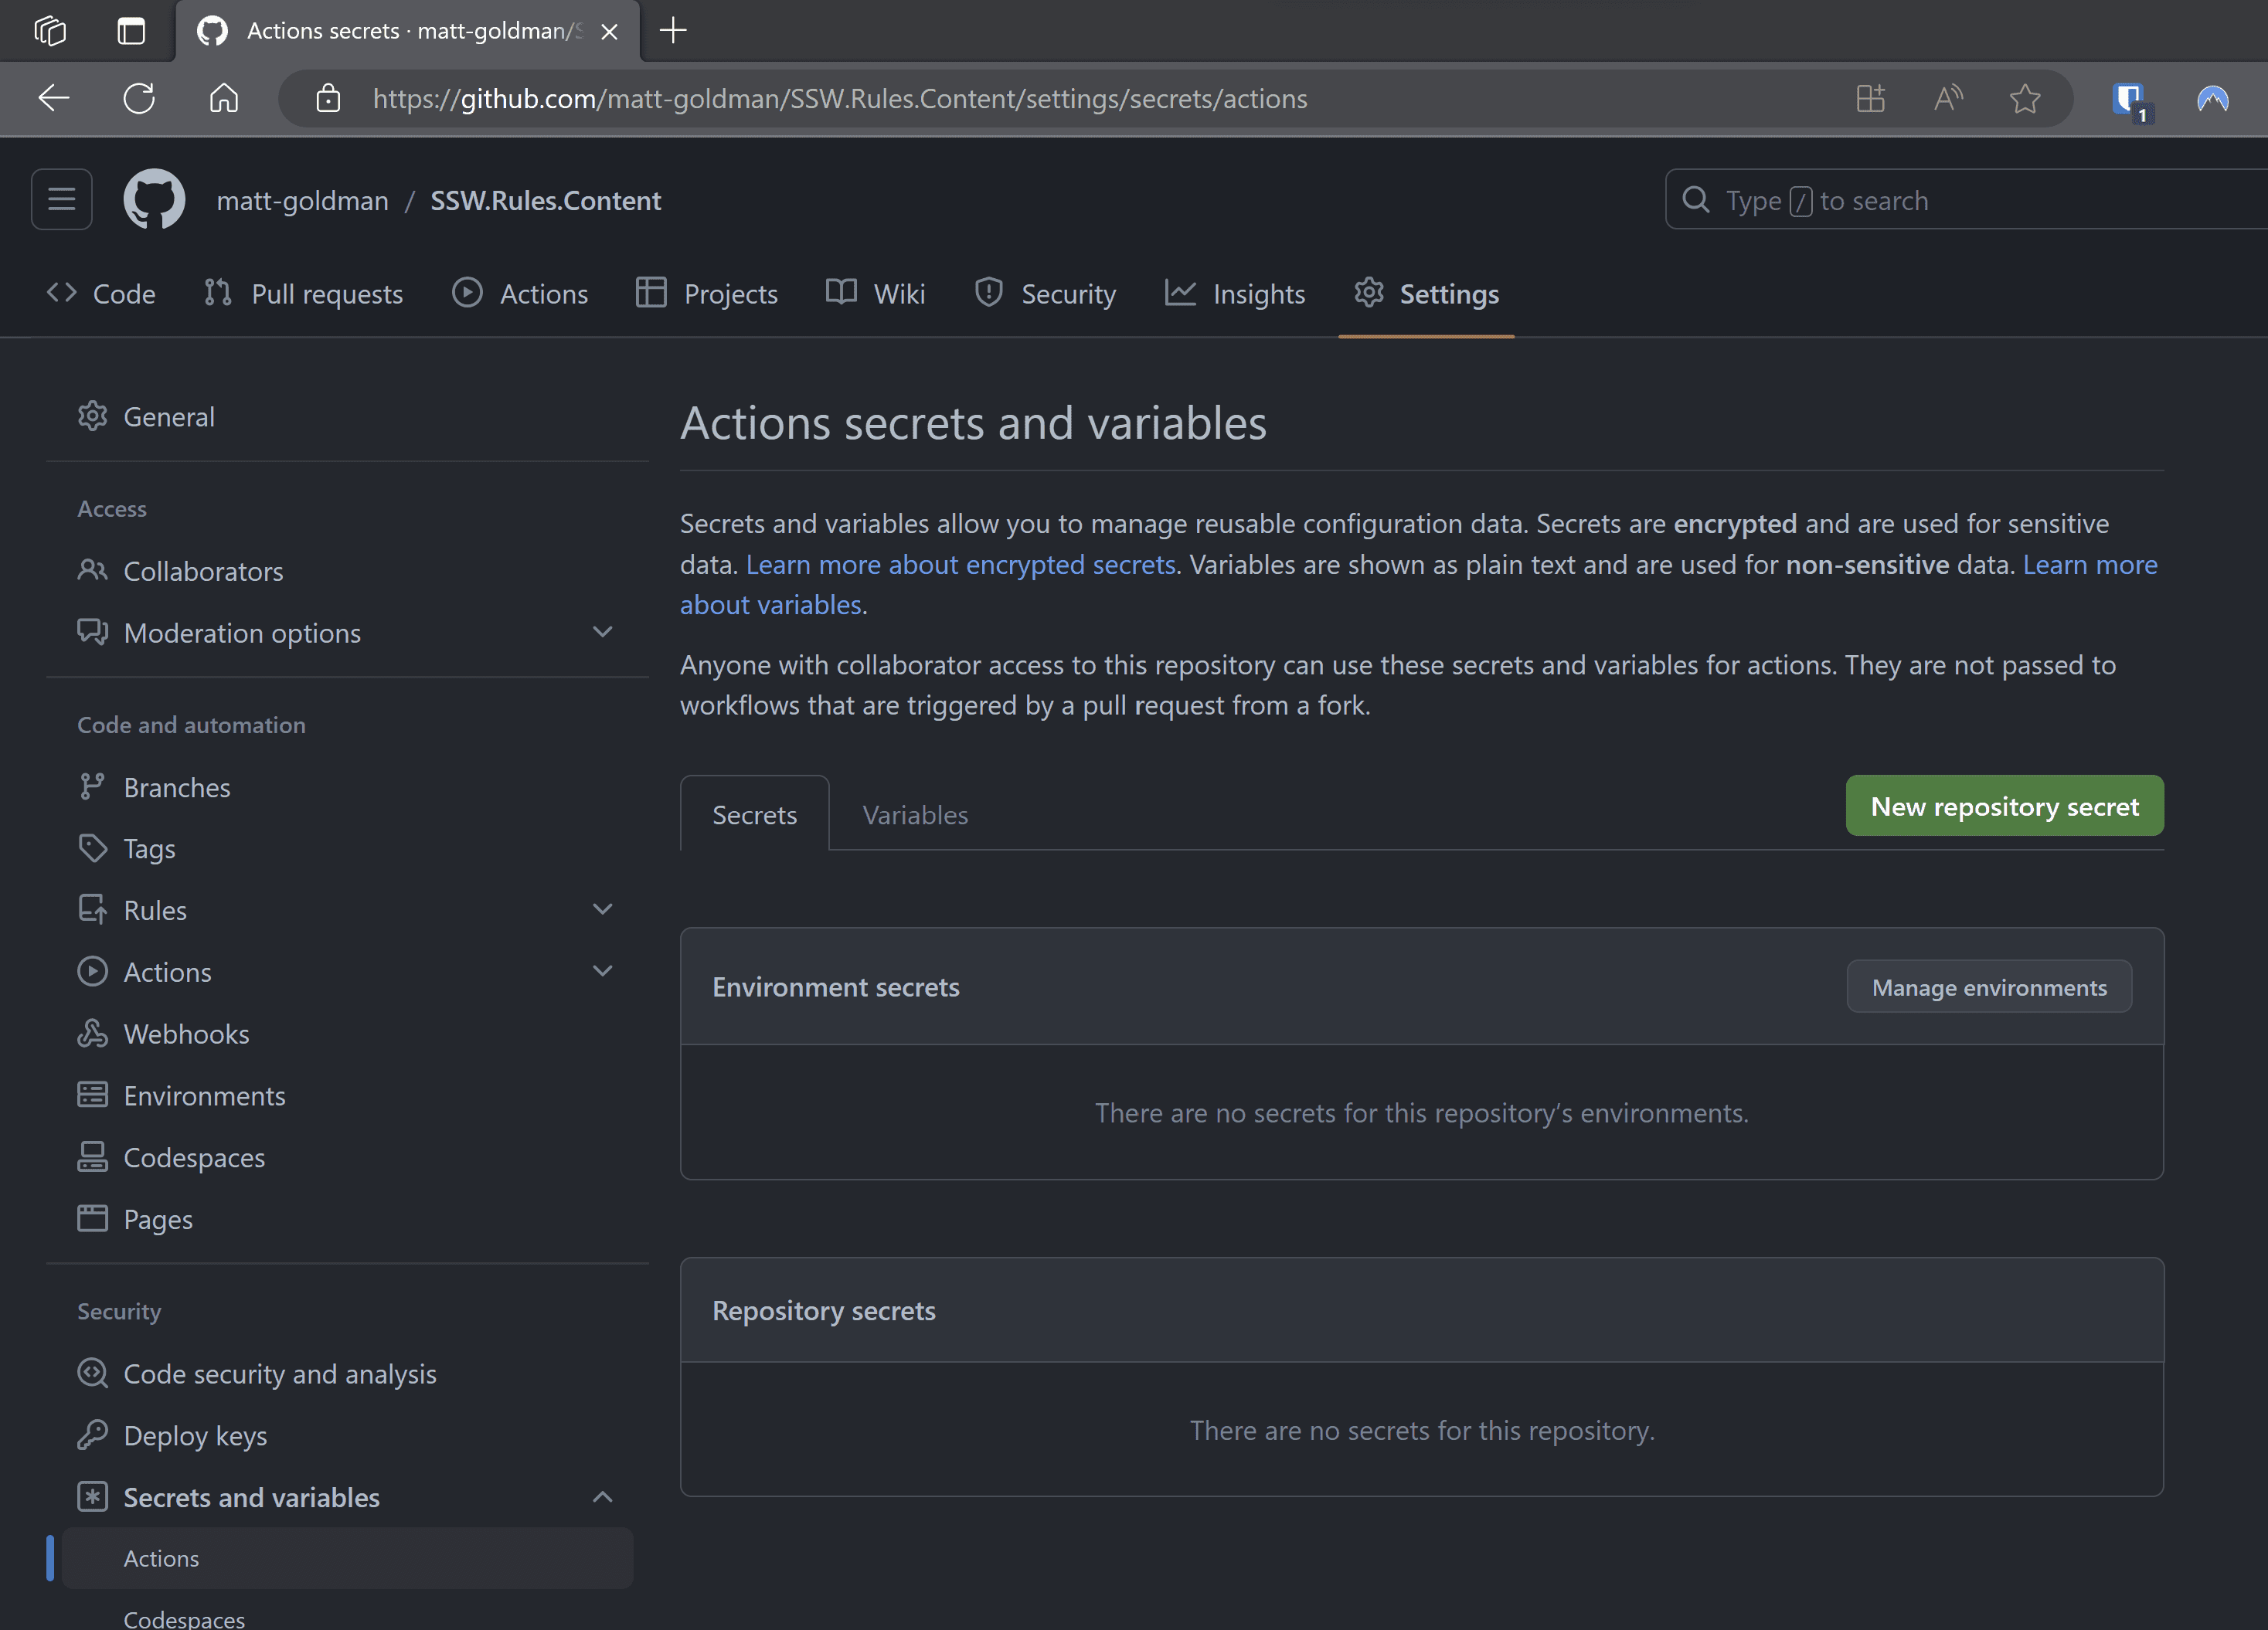
❌ Increased vulnerability surface area – each repo is a potential leak point.Scenario: Instead of per repo, secrets are added at the GitHub organization level.
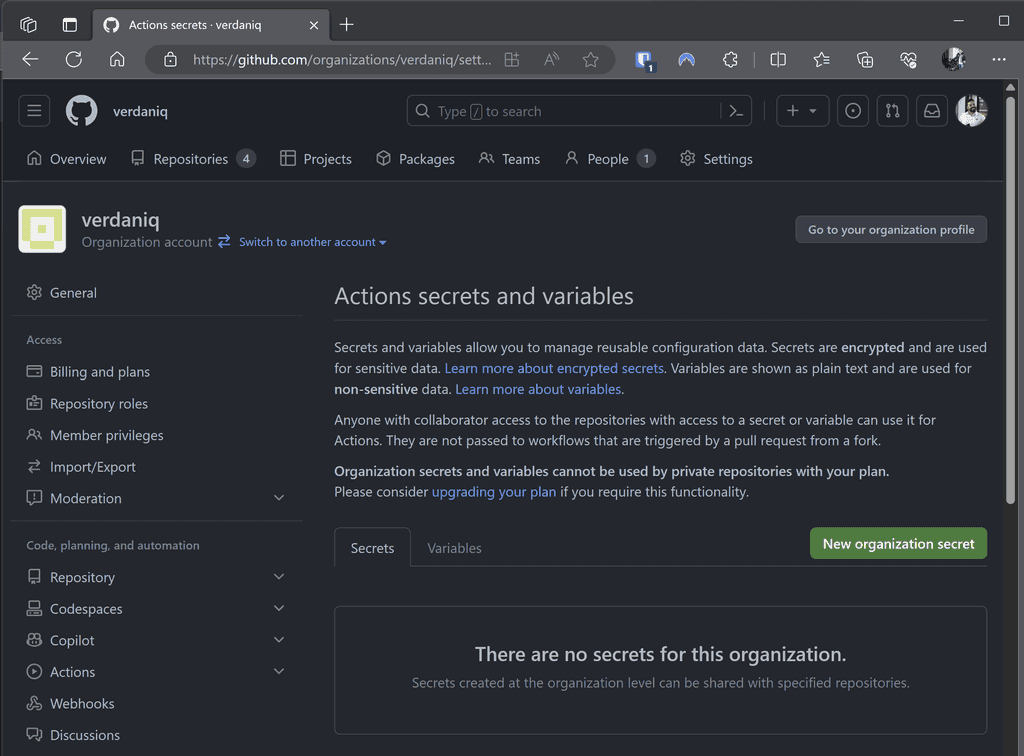
Figure: Secrets added to the GitHub organization Advantages:
✅ Easier management as secrets are centralized.
✅ Reduced chances of inconsistencies.
✅ Less manual work for individual repos.❌ Still a concern - While more efficient, secrets still reside within the CI/CD tool and can be exposed if the platform is compromised.
Scenario: Secrets are stored in Azure Key Vault and accessed by various workflows as needed.
name: Deploy API

on:
  push:
    branches:
      - main

jobs:
  deploy:
    runs-on: ubuntu-latest

    steps:
      # Check out your code
      - name: Checkout code
        uses: actions/checkout@v2

      # Login to Azure
      - name: Login to Azure
        uses: azure/login@v1
        with:
          creds: ${{ secrets.AZURE_CREDENTIALS }} # Note you need this credential in GitHub

      # Fetch the API key from Azure Key Vault
      - name: Get API key from Azure Key Vault
        run: |
          az keyvault secret show --name SSW_REWARDS_API_KEY --vault-name kv-rewards --query value -o tsv > api_key.txt
        id: fetch-key

      # Use the API key in a subsequent step
      - name: Deploy with API Key
        run: |
          API_KEY=$(cat api_key.txt)
          # Your deployment commands using the API_KEY

      # (Optional) Logout from Azure
      - name: Logout from Azure
        run: az logout
Listing: Secrets stored in a dedicated Key Vault in Azure and used by workflows across the organization
Advantages:
✅ Stronger security - Azure Key Vault provides enhanced encryption and access control.
✅ Centralized management - Rotate, update, or revoke secrets without touching individual repos or workflows.
✅ Auditing - Track who accesses what and when.❌ Still a concern - Dependencies on external systems can introduce complexities and may require specific expertise to manage.
Scenario: Secrets are stored in an enterprise-grade secrets manager, which integrates directly with CI/CD platforms.
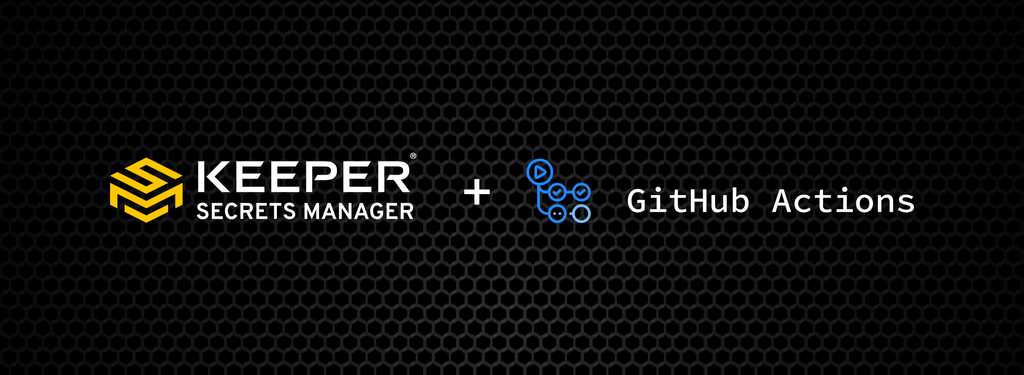
Figure: An enterprise password/secrets manager like Keeper with the Secrets Manager add-on and integration with GA or AzDo Advantages:
✅ Top-tier Security - Dedicated systems like Keeper are designed with advanced security features.
✅ Streamlined Management - Centralize not just CI/CD secrets, but potentially all organizational secrets.
✅ Granular Control - Control who can access what, with full audit trails.
✅ Integrations - Seamless integration with CI/CD platforms reduces friction and the potential for errors.Conclusion:
Leveraging specialized tools reduces manual overhead, boosts security, and ensures a smooth CI/CD process.
Note that in all of these cases, you still need at least one secret stored with your pipeline, whether that's a service principal to log in to Azure to retrieve secrets from Key Vault, or Keeper Secrets Configuration (or equivalent) to access your enterprise secrets manager. Note that if you require different permissions for different workflows or repositories, you may end up with as many secrets in your pipeline tool as if you had the target secrets themselves there.
This may seem counter-productive, but in most cases this is still a better way to manage your secrets, as you still have enterprise controlled access and governance, and a single source of truth.
Remember, the ideal approach may vary based on the size of the organization, the nature of the projects, and specific security requirements. But centralizing and bolstering security around secrets is always a prudent approach.
Pull Request templates are a great way to communicate expectations to developers. You should create different PR templates for different types of PRs. For example, you can have a PR template for bug fixes, a PR template for new features, and a PR template for refactoring. You are also able to create specific PR templates for specific code paths.
You can read how to implement PR templates in the GitHub Docs - Creating a pull request template for your repository.
When creating a PR template, think of how you can help developers create great PRs.
Figure: Bad example - There is no information to guide developers 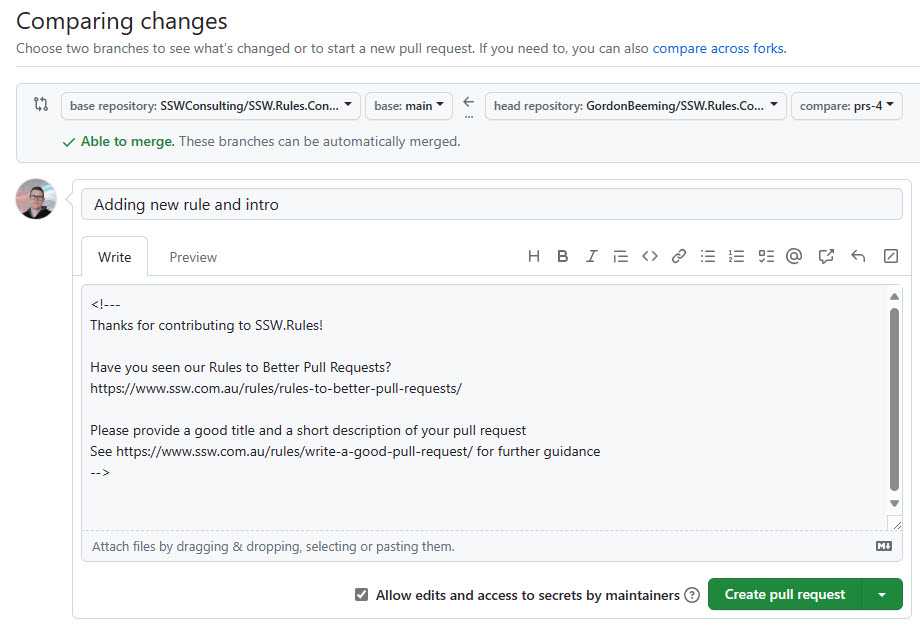
Figure: OK example - The PR template contains handy links to guidance for creating great PRs ⭐ 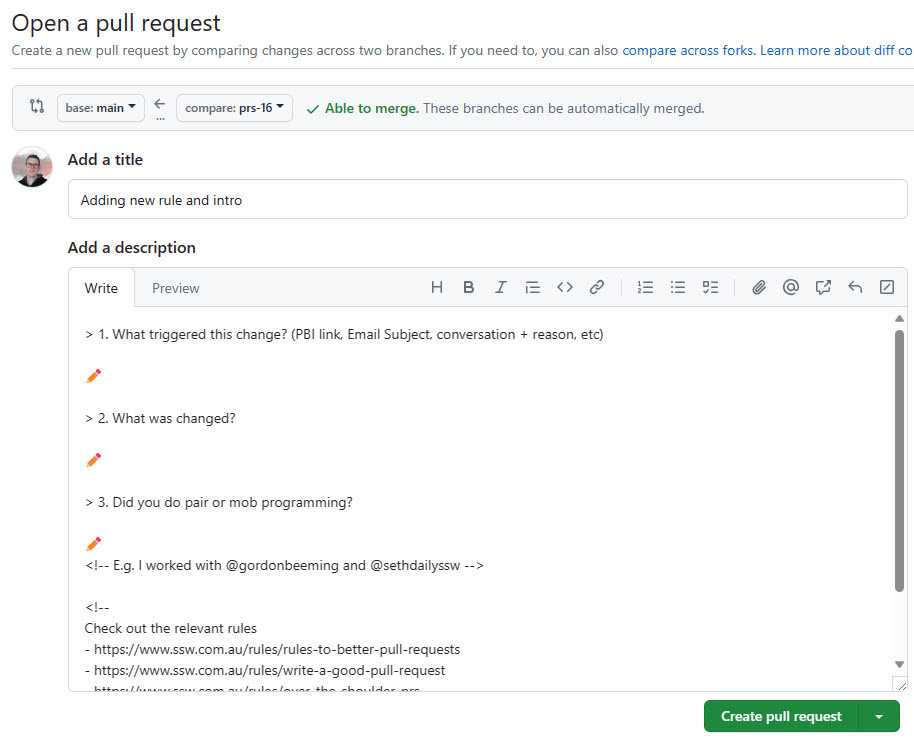
Figure: Good example - This PR template asks for context (to help reviewers), along with guidance links for creating great PRs ⭐ Tip: You can use comments in the Markdown as above. These comments will not show when the PR is created, and is only visible when editing the description.
For a great Pull Request template, take a look at @SSWConsulting/SSW.GitHub.Template.
When you are working on an open source project, you will often get pull requests from contributors. When you merge these pull requests, you should use the "Squash and merge" option. This will squash all the commits into one commit and then merge it into the target branch. This is a good practice because it keeps the commit history clean and easy to read. It also makes it easier for other developers to understand what changes were made in each PR.
Figure: Bad example - It's hard to follow the changes since there’s noise from all commits on the merged branches Commit Messages
Like any commit message, the PR commit message should be short and descriptive. The easiest way to achieve this is to combine the PR title and commit details.
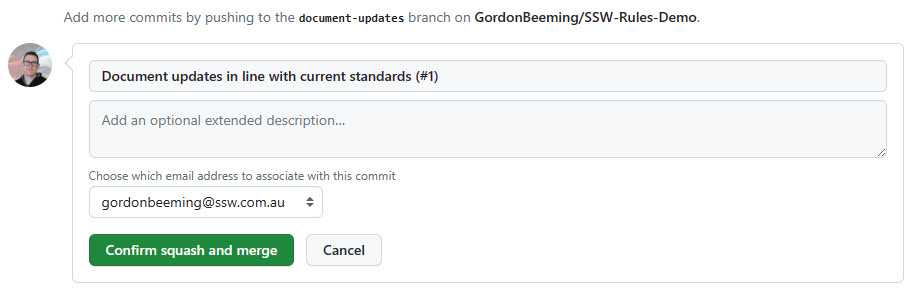
Figure: Bad example - This merge will be missing important information from the commit message 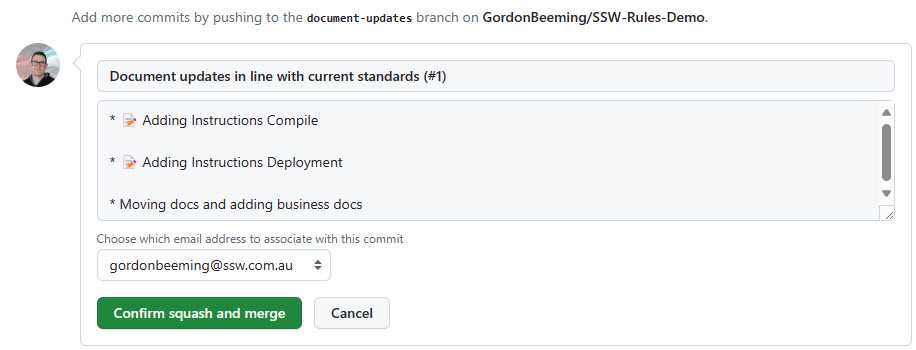
Figure: Good example - This merge will include all the commit messages as part of the PR commit message In order to get GitHub to use your commit details by default you need to change the configuration for the repository.

Figure: Repo Settings | Pull Requests | Allow squash merging, and change the value to "Default to pull request title and commit details" Limit merge types
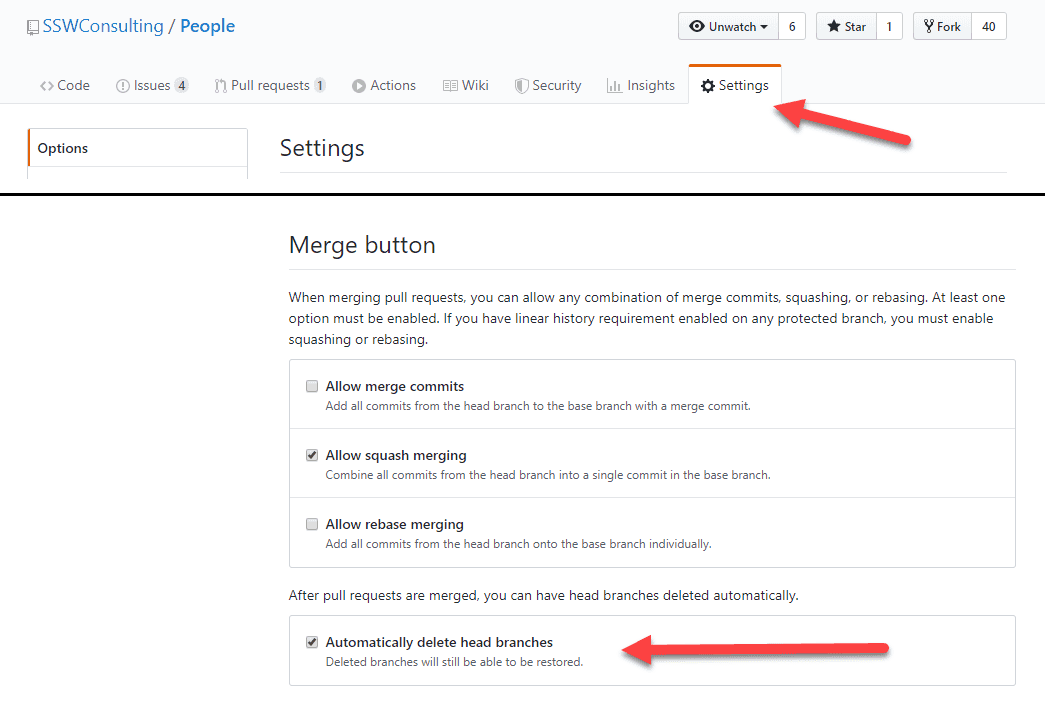
You should limit the merge types that are allowed on your repository. This makes it easy for everyone to know the expected merge type of the repository when the PR is merged.
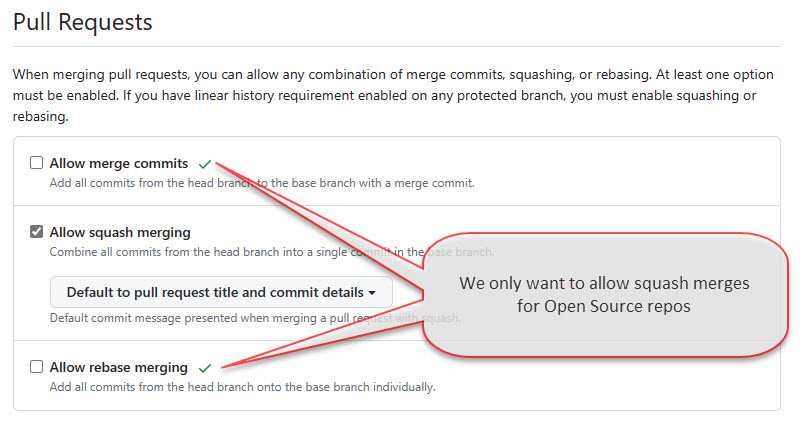
Figure: Repo Settings | Pull Requests, remove "Allow merge commits" and "Allow rebase merging" to force all PRs to be squash merged Automatically delete head branches
After a branch is merged into the target branch, you'd not want to continue development on the previous branch as the changes were squashed in. It's always a good idea to create a new branch after a PR is merged from the target branch if you have additional changes. To make this easier, you can configure GitHub to automatically delete the branch after the PR is merged.

Figure: Repo Settings | Pull Requests, enable "Automatically delete head branches" to avoid stale branches Other configurations
If you find that Pull Requests are often approved but for some reason not merged in, you may want to enable
auto-merge. This will automatically merge the PR when all the required checks have passed.
Figure: Repo Settings | Pull Requests, enable "Allow auto-merge" You may want to enable "Always suggest updating pull request branches", this can be done from Repo Settings | Pull Requests, this provides contributors with an easy way to update their branch from the target branch without performing the merge themselves on their local machine.
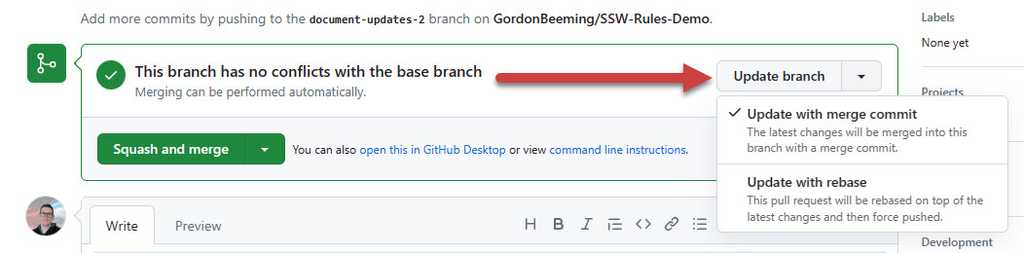
Figure: Providing contributors with an easy mechanism to update their branch helps reduce conflicts if they need to make more changes As PBIs evolve, it's common for their initial descriptions to become outdated or for significant developments to occur that must be recorded for the benefit of the entire team.
Whenever a PBI necessitates an update, the team should add a comment to the issue, detailing the change or event.
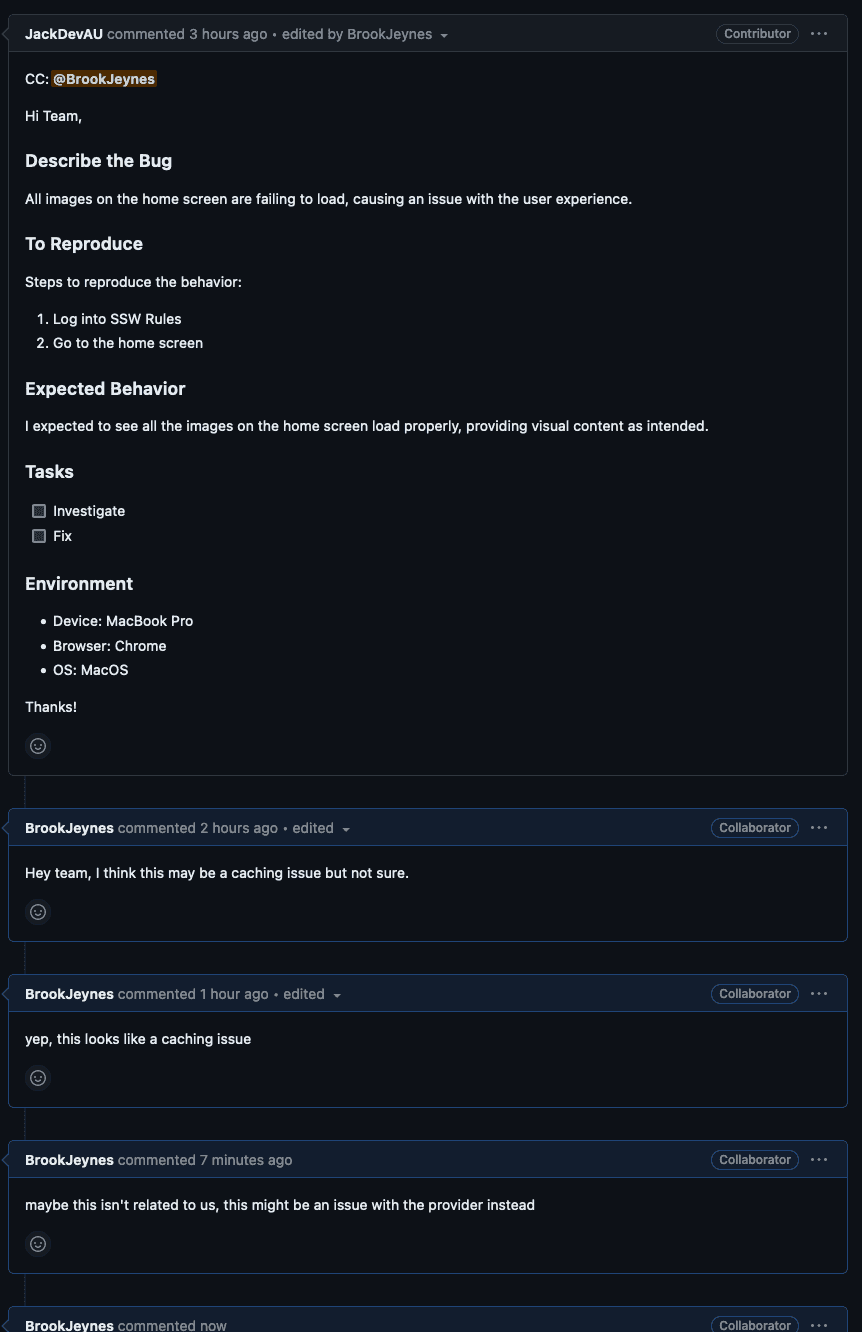
Figure: Bad example - Lots of non-descriptive comments cluttering the issue. 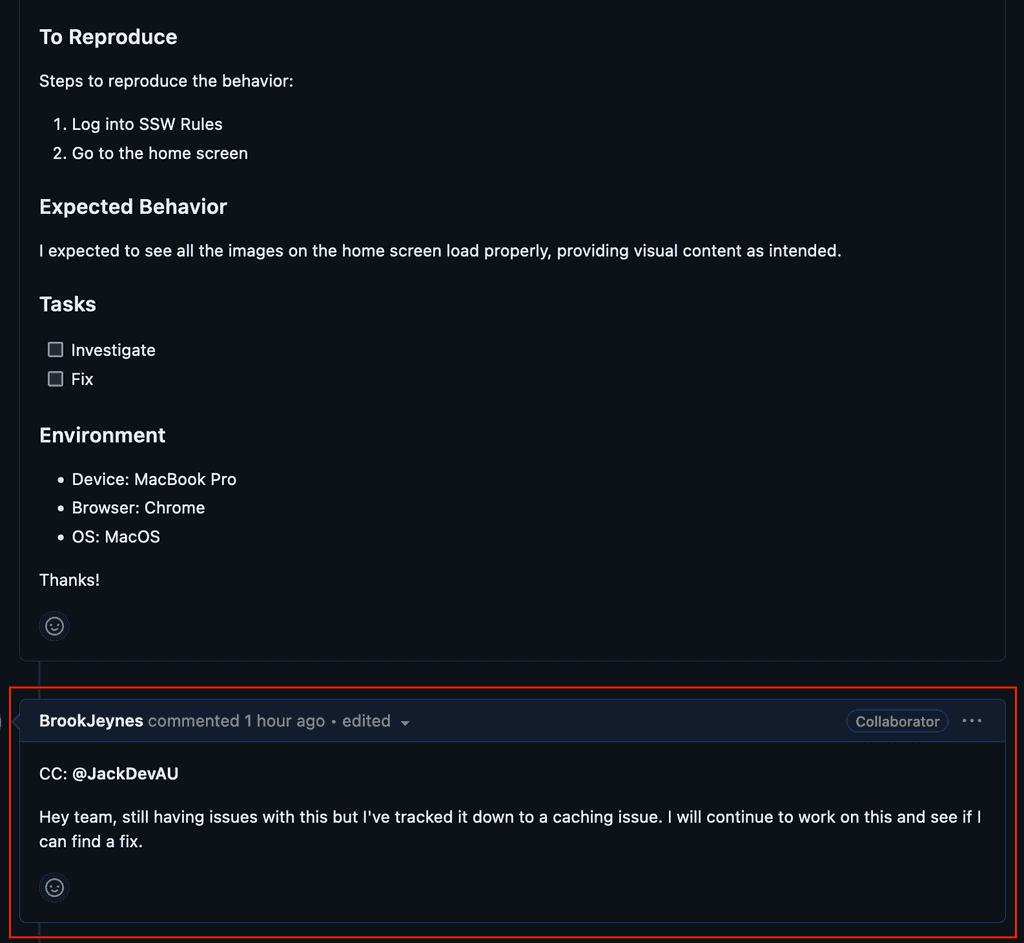
Figure: Good example - Extra context added via comment. In cases where an update is long standing or important, it should be appended to the bottom of the issue description. This update must include the date it was made, serving as a chronological record of changes. In addition, a comment should be left on the issue thread to inform team members that significant information has been added to the issue.
Re-assigning the PBI? You don't need to comment or change the PBI description. GitHub and Azure DevOps both track this via the "Assignees" field and audit changes.
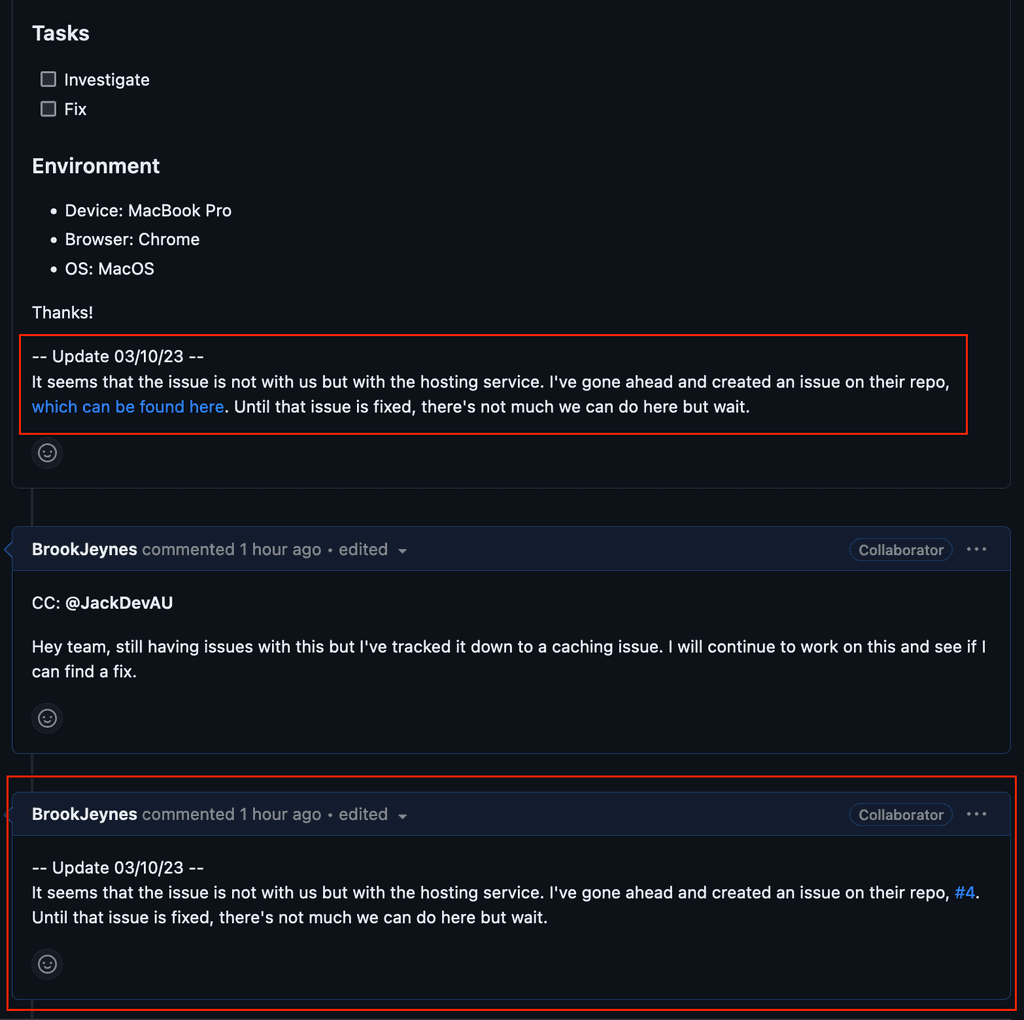
Figure: Good example - Important information added to the issue itself with a comment. It's also important to CC anyone who may need to see this additional information.
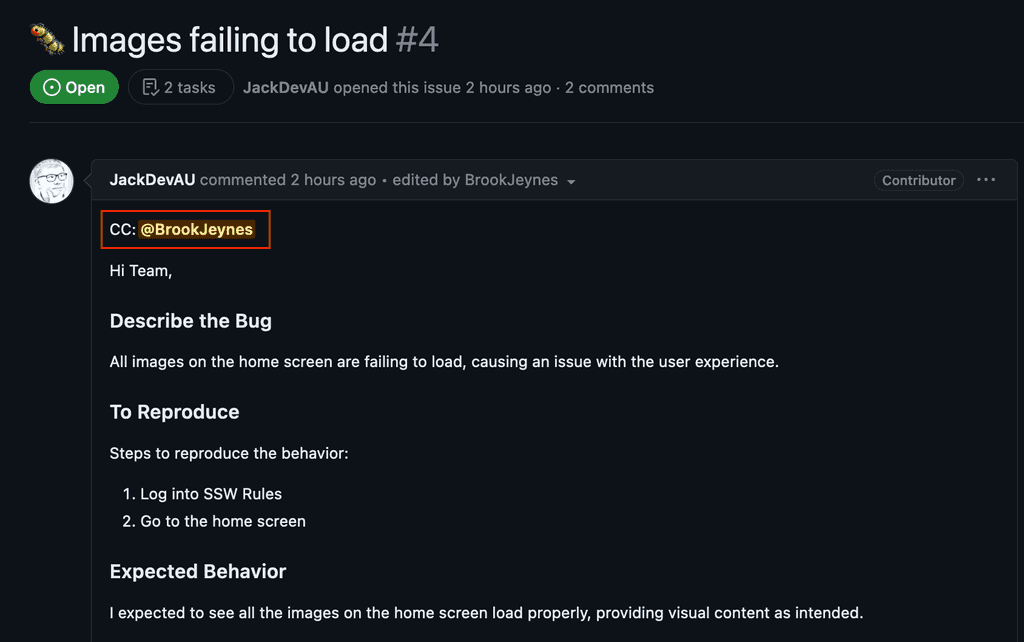
Figure: Good example - Important users CC'd within the issue but addressed to the team. 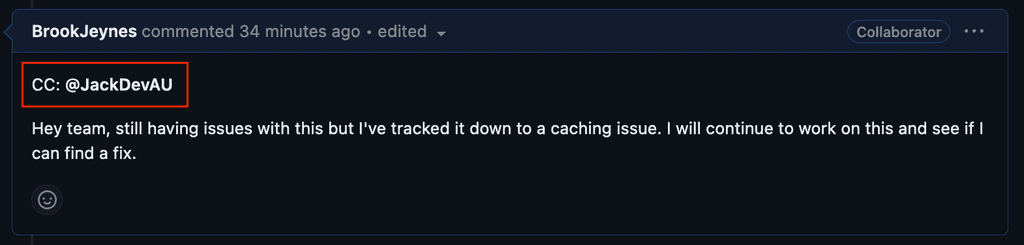
Figure: Good example - Important users CC'd within comments added extra context. When using co-creation patterns such as pair-programming or mob-programming, you should make sure that all the developers get attribution. When done correctly co-authored commits stand out as a testament to teamwork and shared responsibility, reflecting the collaborative efforts and diverse expertise contributed to each change.

Figure: GitHub - Co-Authored Commit There are several different ways to create co-authored commits, depending on the tools you are using.
Live-Share
If you use Visual Studio Live Share to collaborate, it will co-author the git commits with everyone on the share session
Visual Studio Code
Visual Studio Code the Git Mob Extension can be used to co-author commits.
Rider
Rider has a great UI that makes creating co-authored commits easy. It provides intellisense for the co-authored commit trailer, and will suggest the names of the people who have access to the git repository.
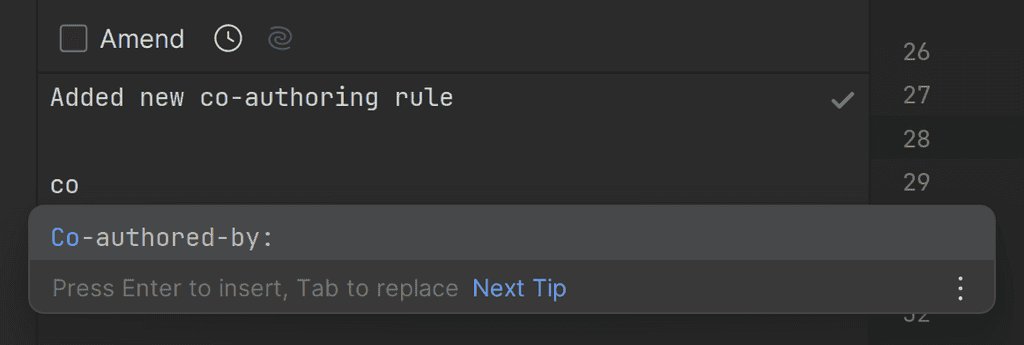
Figure: Rider - Co-Authored Commits GitHub Desktop
GitHub Desktop supports co-authored commits out of the box.
Figure: GitHub Desktop - Co-Authored Commits Git CLI
When writing the commit message, leave 2 blank lines, and give each co-author their own line and Co-authored-by: commit trailer
$ git commit -m "Refactor usability tests. > > Co-authored-by: NAME <[email protected]> Co-authored-by: ANOTHER-NAME <[email protected]>"Some companies want to keep their projects closed-source in order to profit from their products. However, there are several benefits to keeping the source open including:
- Community contribution and feedback
- Allowing controlled free use of your products
We want our projects to be financially sustainable while supporting the open-source space. Let's take a look at the licensing options for open-source projects on GitHub.
This is not legal advice. If you want to explore your options around licensing your projects please consult your lawyer.
Option 1 - No License
As per GitHub's documentation, no author is obligated to choose a license for their project. Without a license, the default copyright laws will apply.
Pros
- No Effort: No effort required on the author's part.
- Some control: Retains some control of the source-code.
Cons
- Not Permissive: Generally, users will have no permission from the author to use, modify or share the software. However, GitHub allows users to Fork and view code as a part of their terms.
Option 2 - MIT
The MIT License is a well known license trusted by many open-source projects.
Examples include:
Pros
- Permissive: Allows for commercial and private use as well as distribution and modification of the author's software.
- Collaboration + Community: Promotes an open and collaborative environment with community feedback.
- Short and simple: The text of the license is simple and quick to understand.
Cons
- Limited Patent Protection: The MIT License doesn't include explicit patent grants or protections.
- Lack of clarity on Trademarks: The license doesn't address the use of Trademarks associated with the software
Option 3 - Copyleft (e.g. GPL)
A copyleft license like the Gnu Public License promote and protect the principals of open-source software. Though they may also introduce complexities and potential limitations that users may be deterred by.
Examples include:
Pros
- Collaboration + Community: Promotes an open and collaborative environment with community feedback.
- Protection Against Exploitation: Guards against consumers taking the source code and making proprietary modifications in a closed environment.
Cons
- Complexity: Some developers and organizations may find a copyleft license to be too complex and stringent.
- Perceived Risk: Copyleft licenses may discourage contributors or participators through perceived risk.
Option 4 - Proprietary
Companies often use a proprietary license when they prefer to have fine-grained control over their intellectual property.
Examples include:
Pros
- Better control: Authors have fine-grained control over their source code and how it's used.
- Benefits of community development: Authors can still benefit from the community engaging with their source code
Cons
- Cost: Drafting and iterating upon your license will cost time and money.
- Bad actors: Authors will need to be vigilant of bad actors abusing the license and choose to pursue them.
Option 5 - Functional Source License (FSL)
Sentry introduced the FSL as a way to support the open-source community whilst retaining control over their IP.
Examples of projects with this license include:
Pros
- Protection: Retains control over source code for up to 2 years
- Free and Open-Source Software (FOSS) Values: Automatically converts to MIT/Apache 2.0 licensing after 2 years
- Continual Iteration: Pushes the author to continually iterate on their project or risk third-parties competing with a forked version of the project.
Cons
- Not strictly Open-Source: While Sentry values FOSS, this license does not meet the strict definition of open-source.
Normally, the best way to provide feedback on content changes is to use the change X to Y format. When it comes to reviewing Pull Requests (PRs) in GitHub, this is not the case - it's inefficient for the PR owner. They have to manually interpret each suggested change, implement them in the code, and then commit the changes, which can be time-consuming.
Video: Pull Request Suggestions | Brady Stroud | SSW Rules (4 min)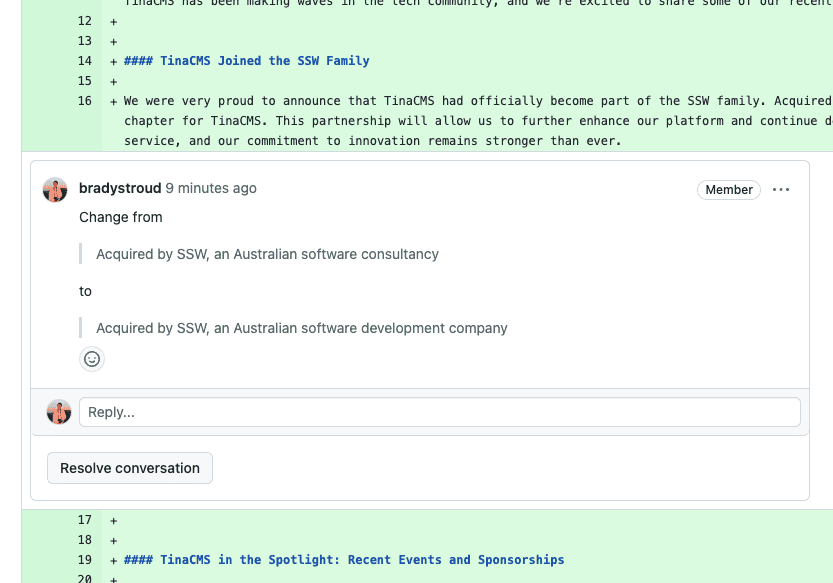
Figure: Bad example - GitHub - Using change X to Y format (need to copy+paste changes) Instead, reviewers should use GitHub's Add a suggestion feature. This allows the reviewer to directly suggest changes in the code diff view, and the PR creator can easily accept or reject these changes with a single click. This process is more streamlined and makes it easier to implement suggestions.
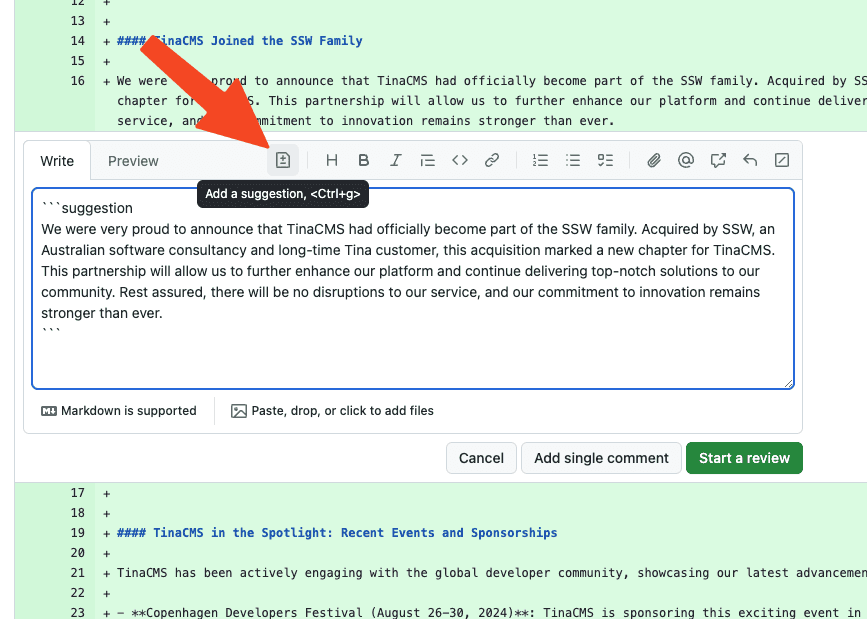
Figure: Good example - GitHub - Using the 'Add a suggestion' button When the PR creator reviews the suggestion, they can either click 'Commit suggestion' to apply it directly or 'Resolve conversation' if they choose not to apply it.
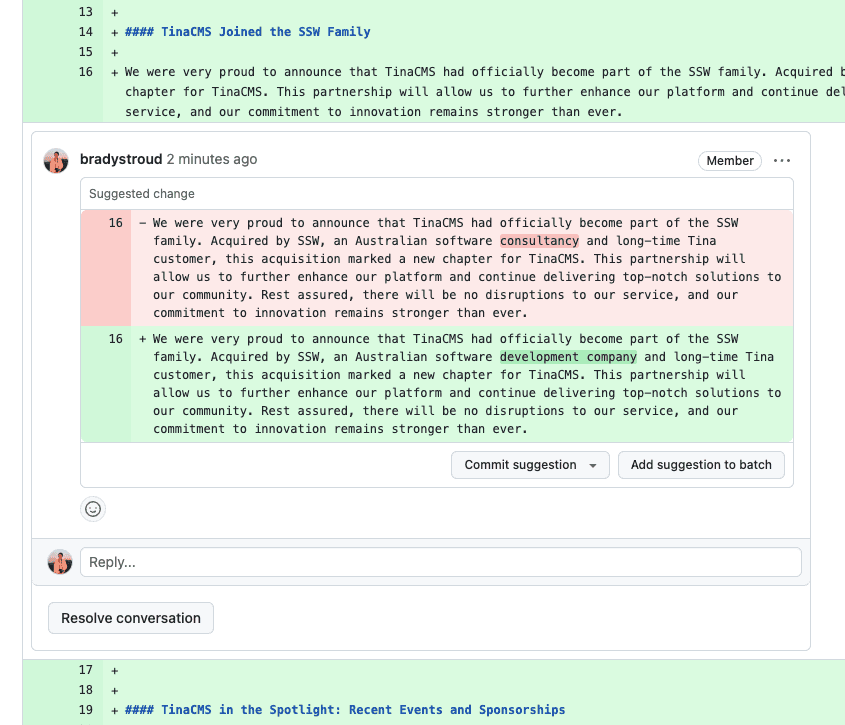
Figure: Good example - GitHub - Easy to see what has changed + awesome 'Commit Suggestion' button ✨ If an author has made multiple suggestions to your code it may be best to add the suggestions in a batch and then. This allows you to create a single useful commit message that summarizes the changes in the feedback.
Figure: Good exmample - Applying code suggestions in a batch If you find a mistake in a file hosted on GitHub, don’t just fix it blindly - check who made the change and why. This helps you understand the context and gives you the chance to inform the contributor if a correction is needed.
GitHub makes it easy to view a file's version history, compare changes, and even see discussions around each commit.
Viewing changes to a file in GitHub
-
Navigate to the file in the repository on GitHub

Figure: File within GitHub UI -
Click on the "History" button (clock icon) at the top right of the file view. You’ll see a list of commits that modified this file

Figure: GitHub history button -
Click on a commit to view the diff - the changes between two file versions, showing what was added, deleted, or changed

Figure: Select a commit from the list 
Figure: View the changes made
If you're working locally, you can also run the following commands to view the exact changes within the terminal.
git log -- path/to/file git show <commit-hash>-